- AI Fire
- Pages
- AI Tutorials
Welcome to our AI Tool Mastery Tutorials page. Here, we provide comprehensive, step-by-step guides to help you understand and effectively use various AI tools. Whether you're a beginner or an experienced user, our tutorials are designed to enhance your skills and understanding of AI tools. Let's dive in and start learning!
Table content (daily updating):
How to create AI QR Codes for FREE in less than 1 minute.
How to create Graphs in ChatGPT in seconds.
How to Generate 100s of memes using the ChatGPT plugin
How to Install Auto-GPT Locally (Setup Guide + Use Cases)
1. How to create AI QR Codes for FREE in less than 1 minute.

Step 1: Go to http://quickqr.art. Type in the website you want your QR code to link to. Then, save it as a PNG.

Step 2: Click "Join Beta Now" to join their Discord.
Drop the QR code in the "paste-bin" channel there.
Then, just copy the image address.


Step 3: Head to the "pixelml-bot-1" (or pixelml-bot-2, 3, 4, 5) channel.
Type "/generate".
For "prompt", write your preferred image.
For "URL", paste the URL from the second step.


Regarding the prompts:
—qrw: adjusts how noticeable your QR code is in the final image.
—steps: how many times the image gets sampled - more steps mean a more artistic look, but it's harder to read.
—seed: your starting point for creating the first image grids.
Step 4: Enjoy your results.
Goodbye to boring old QR codes.
AI generated QR Code Art will be the next big thing.
These AI-generated QR codes are insane:👇
1. Sexy Girl
— AI Fire (@aifireco)
11:07 AM • Jun 14, 2023
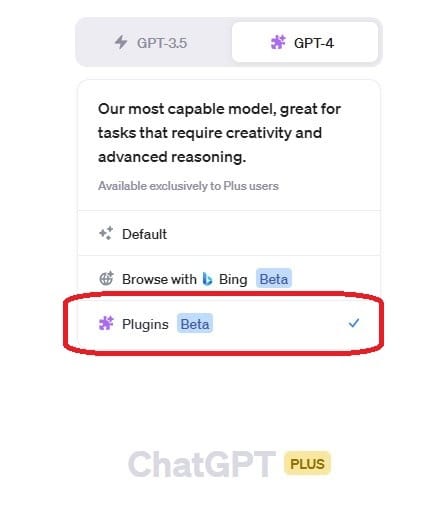
2. How to create Graphs in ChatGPT in seconds.


Step 1: Set up the daigr .am plugin
Turn on plugins in ChatGPT's Beta options
Find and add the daigr .am plugin from the plugin store


Step 2: Enter your prompt
Make sure the daigr .am plugin is enabled
Write the prompt below and put in your data
Instruction: Create a bar chart about (your subject) using this data: (put your data here)

Step 3: Create a pie chart
It works for all types of charts: Bar, line, pie, ...
Prompt (example): Create a pie graph from the data in this table showing the market share of different brands in car sales in 2022: (paste your data)

Step 4: Save your graph
Save your graph as a .svg image
Use an online SVG to PNG converter if necessary


3. How to generate 100s of memes using a ChatGPT plugin
Step 1: Set up the “Meme Creator” plugin
Turn on plugins in ChatGPT's Beta options
Find and add “Meme Creator” from the plugin store


Step 2: Enter your prompt
Make sure the “Meme Creator” plugin is enabled
Write the prompt below.
Create a meme. Context: "Your desired humorous"Instruction: This plugin is very easy to use. Anyone can quickly create funny memes: Generate 100+ style memes => Edit the text on the meme => Change the style as many times as you want.

Step 3: Save your meme and enjoy it.
Save your graph as a .jpg image

4. How to Install Auto-GPT Locally (Setup Guide + Use Cases)
AutoGPT is like a supercharged version of ChatGPT, capable of performing a multitude of tasks autonomously. Here are its key features:
1. Task Handling: AutoGPT can independently complete tasks from a to-do list. It's like having your own personal assistant.
2. Web Browsing and Research: It can research topics just like a human, even capable of ordering food online.
3. Code Execution: Developers can sit back and watch as AutoGPT builds apps, installs necessary packages, and debugs code.
4. Web Scraping: Even digital marketers with minimal coding knowledge can use AutoGPT to build scripts for web scraping and other bots.
5. Podcast Outlining: AutoGPT can help you stay updated with recent events and create outlines for your podcasts.
6. Website Building: It can build a website from scratch, making web development a breeze.
7. Marketing Assistance: AutoGPT can conduct marketing research and provide insightful competitor analysis.
8. Personal Investment Analysis: It can automate financial tasks, acting as your personal investment analyst.
9. Social Media and Customer Service: AutoGPT can manage social media interactions and handle customer service inquiries.
10. Goal Management: It can generate tasks, implement them, and learn from its own actions, making goal management more efficient.
In essence, AutoGPT is a powerful AI tool that can handle a wide range of tasks, making life easier and more productive.
Here's a step-by-step guide on how to install Auto-GPT locally and run it:
1. Install Git and Python: Download Git from gitforwindows.org and install it. For Python, go to python.org, navigate to the download section, and install the most stable version. We recommend Python 3.10.10

2. Set up a directory for Auto-GPT: Decide where you want to install Auto-GPT on your hard drive. Create a new folder for it. Navigate to this folder in your file explorer, click into the command bar to make it typable, and type cmd to open a command terminal.


3. Clone the Auto-GPT repository: Go to the Auto-GPT GitHub page. Copy the clone command provided in the installation instructions. Paste this command into your command terminal and hit enter. This will clone the latest stable release of Auto-GPT into your folder.
Here you are:
git clone -b stable https://github.com/Significant-Gravitas/Auto-GPT.git
4. Set up the .env file: In the new Auto-GPT folder, find the file named .env.template. Make a copy of this file and rename it to .env. Open this file with Notepad.


5. Insert your OpenAI API key: Go to platform.openai.com/account/api-keys to create a new secret key. Copy this key. In the .env file, replace your_openai_api_key with your actual API key. Save and close the file.


6. Install Docker: Go to docker.com and download Docker Desktop. Install it with the default settings and restart your computer. After restarting, run Docker Desktop and let it run in the background.
7. Build Auto-GPT with Docker: Navigate back to your Auto-GPT folder and open a command terminal by typing cmd in the command bar. Copy the Docker build command from the Auto-GPT GitHub page and paste it into your command terminal. Let it run to build Auto-GPT.
docker-compose build auto-gpt
Wait until this process is complete! (It can take 2-3 minutes)
8. Run Auto-GPT with Docker: Copy the Docker run command from the Auto-GPT GitHub page. Paste it into your command terminal and hit enter to run Auto-GPT. You can add arguments at the end of this command to customize how Auto-GPT runs, such as --continuous for continuous mode or --speak for spoken responses.
docker-compose run --rm auto-gpt
You can pass extra arguments, e.g. running with --gpt3only and --continuous or --gpt4only and --continuous
docker-compose run --rm auto-gpt --gpt3only --continuousIf you dare, you can also build and run it with "vanilla" docker commands:
docker build -t auto-gpt .
docker run -it --env-file=.env -v $PWD:/app auto-gpt
docker run -it --env-file=.env -v $PWD:/app --rm auto-gpt --gpt3only --continuous
9. Use Auto-GPT: Once Auto-GPT is running, you can give it goals to complete. For example, you could ask it to research trending news topics in the field of AI and create a text document with 5 AI-related topics to discuss. Auto-GPT will work through these tasks and provide updates on its progress.


10. Access the output files: If you're running Auto-GPT with Docker, you can access the output files through Docker Desktop. Navigate to where Auto-GPT is running, click on the three dots, and click on 'View Files'. You can then save these files to your computer.
Enter this path to get your results:

Remember, the effectiveness of Auto-GPT can depend on the specificity of your goals. Experiment with different tasks and see what works best for you.
Warning: AutoGPT has a major issue - it can trap you in costly loops. If it gets stuck, it keeps running and your bill keeps climbing. One time, a team member of mine faced a whopping $120 charge for a single task, all because he left his computer on. This is a serious problem.
