- AI Fire
- Posts
- 🤖 AI That Works For You: Crafting Your First Automation Agent
🤖 AI That Works For You: Crafting Your First Automation Agent
Follow our detailed instructions to assemble a working AI assistant from scratch that connects to your apps and follows your commands in plain language.
Neil Phan
August 17, 2025

Quick Poll: What best describes your journey with AI so far? |
Table of Contents
We are living in an era where artificial intelligence is no longer science fiction. Tools like ChatGPT have changed how we interact with information. But what if you could create an AI assistant that doesn't just answer questions, but actually acts on your behalf? An assistant that can update spreadsheets, send notifications, manage data, and automate complex workflows?
Welcome to the world of AI Agents.

In this detailed guide, we will go from zero to building our first functional AI Agent using the powerful automation platform n8n. By the end of this article, you will have transitioned from being a mere AI user to a true AI builder. The best part? If you can use ChatGPT, you are fully capable of building this AI Agent.
What Is An AI Agent? Analyzing The Core Architecture
Before we start building, it's crucial to understand the fundamental difference between an AI Agent and a standard chatbot. While a chatbot is limited to conversation, an AI Agent is designed to perform tasks in the digital world.
An effective AI Agent is composed of three essential components that function like a digital nervous system:
The Brain: This is the cognitive center of the Agent. It consists of a Large Language Model (LLM) like OpenAI's GPT-4, which handles language processing and reasoning. Alongside the LLM is memory, which allows the Agent to remember past interactions, maintain context, and learn from conversations. Without memory, every interaction would be a fresh start, rendering the Agent useless for complex tasks.

Tools: These are the "hands" of the Agent, allowing it to interact with the outside world. Tools can be any application or service with an API (Application Programming Interface) - for example, Google Sheets, Slack, Notion, databases, or even email services. By granting the Agent access to these tools, we enable it to read, write, and modify data.

The Brain Stem: This is the most critical component, acting as the command center. The "Brain Stem" is the system prompt - a set of detailed, clear instructions we provide to the "Brain." This prompt defines the Agent's role, its objectives, how it should behave, and most importantly, how it must use the provided "Tools" to accomplish its mission. A well-written system prompt transforms a simple language model into an intelligent autonomous agent.

Think of it this way: ChatGPT can only talk to you. An AI Agent can talk to you, then turn around and talk to Google Sheets to perform a specific action. That is the revolutionary difference.
Our Project: The Subscription Tracker AI Agent
To turn theory into practice, we will build an Agent called the "Subscription Tracker." Its task is simple yet incredibly useful:

You converse with it using natural language: "I just subscribed to Spotify Premium for 120,000 VND per month."
The Agent will parse your message, extracting key information (Service Name, Cost, Frequency).
If information is missing, it will intelligently ask for clarification.
Once it has all the data, it will ask you for confirmation.
Upon your confirmation, it will automatically add a new row to a designated Google Sheet, placing the information in the correct columns.
This project, while basic, is the perfect foundation. Once you master these core principles, you can expand to build more complex Agents capable of handling real business processes like expense management, automated customer support, or orchestrating marketing campaigns.
Why Learning This Skill Matters More Than You Think
You might be thinking, "This is neat, but it doesn't seem very practical for my job." This is a common sentiment, but it overlooks a major shift that is currently underway. Learning to build AI Agents isn't just a fun automation trick; it's a foundational skill for the future of knowledge work.

When you only use pre-built AI tools (like the GPTs in the ChatGPT store), you are trusting a "black box." You don't fully control your data, you don't understand its decision-making logic, and you are limited by the features the developer provides.
In contrast, building your own Agents gives you:
Complete Data Control: Your data flows from you to your tools, not through an obscure third party.
Process Transparency: You know exactly what your Agent is instructed to do and why it makes the decisions it does.
Infinite Customization: You can fine-tune the Agent to fit your unique workflow perfectly.
Deep Understanding: Most importantly, you will understand the nature, capabilities, and limitations of current AI technology.
This skill is akin to learning the fundamentals of programming or database management in previous decades. It will soon become an essential part of the digital toolkit for any professional who wants to work effectively in an AI-driven world.
Learn How to Make AI Work For You!
Transform your AI skills with the AI Fire Academy Premium Plan - FREE for 14 days! Gain instant access to 500+ AI workflows, advanced tutorials, exclusive case studies and unbeatable discounts. No risks, cancel anytime.
Getting Prepared: Setting Up Your Environment
Before we begin, let's ensure you have all the necessary tools:
An n8n Account: Go to n8n.io and sign up for an account. They offer a 14-day free trial of their Cloud platform, which is the ideal choice for beginners as it requires no complex technical setup.

An OpenAI Account: You will need access to the OpenAI API. This is different from a ChatGPT Plus subscription. Go to
platform.openai.com, create an account, set up billing information, and generate an API key. You will need to add a small amount of credit (about $5 is plenty to start) to use the API.
A Google Account: To create and connect to Google Sheets.
Once you're logged into n8n, you'll see a canvas interface. Don't worry if it looks complex; we will go through everything step by step.
Step 1: Building The Agent's Brain
Let's start by creating the cognitive core for our AI Agent.
Setting Up The Communication Gateway (Chat Trigger)
Every workflow in n8n needs a starting point, called a "trigger." In our case, we want to communicate with the Agent via a chat interface.
On the n8n dashboard, click the "Create workflow" button.

In the empty workspace, click the large plus (+) icon.

Search for "chat" and select Chat Trigger.

This node will create a chat interface in the bottom-right corner of the screen. This is where you'll talk to your Agent.

Click anywhere outside the settings window to close it.
If you try typing "hello" into the chat now, nothing will happen. That's because this communication gateway isn't connected to any brain yet.
Adding The AI Agent Node
Now, we will add the central processing unit.
Click the plus (+) icon connected to the Chat Trigger node.

Search for "AI Agent" and select it.

A new node with multiple inputs and outputs will appear. Don't panic! Think of it as an information relay station, processing data from left to right.

On the left side, under the "Input" tab, you'll see it has already detected your chat input ({{$json.content}}). This means the Agent is ready to listen.
Connecting The Language Model (LLM)
An Agent can't think without a language model.
Click on the connector labeled Chat Model on the AI Agent node.

Search for "OpenAI" and select OpenAI Chat Model.

You will be asked to create a new "credential." This is how n8n authenticates with your OpenAI account.
Follow these steps to get your OpenAI API key:
Go to platform.openai.com.

Navigate to the API Keys section in the left-hand menu.
Click "Create new secret key," give it a name (e.g., "n8n Agent Key"), and copy the generated key. Note: You will only see this key once. Copy and store it securely.

Return to n8n, paste the API key into the corresponding field, and save.

In the Model section, choose a model that is cost-effective yet powerful. gpt-4.1-mini is an excellent choice for beginners as it balances performance, speed, and price.

Important: Press Cmd+S (on Mac) or Ctrl+S (on Windows) to save your workflow. n8n does not auto-save!

Testing The Basic Brain
Now, try chatting again. Type "hello" into the chat box. You should get a response! Your Agent now has a basic brain and can communicate.


However, it's still very "naive." Try this test:

Say: "Please remember the keyword 'Project Alpha'."
Wait for the Agent to respond.
Then ask: "What was the keyword I just told you?"
The Agent will reply that it doesn't know what you're talking about. This is because LLMs are inherently "stateless" - they have no memory of past interactions. This is where we need to add memory.
Adding Memory
Click on the Memory connector on the AI Agent node.

Select Simple Memory. This is the most basic form of memory, which saves the conversation history.

In the "Context Window Length" field, set the value to
14. This means the Agent will remember the last 14 interactions (both yours and its). This number is sufficient for most basic tasks.
Save the workflow (
Cmd/Ctrl+S).
Now, clear the old chat (by clicking the trash can icon in the chat box) and try the test again. This time, the Agent will correctly remember "Project Alpha"! Memory is a vital component for building any useful Agent.
Step 2: Equipping The Agent With Tools
The brain is ready. Now it's time to give our Agent "hands" to work with the outside world.
Preparing The Google Sheet
Open a new tab and go to Googles Sheets to create a new spreadsheet.
Name the file "Subscription Tracker."

Create the following column headers:
Service Name,Cost,Currency,Billing Cycle,Start Date,Status.
Rename the sheet (tab) to "Subscriptions."

Keep this tab open so we can grab the URL later.
Connecting The Google Sheets Tool In N8N
Go back to your n8n workflow:
Click on the Tools connector on the AI Agent node.

Search for "Google Sheets" and select Google Sheets Tool.

Similar to OpenAI, you need to create a new credential by clicking "Sign into Google," choosing your account, and granting the necessary permissions to n8n.

Configuring The Tool's Functionality
Now, we need to tell the Agent what this tool can do.
Under Resource, keep it as "Sheet within document."

Change the Operation to Append row. This means the default action of this tool is to "add a new row."
Under Document, select "By URL" and paste the URL of the Google Sheet you just created.
Under Sheet, n8n will automatically load the list of sheets; select "Subscriptions."

The most important part is Columns. For each column value (
Service Name,Cost, etc.), click the sparkle icon (✨). This action doesn't assign a fixed value; instead, it tells the AI: "This is a data field that you need to infer and fill based on the user's input."
Rename the tool node by clicking its title and typing "Add_New_Subscription." Clear naming helps the AI better understand the tool's function.

Save the workflow (
Cmd/Ctrl+S).
Step 3: Activating The Brain Stem (The System Prompt)
This step is what determines the intelligence and effectiveness of your Agent. We need to write a detailed "job description" to instruct the brain on how to use its tools.
The Art Of Crafting An Effective System Prompt
Writing a good system prompt is an art form. Instead of writing from scratch, we can leverage AI to help us.
Take a screenshot of your n8n workflow.

Download your workflow as a JSON file (click the three-dot icon in the top-right corner → Download).

Open ChatGPT (use the latest model like GPT-4o for the best results).
Upload both the screenshot and the JSON file.

Use the following prompt, which is designed to make the AI think systematically:
You are an expert engineer specializing in designing AI Agents. Your task is to create a comprehensive, clear, and effective system message for an AI Agent built on the n8n platform.

This Agent's purpose is to track a user's service subscriptions. Based on the provided workflow screenshot and JSON file, the Agent has access to a tool named "Add_New_Subscription" to add data to a Google Sheet.

The system message you create must strictly adhere to the following structure:

1.  **Role:** Clearly define the Agent's role. Example: "You are a professional personal finance assistant..."
2.  **Core Objective:** State the Agent's ultimate goal. Example: "Your objective is to help the user track all their service subscriptions by collecting information and accurately recording it in a Google Sheet."
3.  **Interaction Flow:** Describe step-by-step how the Agent should interact with the user. This flow MUST include a CONFIRMATION step. Example:
    * Greet the user and listen to their request.
    * Parse the information provided by the user.
    * If information is missing, politely ask for it.
    * After gathering all necessary information, summarize it in a table or list and ask, "Do you confirm adding this information to the tracker?".
    * Only after the user responds with "yes," "confirm," "agreed," or similar affirmative words are you permitted to use the "Add_New_Subscription" tool.
4.  **Tool Usage Rules:** Provide specific instructions on when and how to use the "Add_New_Subscription" tool.
5.  **Data Formatting:** Provide rules for data handling. Example:
    * `Service Name`: The name of the service.
    * `Cost`: Extract only the number, without the currency symbol.
    * `Currency`: Infer the currency unit (e.g., VND, USD) and record it in its own column. If unsure, default to VND.
    * `Billing Cycle`: Standardize to values like "Monthly," "Yearly," or "Quarterly."
    * `Start Date`: Use the current date of the conversation. You can access the current date via the `{{$timestamp}}` variable.
    * `Status`: Default to "Active."

Generate a complete system message based on these requirements.
ChatGPT will analyze your workflow structure and generate a very detailed and powerful system prompt for you.

Installing The System Prompt Into The Agent
Copy the entire system prompt generated by ChatGPT.
Go back to n8n and click on the AI Agent node.

Scroll down to Options, click Add Option, and select System Message.

Click on the word "Expression" to open the text editor.

Delete the default content and paste your system prompt in.

Click outside the editor and save the workflow (
Cmd/Ctrl+S).
The Moment Of Truth: Comprehensively Testing Your AI Agent
Now it's time to reap the rewards. Let's test our Agent.
Clear previous chats and execution logs for a clean start.
In the chat box, type: "Add my new Netflix subscription, it costs 260,000 VND a month."

Press Enter.
At this point, magic will happen. The Agent will:
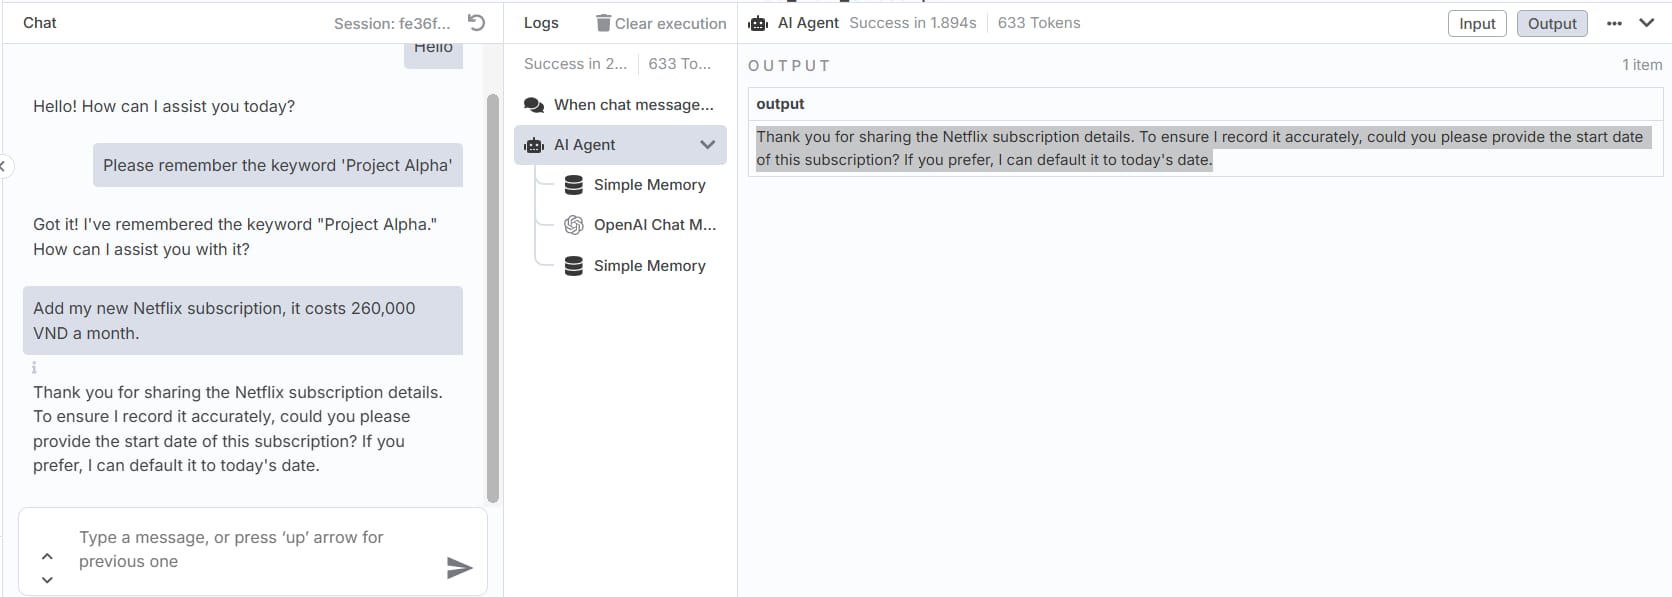
Analyze your message.
Summarize the information: Netflix, 260000, VND, Monthly.
Ask for your confirmation: "Shall I add this information to your tracker?"
You respond: "Yes, please"
The Agent will activate the Google Sheets tool.
Check your spreadsheet, and you will see a new row has just been added with all the correct information!


Handling More Complex Scenarios
A good Agent must handle ambiguity. Try this:
You: "I just signed up for FPT Play."

Agent (expected): "Thank you for sharing your FPT Play subscription. To add it to the tracker, could you please provide the following details:
Cost
Currency (if not VND)
Billing Cycle (Monthly, Yearly, or Quarterly)
Start Date (or should I use today’s date?)
Status (or should I set it as Active by default?)"

This demonstrates that the system prompt is working effectively, guiding the Agent to gather missing information before taking action.
Leveling Up Your Agent: From Basic To Advanced
The AI Agent you've just built is a solid foundation. Now let's think about how to make it even smarter, more like a real human assistant.
1. Adding Duplicate Detection
An assistant wouldn't create two identical entries. We can teach our Agent to do the same.
Add a second Google Sheets tool to the Tools connector.

Set its Operation to Get rows.

Rename this tool to "Check_Existing_Subscriptions."

Update your system prompt with new logic: "Before using the
Add_New_Subscriptiontool, you must always first use theCheck_Existing_Subscriptionstool to see if the service already exists. If it does, inform the user and ask them what they would like to do next (e.g., update the old entry or still create a new one)."
2. Enabling Update Functionality
What happens when the price of Netflix increases? You'll want to update the existing entry rather than create a new one.
Add a third Google Sheets tool.

Set its Operation to Update row.

Rename it to "Update_Subscription."

Update the system prompt with more complex logic, instructing the Agent when to use
Add_New_Subscriptionand when to useUpdate_Subscriptionbased on the user's response after the duplicate check.
3. Integrating More Tools
A truly powerful Agent can orchestrate multiple applications.
Add a Slack tool: After successfully adding a subscription, the Agent could automatically send a notification to your
#financechannel on Slack.

Add a Notion tool: The Agent could create a new page in your Notion database to store more detailed notes about each subscription.

By adding tools and updating the system prompt, you can create incredibly complex, cross-application automation chains, all controlled by natural language.
The Golden Rules For Success
As you venture deeper into building Agents, keep these principles in mind:
Save Frequently: Make
Cmd/Ctrl+Sa habit. Losing an hour's worth of work because you forgot to save is a frustrating experience.

Start Simple, Expand Incrementally: Don't try to build an Agent with 10 tools from the start. Begin with a core function, make it work perfectly, and then add more layers of complexity.

The System Prompt is Key: Spend the most time refining your system prompt. It is the operating brain of the entire system. A small change in the prompt can lead to a big difference in the Agent's behavior.

Test Thoroughly: Experiment with many different types of input:
Ideal cases: "Add Spotify, $10, monthly."
Ambiguous cases: "Add a music service."
Edge cases: "Cancel Netflix." (Your current Agent doesn't have a tool for this; see how it reacts).

Monitor API Costs: Every time your Agent "thinks" (makes a call to OpenAI), you incur a small fee. Use the mini models when starting out and always keep an eye on your usage on the OpenAI dashboard.
Final Thoughts: You Are Building The Future
Congratulations! You have not just completed a tutorial; you have made the leap from being an AI consumer to an AI creator. The skill you have just learned is not just about connecting apps; it's about shaping the way humans and machines will collaborate in the future.
When you build your own Agents, you are creating tools that are transparent, controllable, and completely customized to your needs. This is the foundation of a future where AI technology empowers individuals, rather than replaces them.
Your journey is only just beginning. Experiment, break things, fix them, and most importantly, have fun with the creative process. Every expert was once a beginner, and every complex AI system began with a simple idea.
Now, go out there and build something amazing!
If you are interested in other topics and how AI is transforming different aspects of our lives or even in making money using AI with more detailed, step-by-step guidance, you can find our other articles here:
How would you rate the quality of this AI Workflows article? 📝 |
Reply