- AI Fire
- Posts
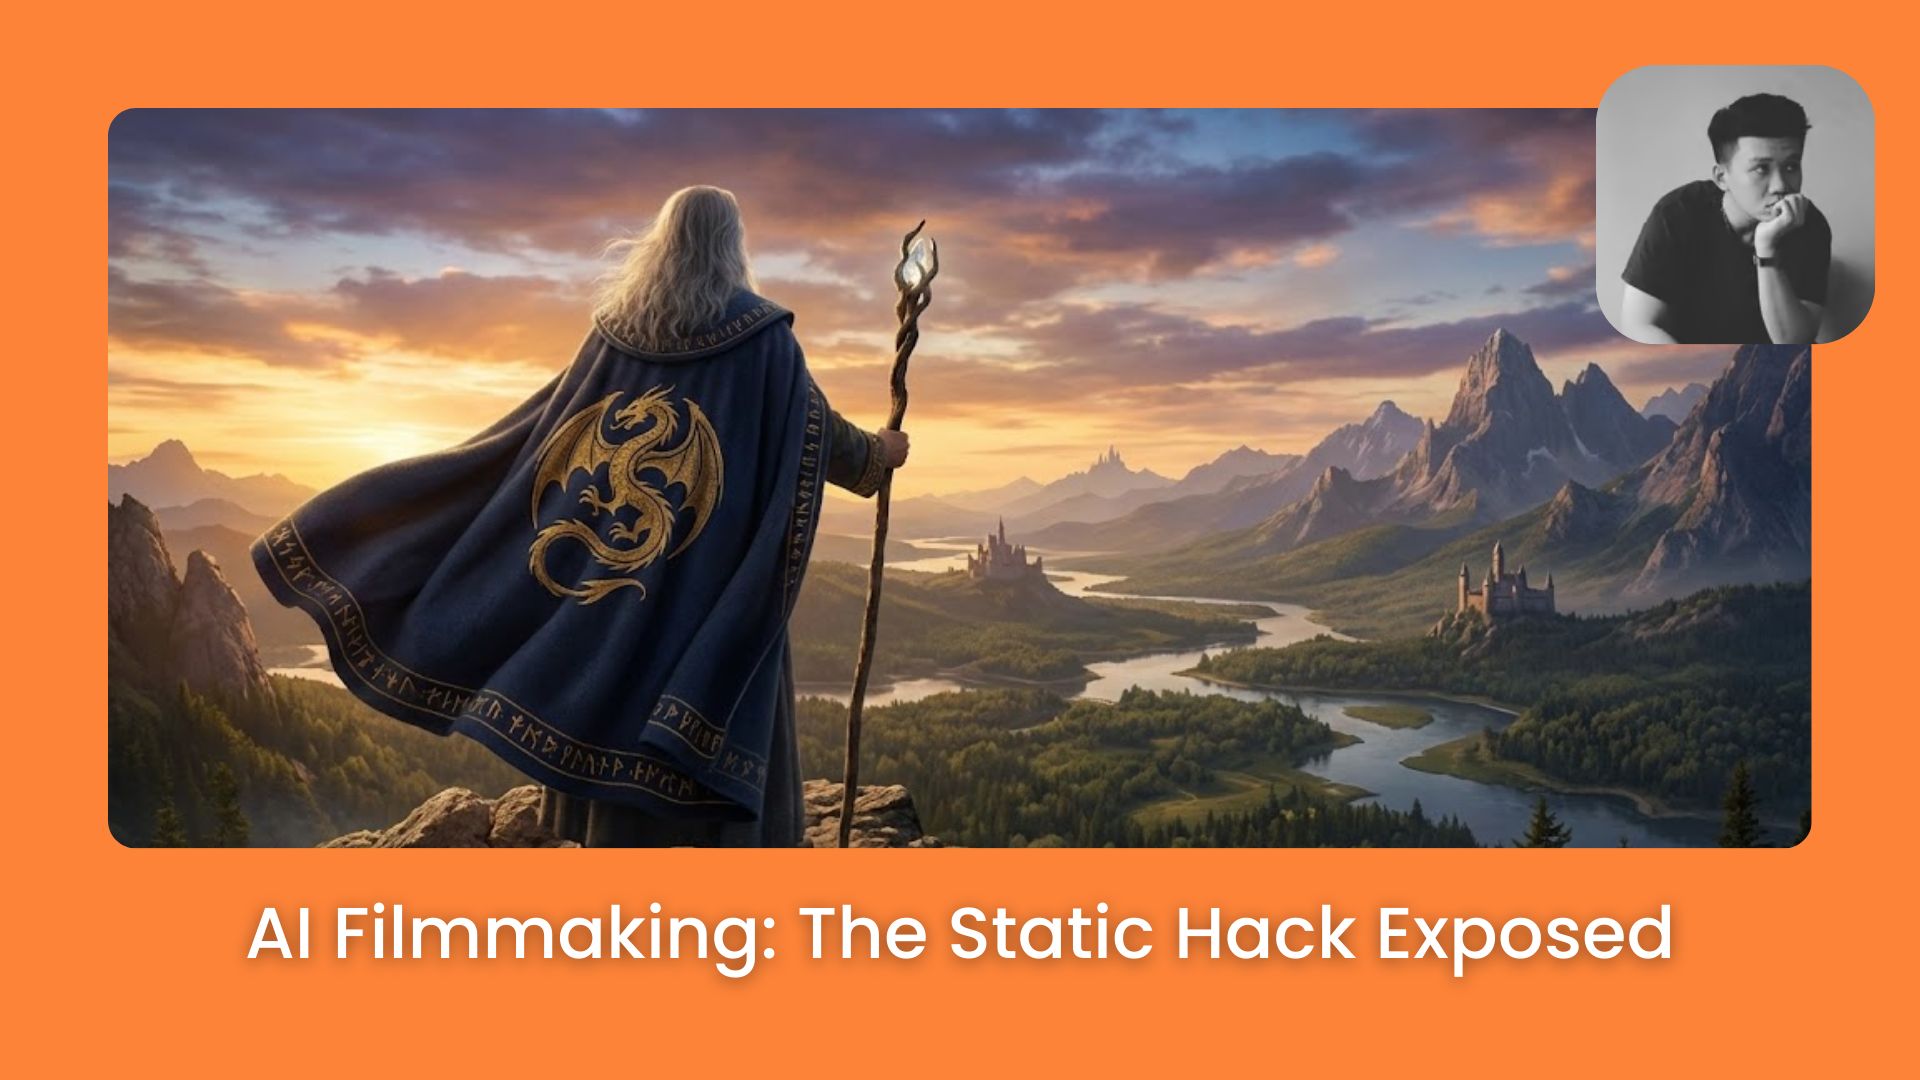
- 🎬 "Static" Hack You Need to Make Videos Look Real, Intentional, and Professional
🎬 "Static" Hack You Need to Make Videos Look Real, Intentional, and Professional
Your AI videos look fake because you use wrong prompts. Use my "Mega Prompts" and Nano Banana workflow to create cinematic shots instantly today.
Neil Phan
January 27, 2026
TL;DR
Professional AI filmmaking isn't about luck; it's about controlling the camera and consistently directing the "actor." By generating high-quality source images in Nano Banana and using Kling AI to add specific movements like static shots, rack focus, and dolly zooms, you can create cinematic videos that look real. This guide provides step-by-step workflows for mastering complex camera techniques, ensuring character consistency, and choosing the right tool stack for your budget.
Key points
Tool: Use Nano Banana for character consistency and Kling AI for realistic movement.
Technique: Static shots force the viewer to focus on details, creating a more cinematic feel.
Movement: Truck creates 3D depth (parallax), while Pan often looks flat.
Critical insight
You are the director, AI is just the crew; if you give lazy instructions, you get lazy results.
What's your biggest struggle with AI Filmmaking? 🎬😩 |
Table of Contents
Have you ever asked yourself: "Why do other people's AI videos look like Hollywood movies, but mine look... fake and stiff?"
I understand that feeling. In my first days of AI Filmmaking, I wasted so much money (credits). I only got videos with distorted characters and weird movements, forcing me to find a way to keep my lead actor identical across every cinematic frame. Then, I realized something important: AI is like a genius child. It needs a director who gives clear orders.
If you are looking for a "shortcut" to make professional movies, this guide is for you. I will guide you step-by-step with a standard process: Where to make images (Nano Banana) and Where to make movement (Kling AI).
Let's turn the ideas in your head into reality right now.
Part 1: Why Is Camera Movement The Soul Of AI Filmmaking?
Beginners often mistake fast movement for quality, but mastering the "Static Shot" is crucial for professional AI filmmaking. By keeping the camera still, you force the audience to focus on subtle details like eye movement or drifting smoke, which creates a deeper sense of realism.
To achieve this, generate a highly detailed image in Nano Banana first which is the key to turning one image into infinite camera angles, then use Kling AI to animate only the small, natural elements without shaking the camera.
Key takeaways
Concept: Stillness highlights detail; constant motion hides it.
Workflow: Generate image in Nano Banana -> Animate in Kling AI.
Goal: Keep sharpness high by minimizing camera movement.
Prompt: Use keywords like "Static camera" and "Subtle movements."
Sometimes the most powerful move a director can make is to not move the camera at all.
In AI filmmaking, the first lesson is controlling stillness (The Static Shot). When the camera doesn't move, the viewer must look at the details: the character's eyes, the smoke, or dust in the sunlight.
Let's practice creating a still scene with deep detail.
Step 1 (Create Original Image): Open Nano Banana. We need to make a portrait photo with very high detail to use as a source.
Front view close-up of an old fisherman smoking a pipe. Deep wrinkles on his face, weathered skin texture. He looks tired but wise. Background is a misty harbor at dawn. Soft blue cinematic lighting, shot on 50mm lens, f/1.8, highly detailed, 8k resolution.
Step 2 (Create Video): Download that image. Upload it to Kling AI (Image-to-Video mode). The goal here is to keep the sharpness of the image, only adding small movements to make the video "alive" without making it blurry.
Static camera, fixed shot. Subtle movements of smoke rising from the pipe. The fisherman blinks slowly. Mist floating in the background. High texture retention, no camera shake.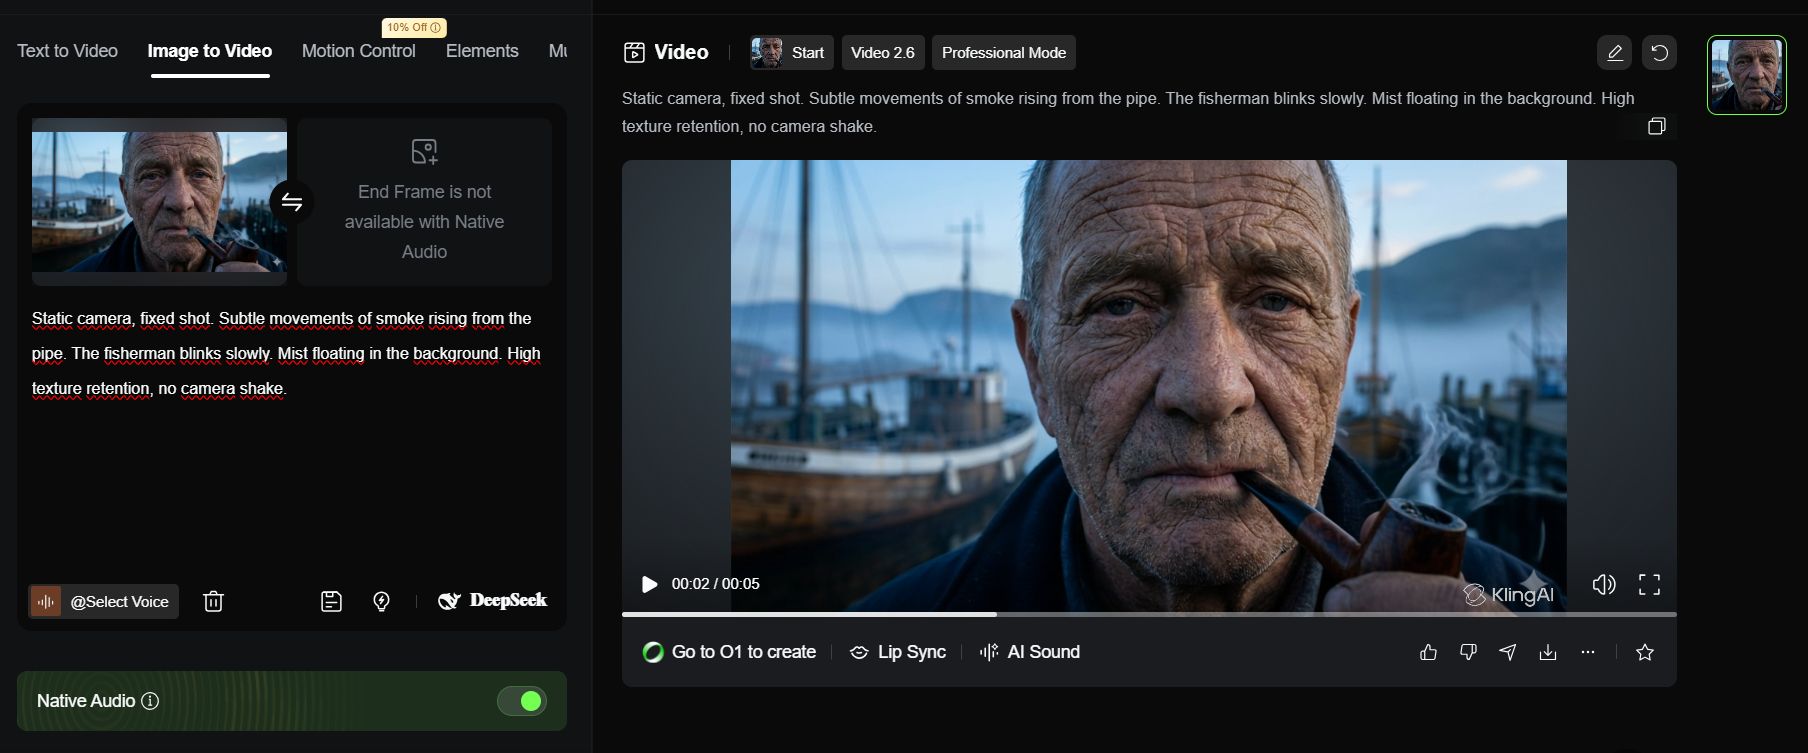
Part 2: How To Create Depth With Rack Focus In AI Filmmaking
Rack Focus guides the viewer's eye by shifting sharpness from a foreground object to a background subject, creating a sophisticated 3D effect. Start with an image that has distinct layers like a glass in front and a person behind, then command the AI to shift the focus point smoothly.
This technique turns a flat video into a narrative scene by telling the audience exactly what to look at and when.
Key takeaways
Definition: Shifting focus from near to far (or vice-versa).
Setup: Ensure your source image has a clear foreground and background.
Effect: Creates cinematic depth and directs viewer attention.
Prompt: "Focus starts sharp on [Object A], then shifts to [Object B]."
Rack focus isn't just a cool trick; it's a way to edit the story without cutting the scene.
1. What Makes Rack Focus A Powerful Storytelling Tool In AI Filmmaking?
The Rack Focus technique is like pointing your finger and telling the audience: "Look at this... okay, now look at that thing behind it." It creates great 3D depth.
Learn How to Make AI Work For You!
Transform your AI skills with the AI Fire Academy Premium Plan - FREE for 14 days! Gain instant access to 500+ AI workflows, advanced tutorials, exclusive case studies and unbeatable discounts. No risks, cancel anytime.
2. The Process:
Step 1 (Create Original Image): Open Nano Banana. We need a photo with a clear foreground (thing near you) and background (thing far away).
Cinematic shot inside a jazz bar. In the extreme foreground, a glass of whiskey with melting ice sits on a wooden table.

In the blurred background, a mysterious woman in a red dress is sitting alone looking at the window. Moody lighting, noir atmosphere.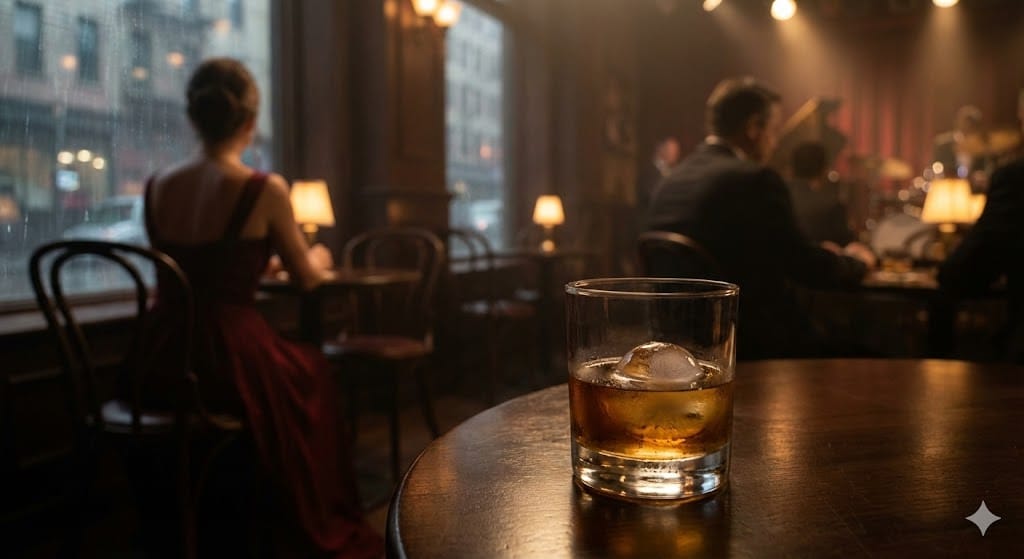
Step 2 (Create Video): Upload the image to Kling AI. Tell the AI to shift the focus from the glass to the woman.
Cinematic rack focus shot. The focus starts sharp on the whiskey glass in the foreground. Then, the focus smoothly shifts to the woman in the background. Soft diffuse lighting, melancholic mood, shot on 85mm lens, filmy grain texture.
As you can see, once you feed that specific rack focus prompt into Kling AI, the transition is incredibly smooth.
With the cinematic lighting and that subtle film grain, it doesn't look like a fake AI clip anymore. It feels like a real, intentional shot from a high-end movie.
Part 3: The Secret To Character Consistency In AI Filmmaking
This is the most important part. If your character has long hair in Scene 1, but short hair in Scene 2, your movie fails. You need to create a fixed "Virtual Actor" (Character Sheet).
Step 1 (Create Actor): Use Nano Banana again to make a standard character sheet.
Front view full body character sheet of a Cyberpunk female mercenary.

She has short silver hair with purple streaks, wearing a tactical leather jacket with glowing neon blue circuit patterns.

She stands confidently in a rainy futuristic street. Wet skin texture, sharp focus, volumetric lighting, photorealistic, 8k, Unreal Engine 5 style render.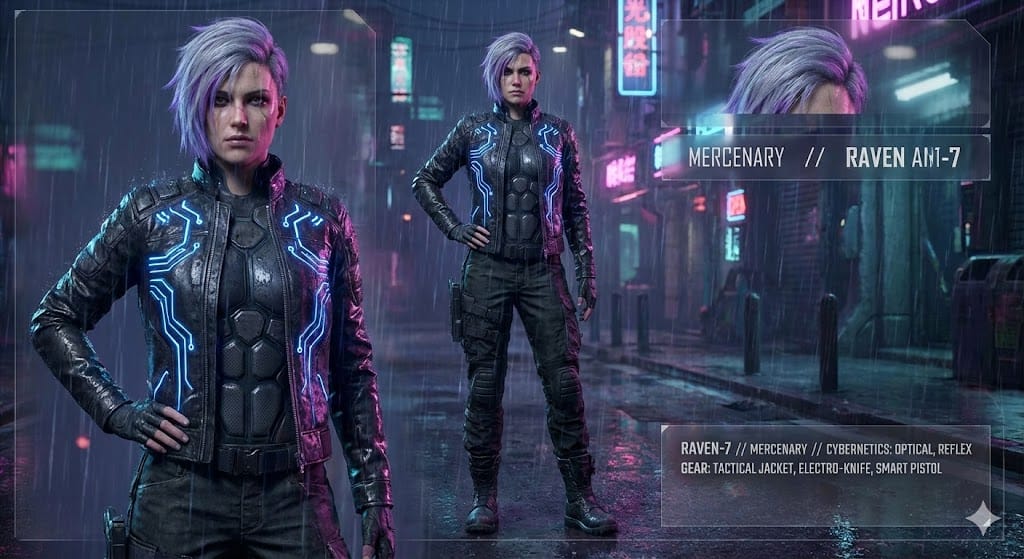
Step 2 (Apply): Save this image. From now on, whenever you make a video about this girl on Kling AI, always upload this image to the First Frame or Character Reference box. The AI will understand it must use this exact girl, and not draw someone else.
Part 4: Mastering Dolly Movements In AI Filmmaking
Many people confuse Zoom and Dolly.
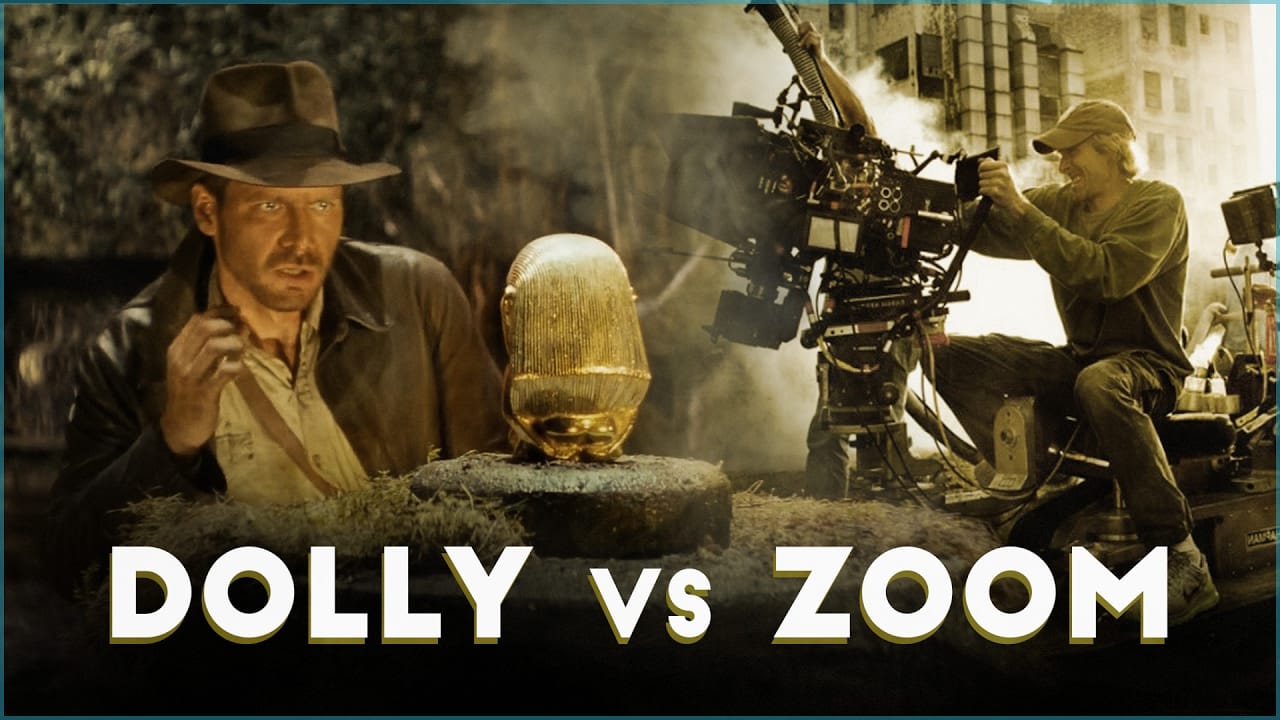
Zoom: Making the image bigger (makes space look flat).
Dolly: Moving the whole camera into the space (creates real 3D depth). In AI filmmaking, Dolly always looks more "real."
1. Dolly In (Move Closer)
The Dolly In is one of the most powerful tools in a director's arsenal. Unlike a simple zoom, which can make a shot feel flat, a Dolly In physically moves the camera through the environment.
Now, let’s bring our character to life using this movement. We will use the Cyberpunk mercenary we created in Part 3 to capture a raw, emotional moment.
Step 1 (Create Image): Use the Cyberpunk girl image from Part 3.
Step 2 (Create Video): Upload to Kling AI and use the Dolly In command.
Slow and steady camera dolly in. The camera moves physically closer to the Cyberpunk female mercenary.

She looks up at a giant hologram advertisement with a sad expression.

The neon lights reflect clearly in her eyes.

Background implies a busy city but is blurred due to depth of field. High contrast, emotional atmosphere.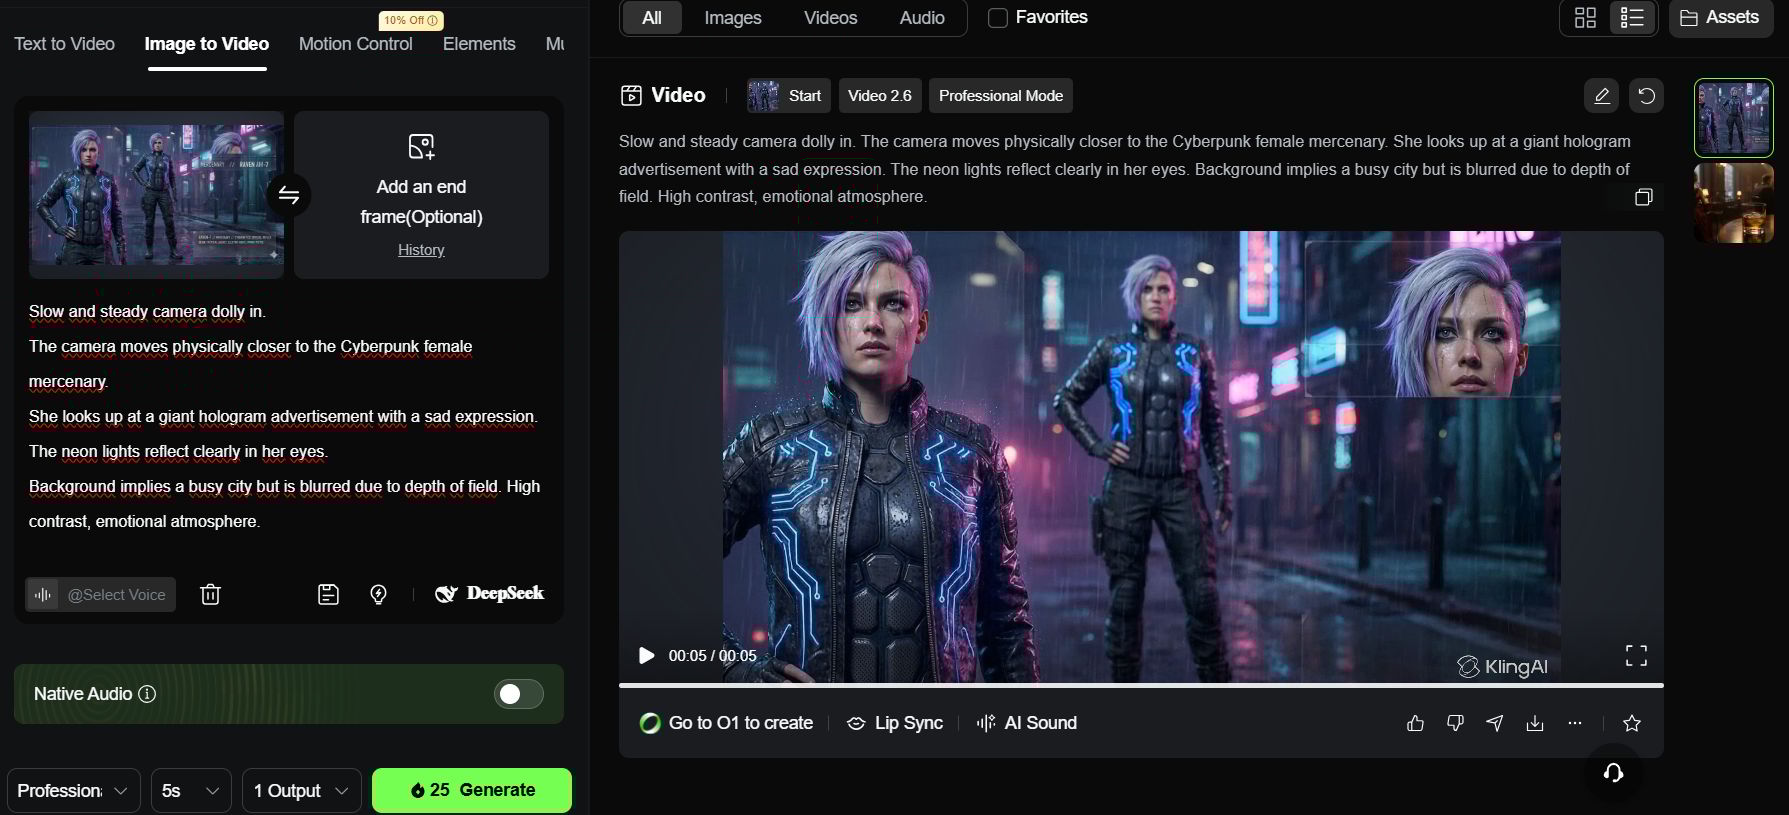
2. Dolly Zoom (Vertigo Effect)
A dizzying technique. The character stays the same size, but the background stretches out.
Step 1 (Create Image): Still use the character image from Part 3.
Step 2 (Create Video): Upload to Kling AI.
Dolly zoom effect (Vertigo shot). The camera tracks backward while zooming in on the mercenary's face.

Her size remains constant in the frame, but the futuristic alleyway behind her appears to stretch and elongate unnaturally.

Disorienting visual effect, psychological thriller vibe, sharp focus on face.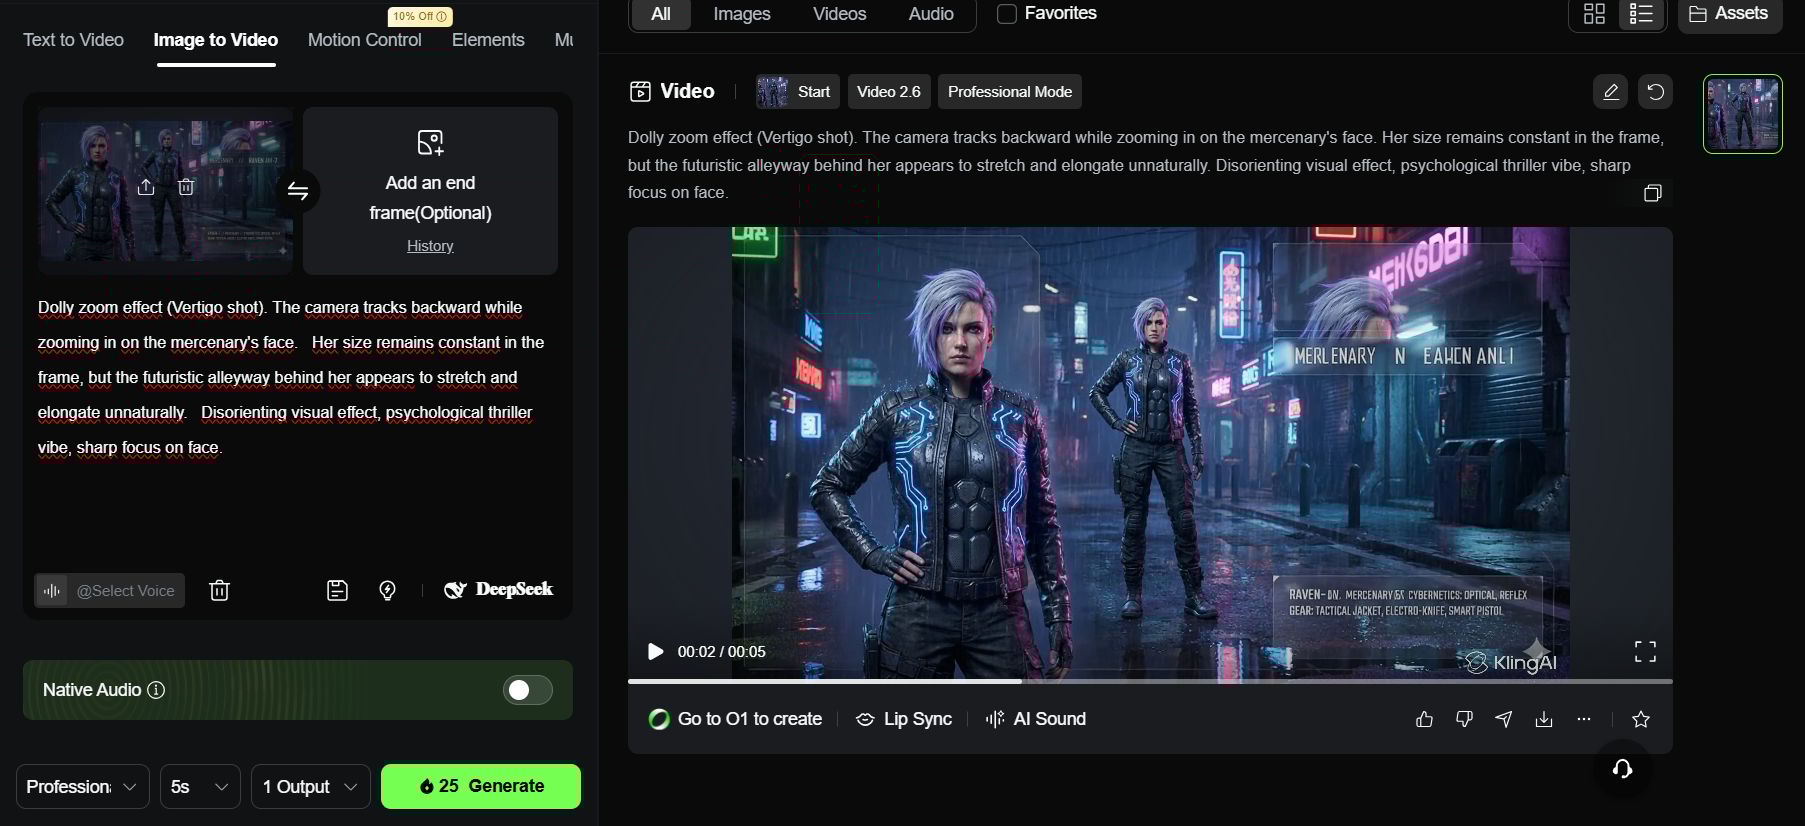
Part 5: Master Directional Movements Like Pan And Truck In AI Filmmaking
1. Why Is The "Truck" Movement Often Better Than "Pan" For 3D Depth?
To make your video look professional, you must understand the difference between these two moves. Many beginners use them wrongly, and that makes the video look flat.
Pan (The Pivot): Imagine you are standing still and just turning your head left or right. The camera does not move from its spot.
Result: The background looks flat like a painting.
Watch the Pan technique in action:
Truck (The Slide): Imagine you are walking sideways next to the character. The camera physically moves through the space.
Result: This creates the "Parallax Effect." This means things near the camera move fast, but things far away move slow. This makes your video look truly 3D and expensive.
Watch the Truck & Parallax effect:
2. The Process (Action Scene):
Now that you understand the theory of the Parallax Effect, let’s put it into a high-stakes scenario. We are going to direct a cinematic sequence of a Samurai in motion. By using the Truck movement instead of a Pan, we will make the forest feel vast and the speed feel dangerous.
Step 1 (Create Image): Open Nano Banana. Create a scene of a Samurai running or riding a horse.
Side profile wide shot of a samurai riding a black horse through a bamboo forest. He holds a katana. Sunlight filtering through the leaves (god rays). Dynamic motion pose, cinematic composition.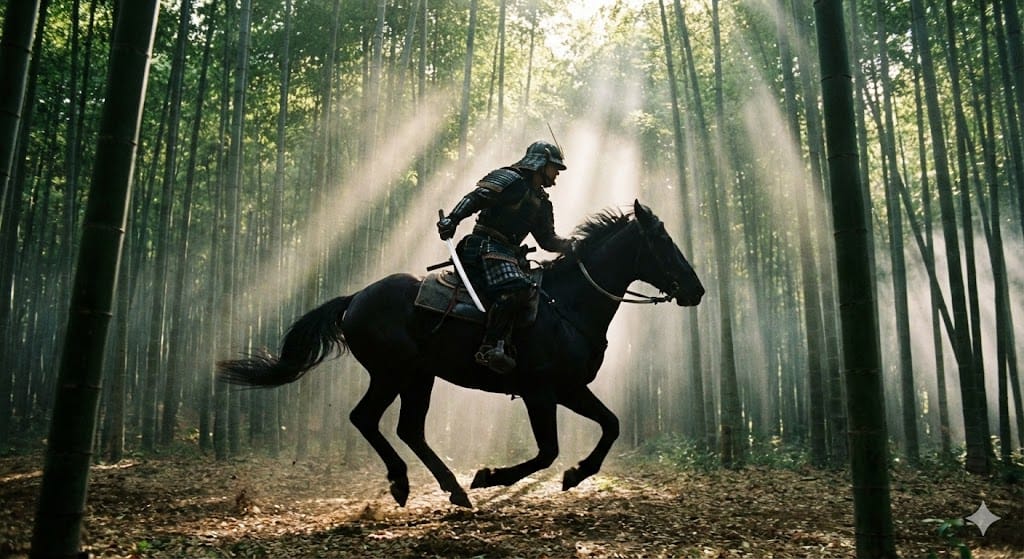
Step 2 (Create Video): Upload to Kling AI. Use the Truck command so the camera runs parallel to the horse.
Side tracking shot (Truck Right). The camera moves parallel to the samurai riding the horse at high speed. Motion blur on the background bamboo trees, but the samurai remains sharp. Sparks flying from hooves. Dynamic angle, cinematic speed.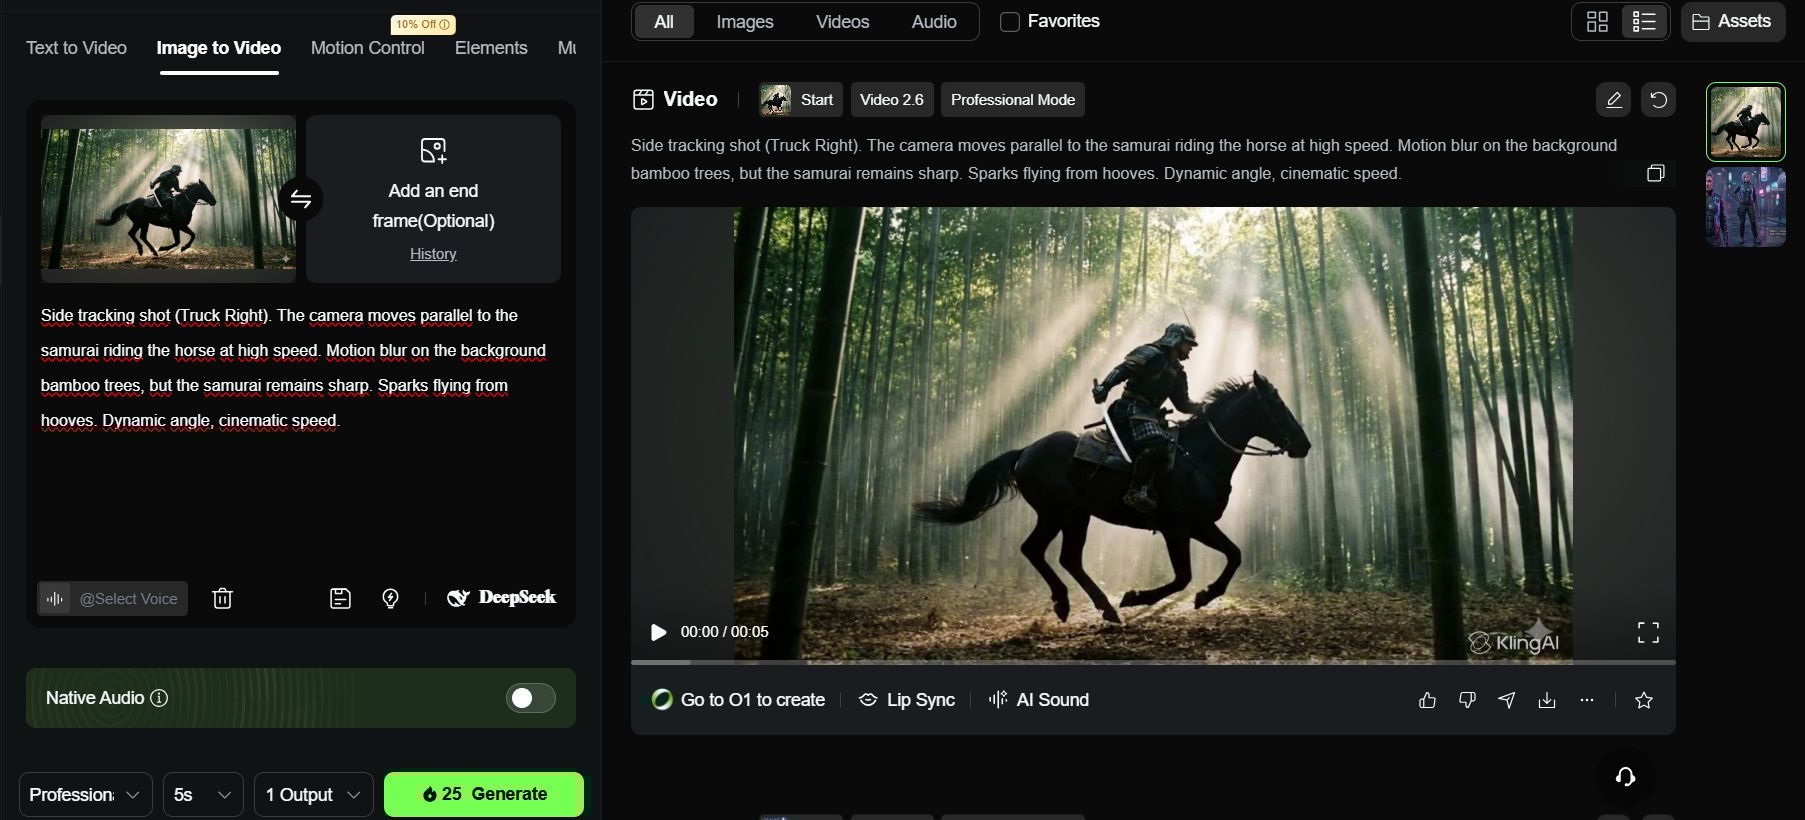
Then you'll see that the video doesn't just "slide" flatly across your screen. Because we used the Truck Right command, the AI understands it needs to calculate a moving perspective.
You will notice the bamboo stalks in the immediate foreground blur and move quickly, while the distant trees shift slowly. This visual depth, combined with the motion blur on the horse's hooves, creates a professional, high-octane action sequence that looks like it was shot on a real movie set.
Part 6: Multi-Frame Strategy For Complex Actions
If you want the character to do a hard action like "jumping off a cliff," AI will often fail and make the image look broken. The solution is to give it a Start Point and an End Point.
Step 1 (Create Start Frame): Open Nano Banana. Create an image of a man standing on the edge of a cliff.
Full body shot of a man standing on the edge of a high cliff, looking down at the ocean. Sunny day, wind blowing his jacket.
Step 2 (Create End Frame): Still in that same chat, let's generate the After state. By keeping the context in the same session, you help the AI maintain character consistency while changing the pose.
Low angle shot of the same man diving through the air, arms spread out. Blue sky background. Action pose.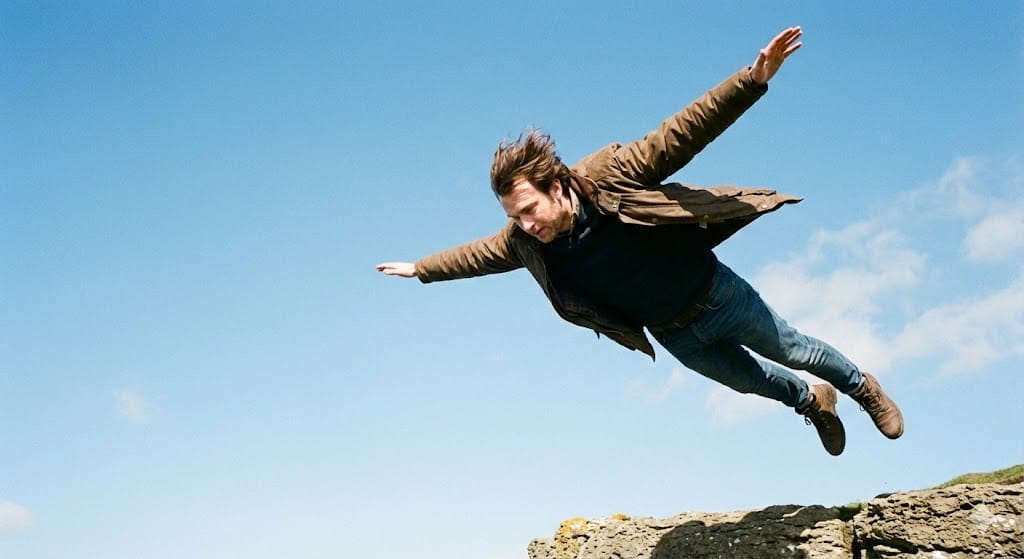
Step 3 (Create Video): Open Kling AI (or Luma Dream Machine). Upload Image 1 to Start Frame, Image 2 to End Frame.
The character performs a graceful dive from the cliff into the air. Gravity-accurate falling motion.

His jacket flaps violently in the wind. Smooth transition between the standing pose and the falling pose.

Cinematic motion blur.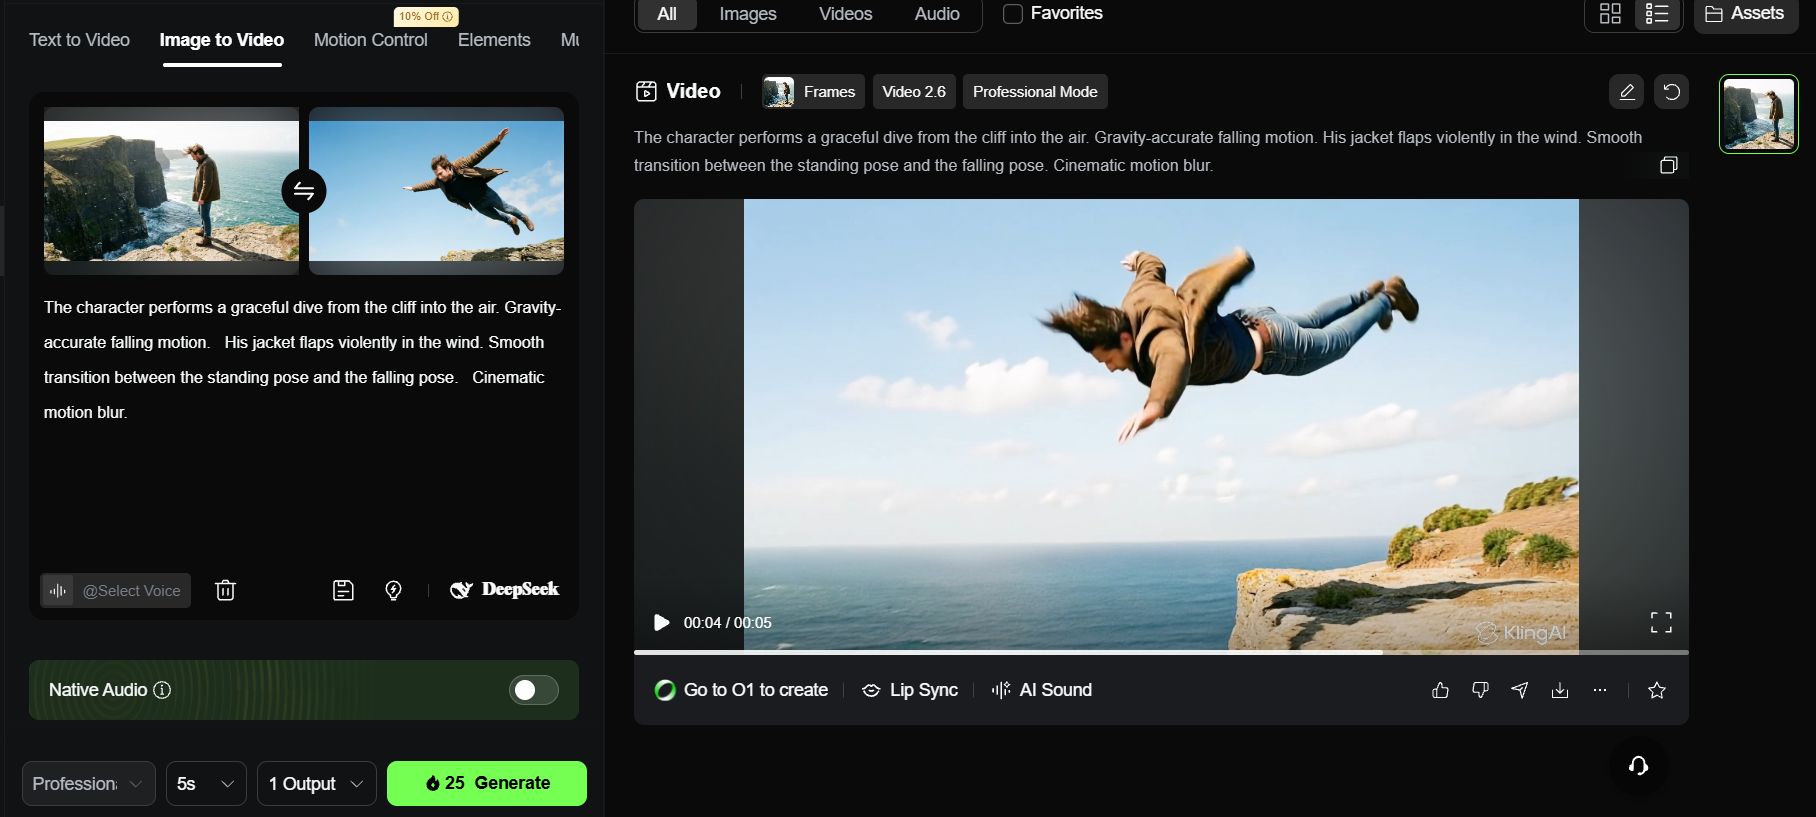
Pro Tip for Multi-Frame: The secret to a flawless transition lies in character consistency. Always ensure your subject’s clothing, hair, and features are identical in both the Start and End frames.
Actionable advice: Use your Virtual Actor reference image from Part 3 when generating both frames in Nano Banana. If the character changes even slightly between these two points, the AI will struggle to stitch the movement, leading to visual glitches during the dive.
Part 7: The Orbit Shot And The "Landmark" Secret
Orbiting which is like moving the camera in a circle around someone often fails in AI videos. When you try this, the AI gets confused, and your character might accidentally grow a second face on the back of their head! It looks like a horror movie.
To fix this, you need to use a secret trick called Landmarks.
What are Landmarks?
In simple words, a Landmark is a specific detail on your character that doesn't change, like a scar on the face, a tattoo on the arm, or a big logo on the back of a jacket.
Think of it as a hook for the AI. When the camera moves around, the Landmark tells the AI: "Hey, look! This logo is still here, so don't change the character's body." It helps the AI understand the 3D space so the person looks the same from every side.
Now, let me show you an example of how this works:
Step 1 (Create Image): Staying in Nano Banana, we need to create a character with a very clear detail on their back. We will use a Golden Dragon as our Landmark.
Full body back view of a wizard standing on a mountain peak. He wears a cape with a golden dragon emblem on the back. Epic fantasy landscape in front of him.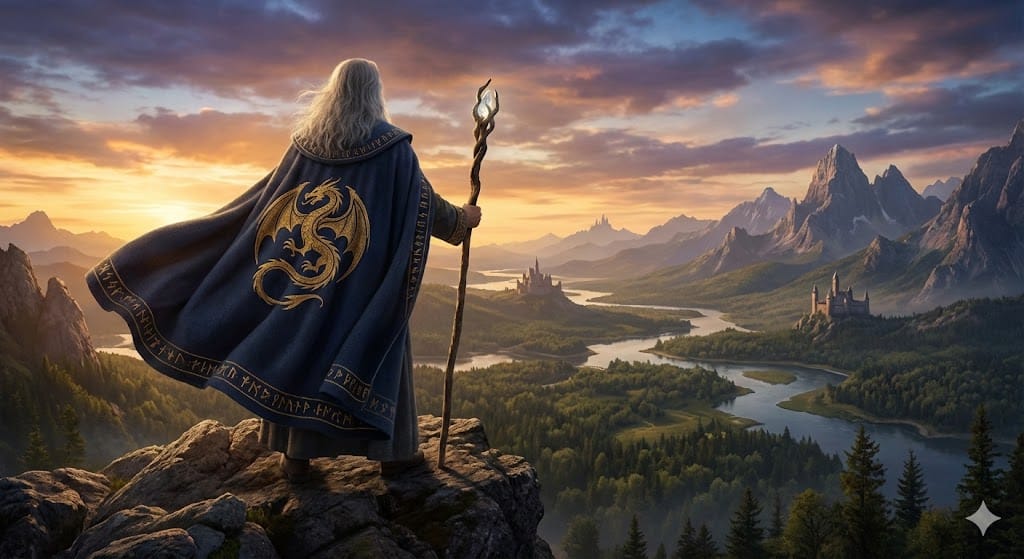
Step 2 (Create Video): Now, take that image and upload it to Kling AI. To make sure the camera moves perfectly without breaking the character, try using this prompt:
360-degree camera orbit. The camera circles completely around the wizard. As the camera moves behind his back, we clearly see the golden dragon emblem on his cape.

The camera continues to circle back to his front. Dusty atmosphere, magic particles swirling. Keep character consistency strict.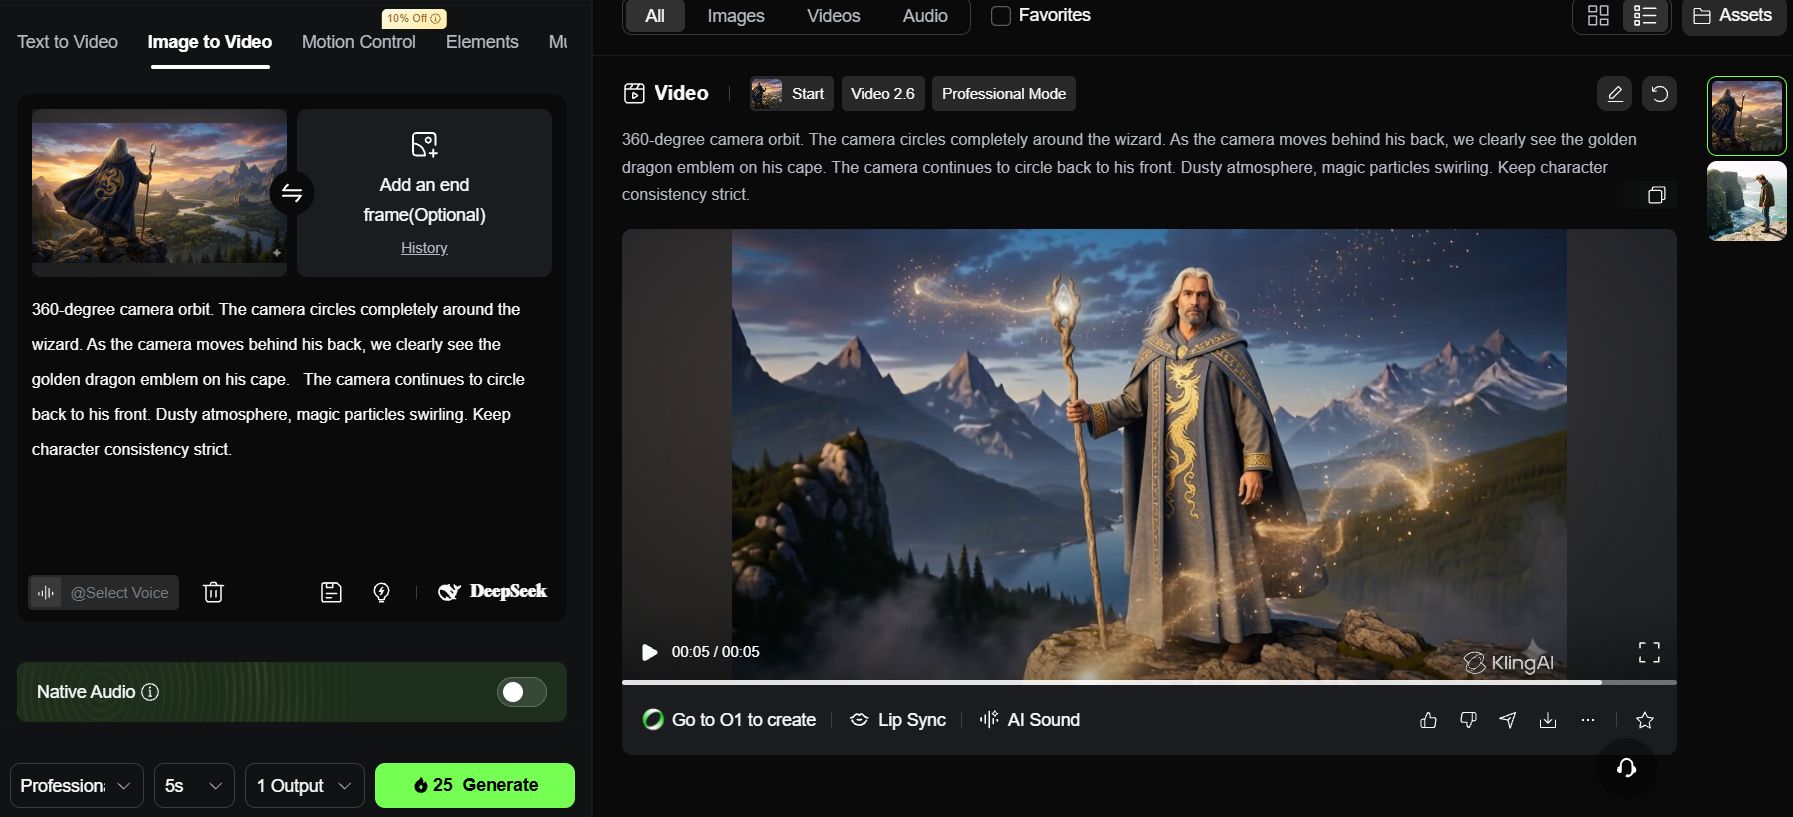
The video output you’ll see is a smooth camera circle around the wizard. Because we told the AI to look for the golden dragon emblem on his back, the character stays consistent the whole time.
The AI uses that dragon as a map to understand where the back of the character is, preventing any weird second faces from growing.
Part 8: Comparison Of Top AI Filmmaking Tools In 2026
There are hundreds of AI tools out there. It is easy to get lost and spend too much money on subscriptions you don't need. Based on my testing, you only need a specific set of tools depending on what kind of video you make.
Tool Name | Its "Superpower" (Main Strength) | Best For Which User? | My Honest Review |
Nano Banana (on OpenArt) | The Foundation: Creates hyper-realistic skin and consistent faces; perfect prompt adherence. | Everyone | The essential starting point. High-quality source images are non-negotiable for a professional-looking video. |
The Budget King: Sharp 4K resolution with superior physics and lighting. | Beginners & Documentary Makers. | The best high-quality free/low-cost alternative. Great for B-Roll, though less fluid with complex human acting. | |
Kling AI | The Storyteller It is the "King of Movement." It understands commands like "Truck," "Dolly," and "Orbit" perfectly without distorting the face. | Serious Filmmakers. | Worth the investment. Highly stable and rarely glitches; perfect for consistent character storytelling. |
The Action Star: Energetic, fast movements; great for VFX and transformations. | TikTok Creators & Anime Fans. | The go-to for music videos and "cool" action scenes. Not ideal for slow, emotional pacing. |
My Recommendation for You:
If you are just starting and have $0: Use Nano Banana (Daily credits) to make images + Google Veo 3 to make videos.
If you want to make a serious movie: Use Nano Banana + Kling AI.
If you make music videos: Use Seedance 1.5 Pro.
How useful was this AI tool article for you? 💻Let us know how this article on AI tools helped with your work or learning. Your feedback helps us improve! |
Part 9: The Golden Rule – "Garbage In, Garbage Out"
You see, the difference between an amateur video and a professional one is Detail. Never write short prompts like "a girl walking".
A standard Mega Prompt must always include:
Subject: Who is it? What are they wearing?
Environment: Where is it? What is the weather like?
Camera Gear: What lens (35mm/85mm)?
Movement: Dolly, Truck, or Orbit?
Lighting: Cinematic, Neon, or Natural?
Use this formula:
[Movement Type] + [Detailed Subject Description] + [Environment & Lighting] + [Technical Specs]
One final example for you to practice:
Tracking shot, camera trucks right. A cyberpunk girl with neon glowing skin walking through a rainy alleyway.

Reflections on wet pavement. She wears a transparent plastic coat. Shot on Sony Venice 2, 35mm prime lens, f/1.4 aperture.

Blade Runner 2049 aesthetic, teal and orange color palette, cinematic grain, volumetric lighting.
Conclusion: Your Journey From "User" To "Film Director"
We have reached the end of this Masterclass. Remember, AI Filmmaking is a skill, not magic. Your first video might look a bit weird, and that is 100% normal. The difference between a beginner and a pro is simply Patience.
You are the Director, AI is just the Crew. The AI doesn't know what looks "epic" or "sad" until you tell it. If you are lazy with prompts, the result will be lazy. But if you control the camera movements like we practiced, the result will be a masterpiece.
Stick to this Winning Formula:
Nano Banana: Use this as your "Casting Director" to build perfect actors and sets. Never skip this.
Google Veo 3 / Kling: Use these as your "Cameraman" to breathe life and movement into those images.
Technology changes fast, but the storytelling skills you learned today will last forever.
You have the tools. You have the Mega Prompts. Now, don't just close this tab. Open OpenArt right now, create your first character, and shout "Action!"
I can't wait to see your story. Good luck!
If you are interested in other topics and how AI is transforming different aspects of our lives or even in making money using AI with more detailed, step-by-step guidance, you can find our other articles here:
Building Apps with Bolt: A No-Code Guide to Turning Ideas into Reality
Detailed Guide: How To Automatically Get Unlimited High-Quality LinkedIn Jobs*
Prompt Engineering Automation: Build a Mini AI Assistant with n8n
Discover My Ultimate AI Tools Productivity Kit for 2024*
*indicates a premium content, if any
Reply