- AI Fire
- Posts
- 🎬 Nano Banana Pro Control: One Image to Infinite Camera Angles in Seconds
🎬 Nano Banana Pro Control: One Image to Infinite Camera Angles in Seconds
Tired of inconsistent AI results? Learn how Nano Banana Pro keeps your character perfect in every shot. Turn one image into a pro video library now.
Neil Phan
December 25, 2025
TL;DR
Nano Banana Pro enables character consistency by using a single foundation image as a strict reference for infinite camera angles. This workflow creates professional videos when paired with Veo 3.1 Fast and start-end frame prompting.
Random generation often leads to inconsistent characters. This guide explains how to create a "Foundation Image" that anchors all shots, ensuring the subject remains identical across every angle. You will learn to generate specific cinematic shots using technical camera terminology that the model natively understands. The process concludes by animating these images into smooth videos using specific start and end frames to prevent morphing artifacts.
Key points
Veo 3.1 Fast provides professional video quality at significantly higher speeds than standard models.
Never skip the foundation image step or characters will look different in every subsequent shot.
Use AI assistants to write descriptive transition prompts between your start and end frames.
Critical insight
Video consistency relies on defining the destination image first, forcing the AI to connect two known points rather than guessing the path based on text alone.
🎰 Does generating AI images feel like gambling to you? |
Table of Contents
Have you ever felt like using AI image tools is a bit like gambling? You type in what you want, you press a button, and you just hope the result looks good. Sometimes you win, but most of the time, it feels random. You might get a great character in one picture, but when you try to move the camera or change the shot, the character looks completely different. It is frustrating.
To make real, professional video or storytelling content, you need control. You need to be like a movie director who decides exactly where the camera goes.
In this guide, I will show you how to take full control using Nano Banana Pro. We will stop playing the "slot machine" game. Instead, I will teach you how to take just one single image and turn it into any camera angle you can imagine. Then, we will turn those images into smooth, high-quality videos.
You do not need to be a tech genius to do this. I promise.
Part 1: Why Is Nano Banana Pro Better Than Other Tools For Camera Control?
Nano Banana Pro uses a "Reference Image" workflow rather than random generation, giving you control over the camera. Unlike standard AI that creates a new character every time, this tool understands camera physics and maintains character consistency. It acts like a director's tool, not a slot machine.
Key takeaways
Fact: Most AI tools suffer from "inconsistency," changing details like clothes or faces.
Tool: Nano Banana Pro is powered by Gemini 3 and understands lens physics.
Concept: It uses a "Foundation Image" as a master blueprint for all shots.
Action: Use this tool to move the camera around a character without losing their identity.
To tell a real story, you need a tool that listens to "lens" commands, not just "content" descriptions.
You might be asking, "Why do I need to learn a specific tool like Nano Banana Pro? Can't I just use any image generator?"
Here is the thing about most AI tools: they are stubborn. If you ask for a "wide shot" of a character you created previously, the AI usually generates a new character who sort of looks similar, but not really. Maybe the nose is different, or the clothes change color. This is called "inconsistency," and it creates the "AI slop" look that everyone hates.
Nano Banana Pro (which is powered by Gemini 3) is different because it understands the language of cameras. It knows what a "lens" is. It understands physics better than older models.
This deep understanding of light and texture is also the secret to escaping that waxy, artificial skin effect. If you're tired of that look, you need to see how to finally create AI photos that don't look fake before mastering these camera angles.
The Problem With Random Generation
When I first started, I would generate 100 images just to get 2 that looked like the same person. It was a waste of time. When you watch a movie, the main actor does not change their face in every scene, right? That is the level of consistency we need.
The Solution: The Reference Workflow
This tool allows us to use a "Reference Image." Think of this as your master blueprint. By feeding the tool one perfect image and telling it, "Keep this character, but move the camera to the left," it actually listens.
Here is what you will need to follow along with me:
Nano Banana Pro (Access via Google AI Studio)
Veo 3.1 Fast (For the video part later)
An AI text assistant like Claude or ChatGPT (To help write descriptions)
Learn How to Make AI Work For You!
Transform your AI skills with the AI Fire Academy Premium Plan - FREE for 14 days! Gain instant access to 500+ AI workflows, advanced tutorials, exclusive case studies and unbeatable discounts. No risks, cancel anytime.
Part 2: How Do You Create A Perfect Foundation Image In Nano Banana Pro?
A Foundation Image is the master blueprint that defines your character's look, lighting, and mood for the entire project. You must create this single perfect image first using a highly specific prompt that details the subject, environment, and camera settings. This image serves as the "North Star" reference for every subsequent angle you generate.
Key takeaways
Detail: Describe the "distance" (e.g., Medium shot) and specific textures (e.g., rain, neon).
Mistake: Rushing this step leads to inconsistent results later.
Metaphor: This image is the parent; all other shots are its children.
Action: Save this file immediately; never lose your source reference.
Everything starts with step one. This is the most critical part of the entire process. If you rush this, everything else will fail. We need to create a "Foundation Image."
A Foundation Image is the parent of all your future images. It defines who your character is, what they are wearing, the lighting, and the mood.
Creating The Character
I don't want to use a boring example. Let's create something visually interesting so you can see how the details hold up. Let's make a "Cyberpunk Street Food Chef" in a rainy Neo-Tokyo setting. This allows us to test complex lighting (neon lights) and textures (rain, steam).
The Prompt Strategy:
You need to be very specific. Do not just say "Cyberpunk chef." You need to describe the distance and the details.
Here is the prompt I used in Nano Banana Pro:
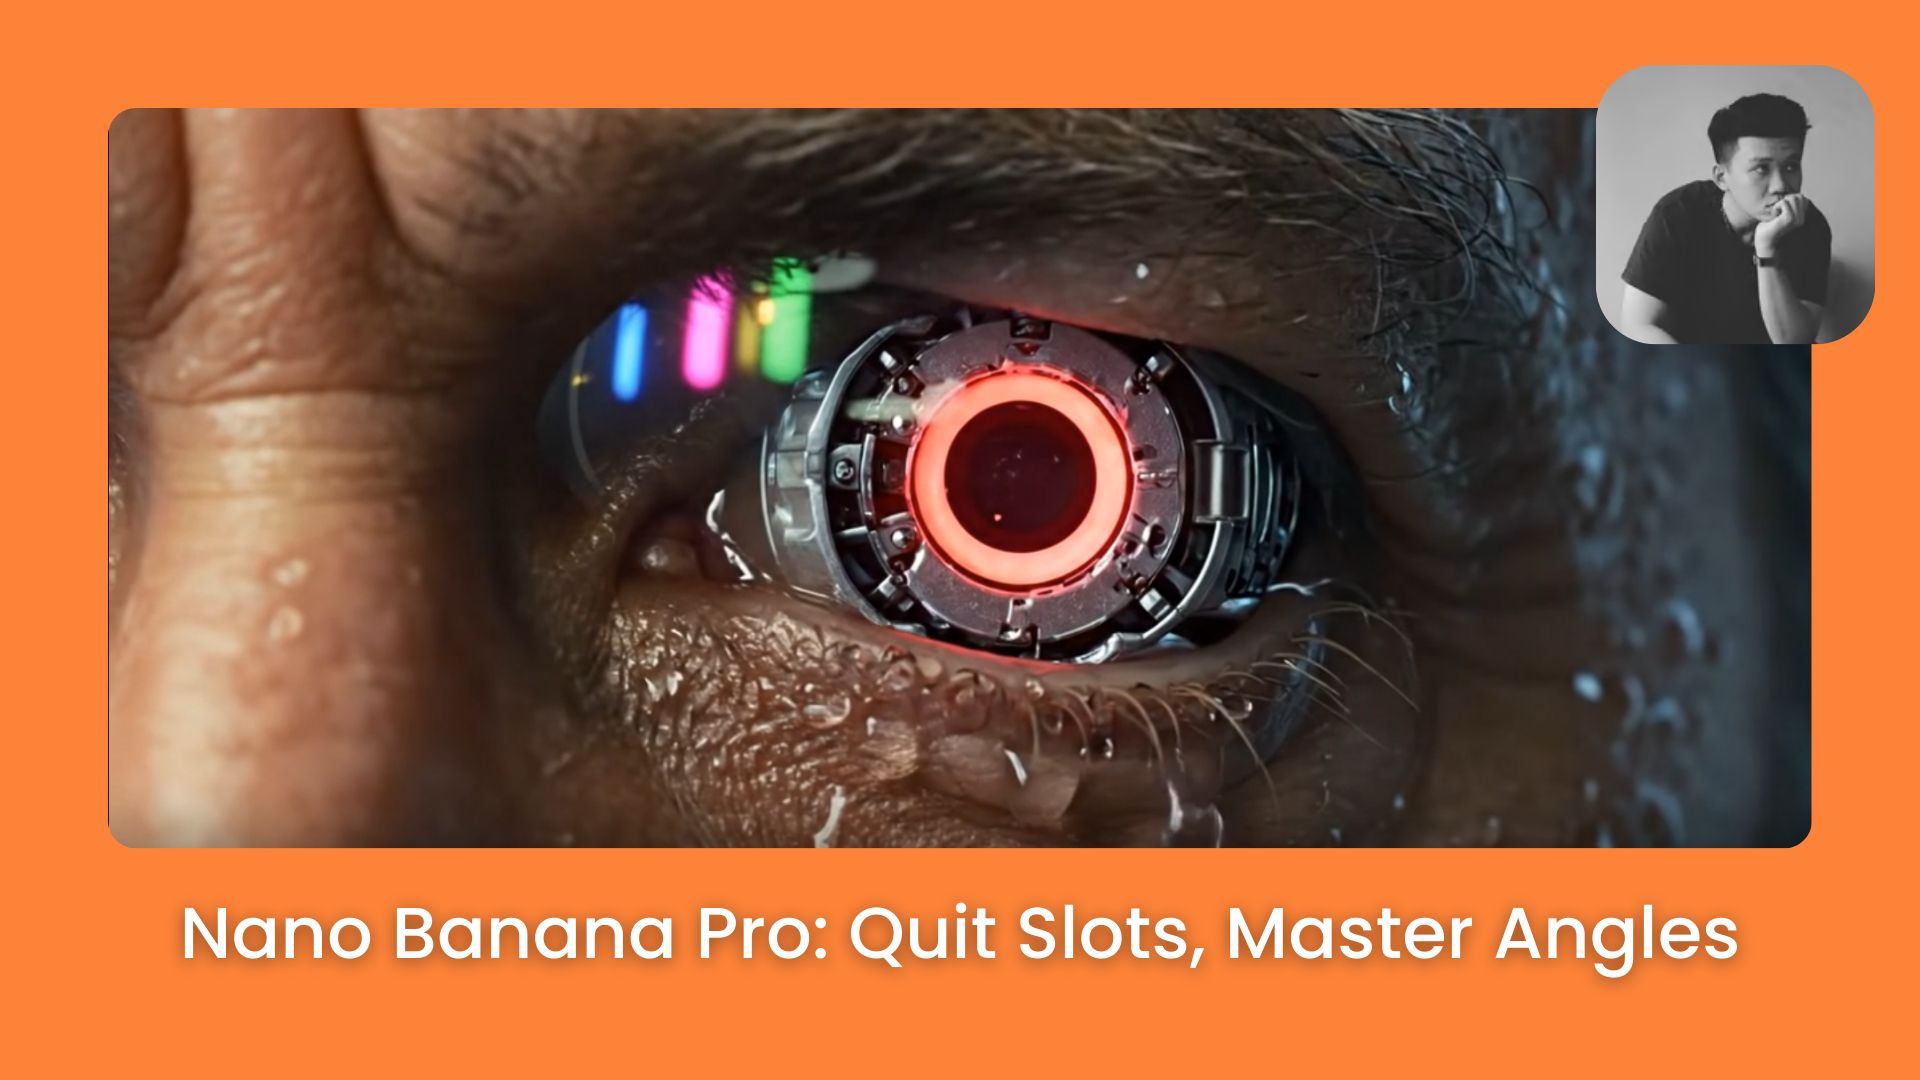
"Medium shot, eye-level portrait of an old Japanese street food chef. He has a gray beard, a robotic cybernetic left eye with a red lens, and is wearing a stained white apron over a dark tech-wear shirt. He is standing in a small, steam-filled ramen stall. Background is a rainy street in Neo-Tokyo with pink and blue neon signs blurred in the distance (bokeh). Cinematic lighting, photorealistic, 8k, water droplets on his skin."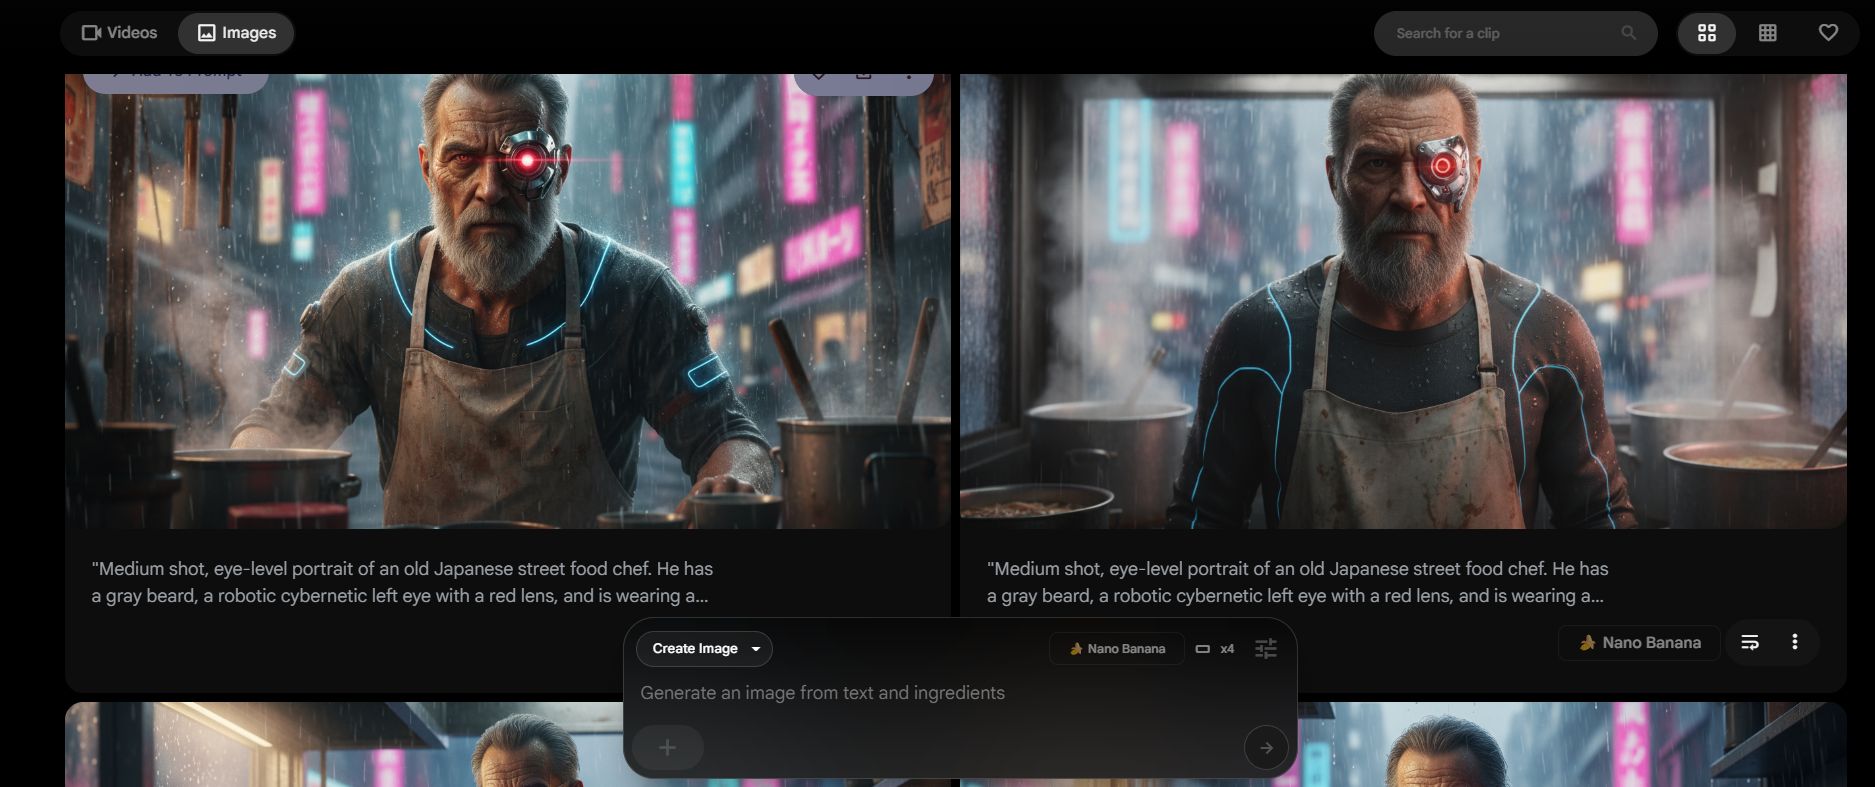
Why this prompt works
Subject: Defined clearly (old man, robotic eye, apron).
Environment: Defined clearly (ramen stall, rainy, neon).
Camera: Defined clearly (Medium shot, eye-level).
Once you generate an image you love, save it. Do not lose it. This file is your "North Star." Every time we make a new angle, we will show this image to the AI and say, "Look at this guy. Draw him again, but from a different spot."
Part 3: What Camera Angles Can You Create With Nano Banana Pro?
Now comes the fun part. We are going to become cinematographers. We will take our Cyberpunk Chef and move the camera around him without losing his identity.
In Nano Banana Pro, you will upload your Foundation Image into the "Image Prompt" or "Reference" section. Then, you will change the text prompt to describe the new angle.
Here is a list of the essential angles you need to know, and the exact prompts I use to get them.
1. The Extreme Wide Shot (Establishing The Scene)
This shot tells the audience where we are. It makes the character look small and the world look big.
The Prompt:
"Extreme wide shot, long shot. The Cyberpunk Chef is visible as a small figure in his lit-up stall in the center. Surrounded by towering dark skyscrapers and heavy rain. Wet pavement reflects the neon lights. Dystopian atmosphere."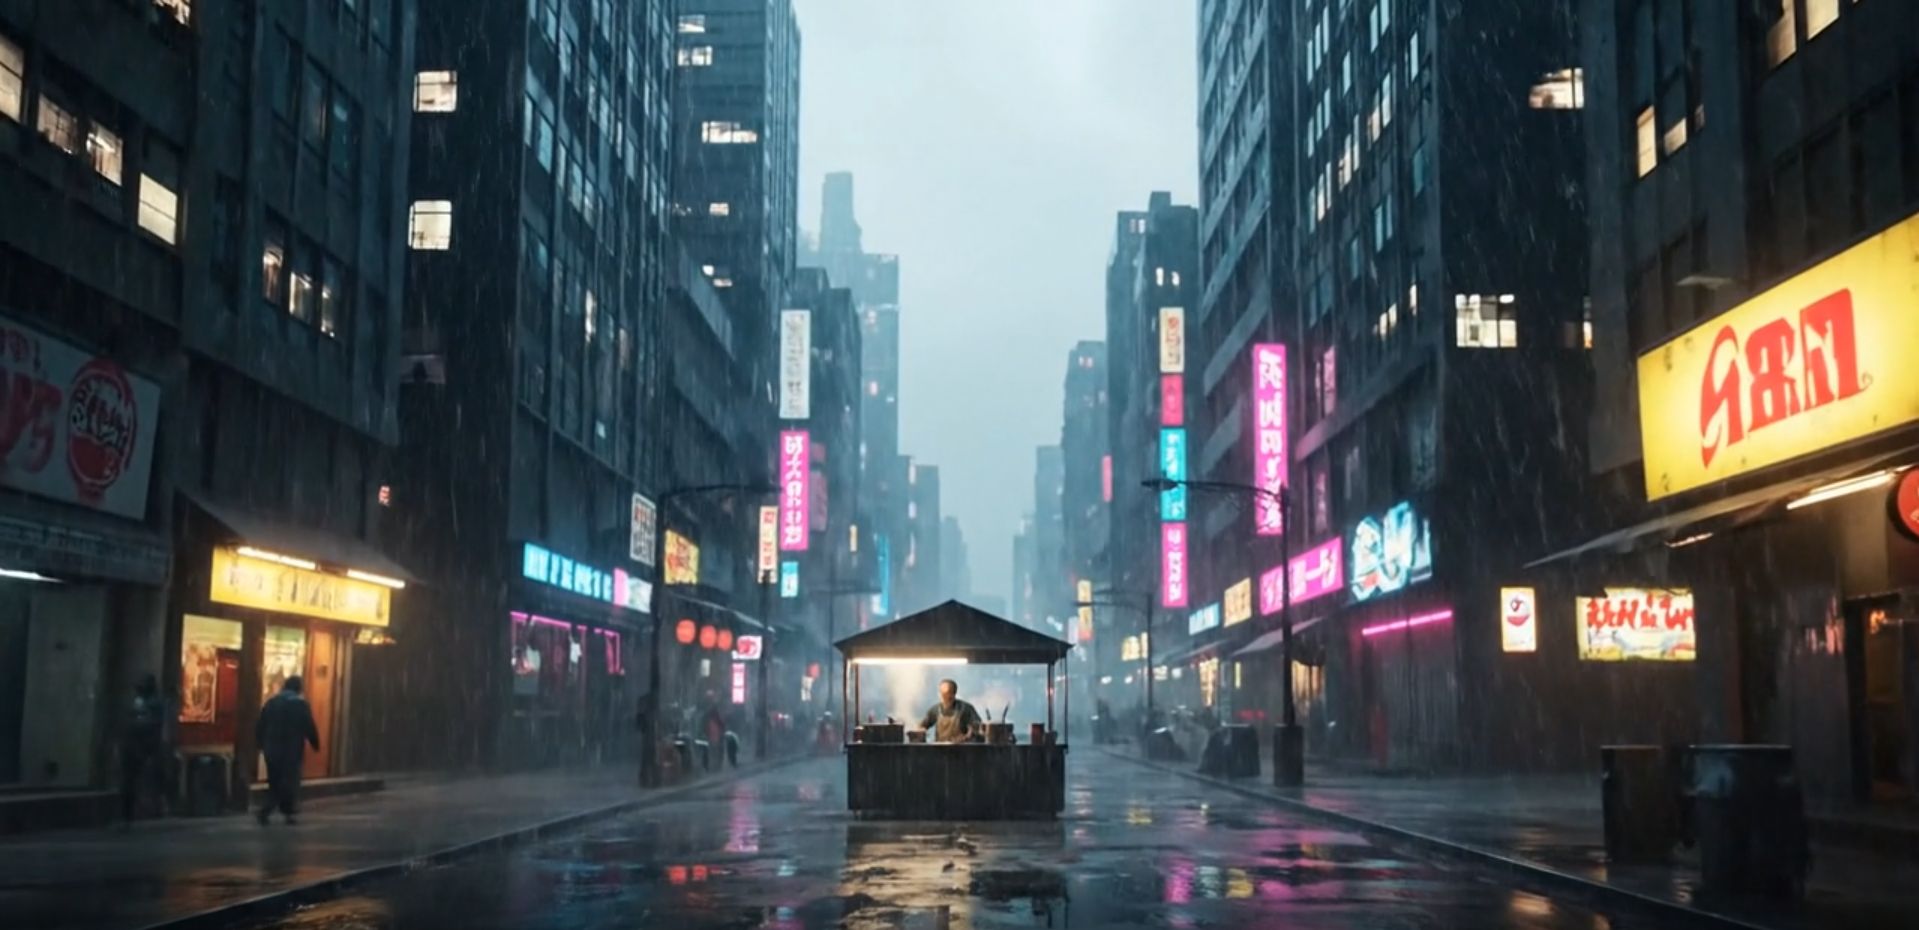
I use this at the very beginning of a video. It sets the mood before we meet the character up close.
2. The Low Angle (Power And Heroism)
When you put the camera low and look up at someone, they look powerful, important, or intimidating.
The Prompt:
"Low angle shot, looking up at the Cyberpunk Chef from the counter level. He looks looming and masterful as he holds a ladle. The ceiling of the stall and the rainy sky are visible above him. Dramatic perspective."
My experience:
When I tried this, Nano Banana Pro kept the robotic eye on the correct side (the left eye). This is usually where other AIs fail.
3. The High Angle (Vulnerability Or Information)
This is looking down on the subject. It can show what they are doing with their hands.
The Prompt:
"High angle shot, looking down at the Chef's hands preparing noodles. We see the top of his head and the steaming bowls of broth on the counter. The wet street is visible in the background."
4. The Dutch Angle (Tension And Unease)
This is a classic movie trick. You tilt the camera to the side so the horizon line is not straight. It makes the viewer feel like something exciting or dangerous is about to happen.
The Prompt:
"Dutch angle, canted angle shot. The camera is tilted 30 degrees. The Chef looks intense, looking off-screen to the right. Dynamic energy, heavy rain falling diagonally across the frame."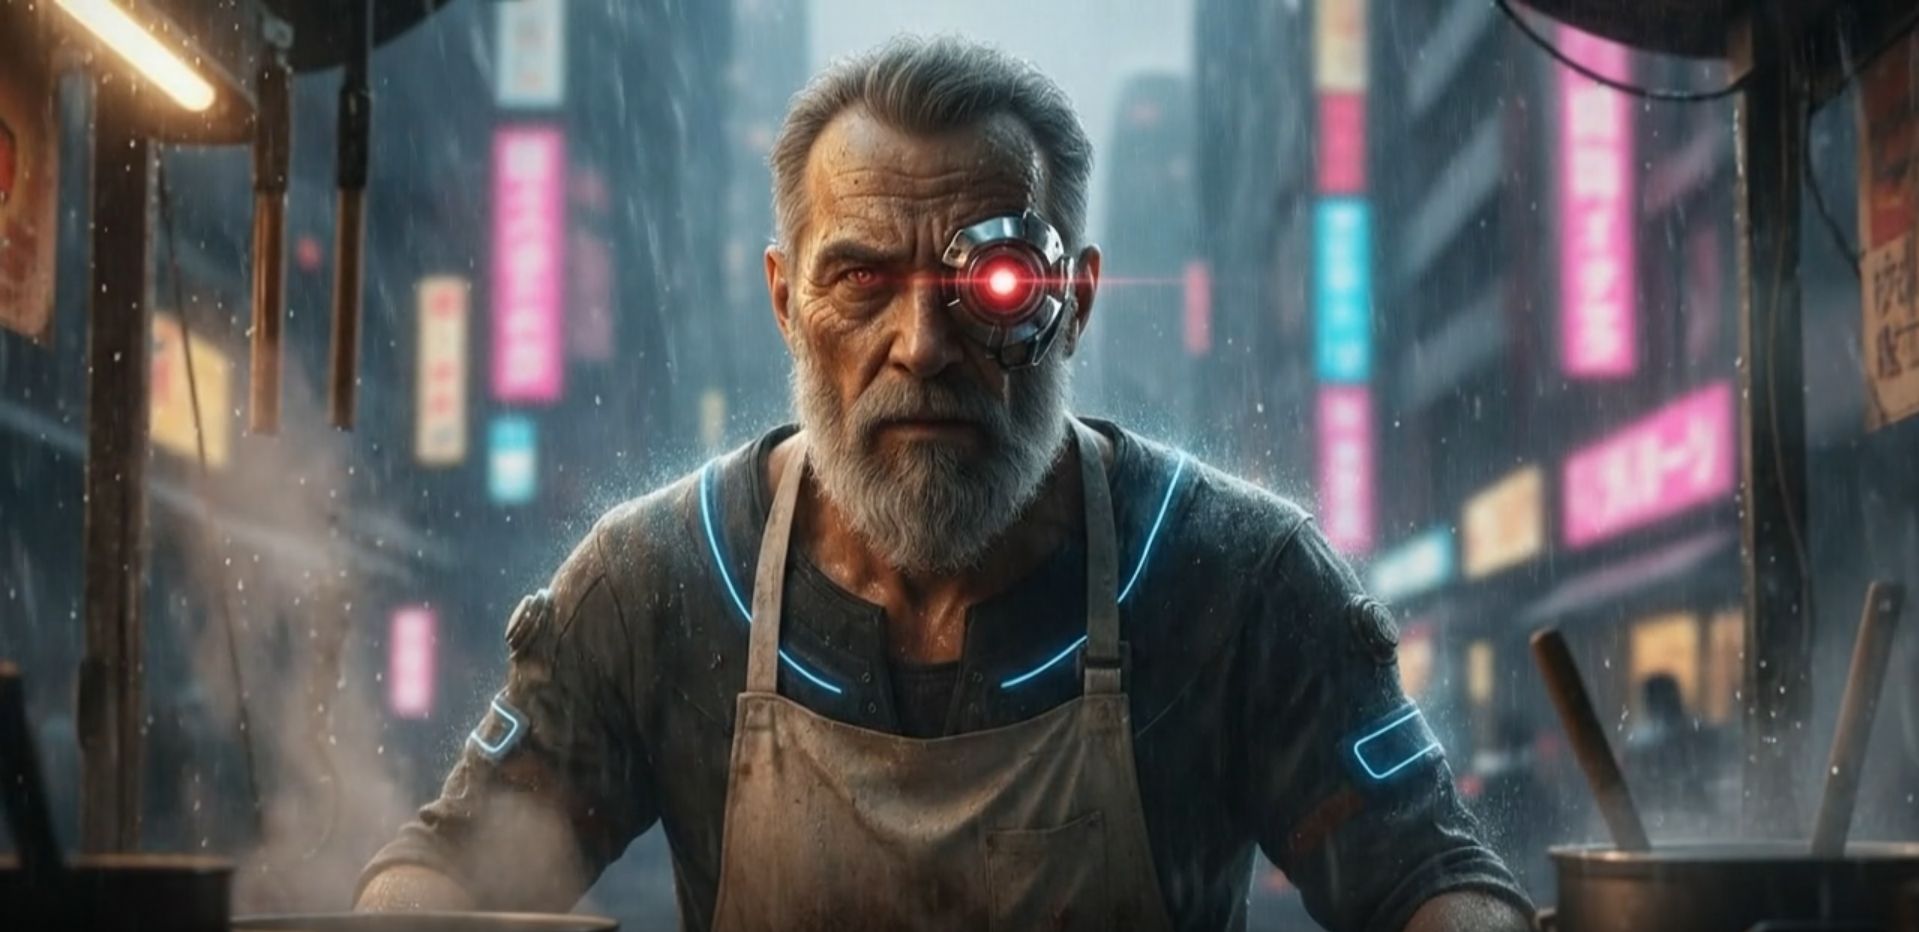
Note: The AI understands the term "Dutch Angle" perfectly. You don't need to explain "tilt the camera."
5. The Over-The-Shoulder (Connection)
This is vital for storytelling. It shows what the character is looking at, or shows someone talking to the character.
The Prompt:
"Over-the-shoulder shot from behind a customer. The back of a customer's jacket is blurry in the foreground. In focus, the Cyberpunk Chef is handing a bowl of ramen forward. He is making eye contact with the camera."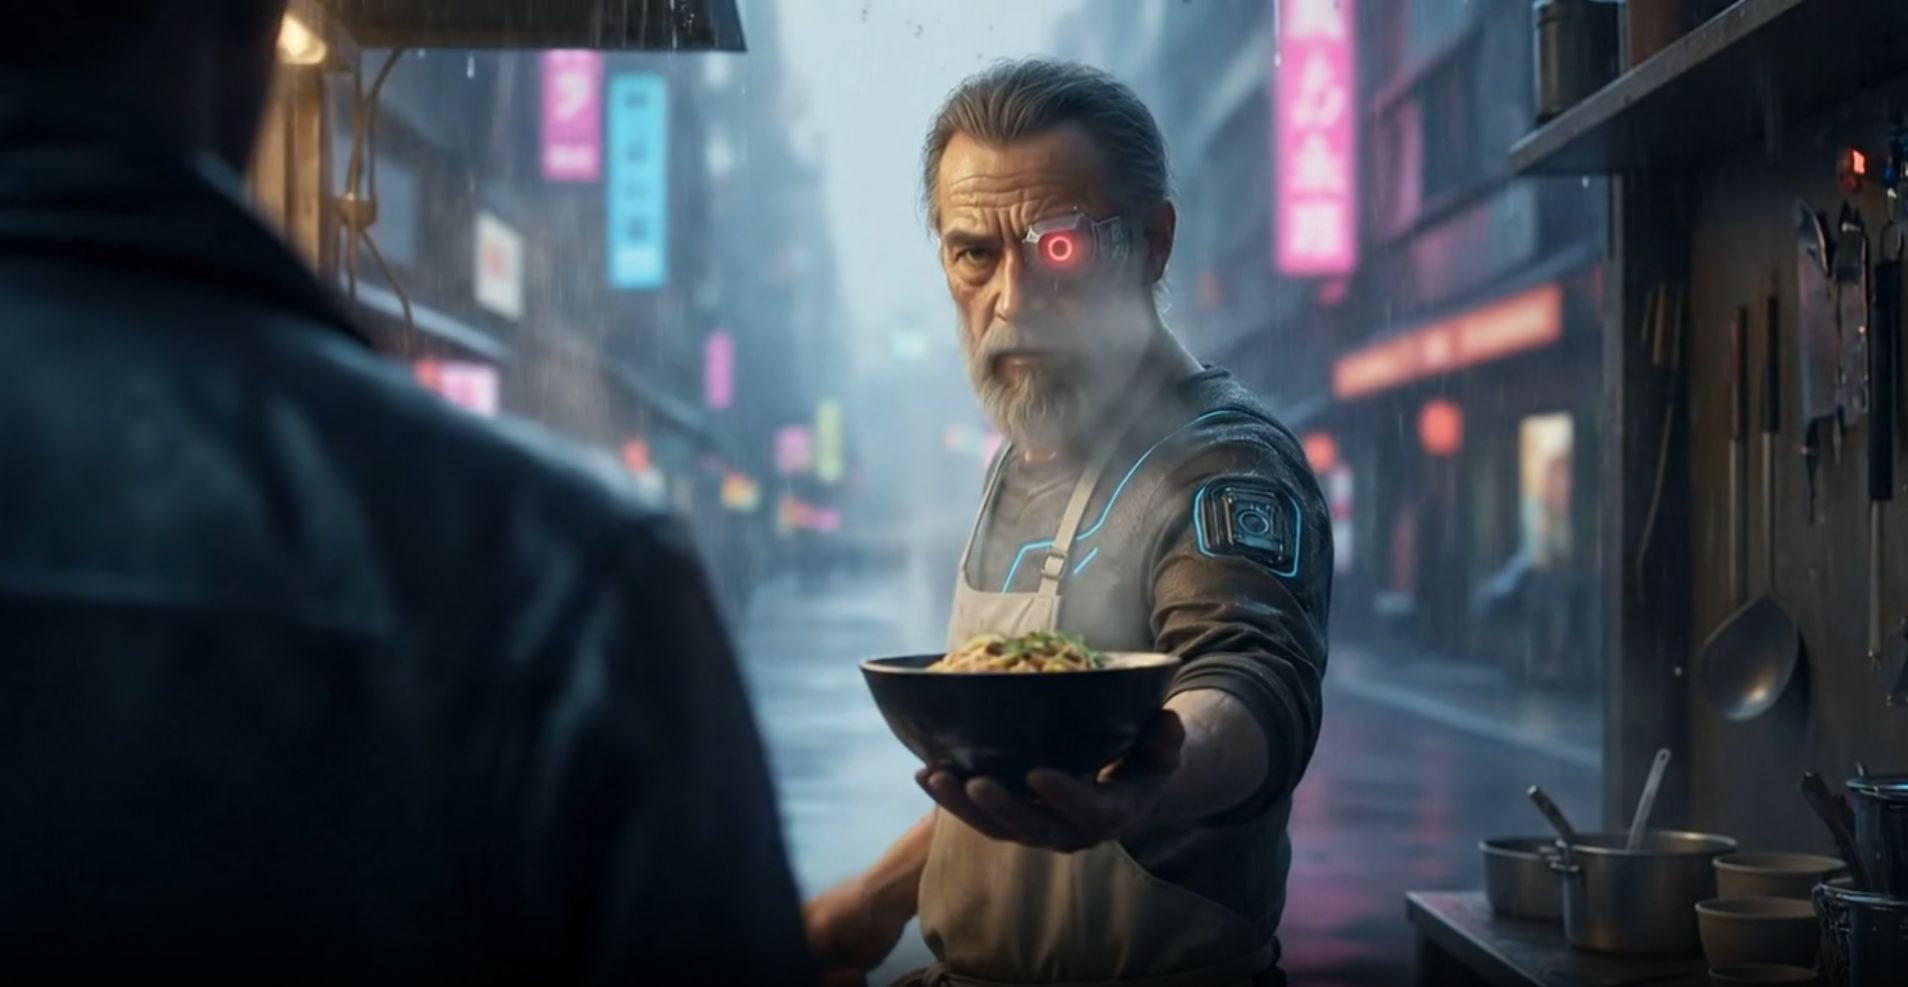
6. The Macro Shot (Intimate Details)
This brings the viewer incredibly close. It creates intimacy.
The Prompt:
"Extreme close-up, Macro shot of the Chef's cybernetic eye. We can see the mechanical details of the lens and the reflection of neon lights in the glass. Water droplets clinging to his skin. Shallow depth of field."
Building Your Library
Do not just make one and stop. I recommend you sit down for an hour and generate 10 to 15 different angles of your character. Save them all in a folder. This is your "footage." Now you are ready to edit.
Part 4: How Do You Turn Nano Banana Pro Images Into Video?
You have a folder full of beautiful images. But they are still just pictures. How do we make them move?
This is where we switch tools to Veo 3.1 Fast. There are other video generators, but I prefer Veo right now because it is fast (as the name says) and very good at understanding physics.
There are two ways to animate your images.
Method A: The Simple "Start Frame" (Pushing The Sled)
In this method, you give Veo just one image (your Start Frame) and a text prompt. You are basically giving it a push and letting the AI guess where it goes.
When to use this:
Simple movements (Zooming in, panning left).
Atmospheric shots (Rain falling, steam rising).
Example for our Chef:
I uploaded the "High Angle" of the chef.
Prompt:
"The chef nods slowly and blinks. Steam rises from the pot. Rain falls in the background. Subtle movement."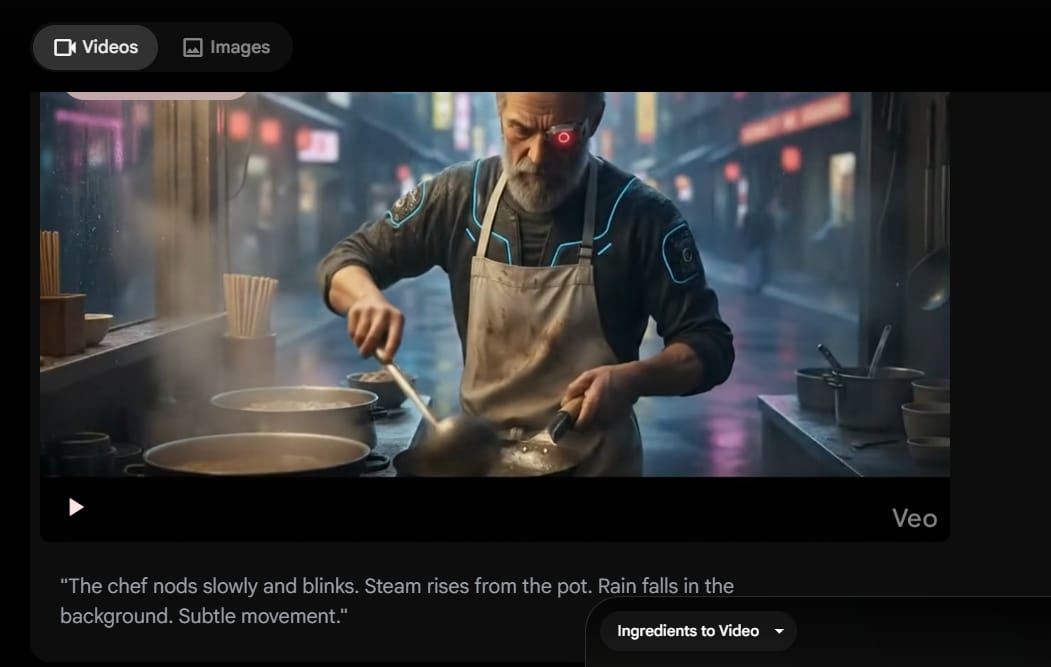
This works great because the AI doesn't need to invent a new location. It just animates what is already there.
Method B: The "Start and End Frame" (Laying the Train Track)
This is the secret sauce. This is how you get professional control.
If you just use a start frame and say "Chef walks away," the AI might make him morph into a car or walk through a wall. It doesn't know where he is going.
But, if you give Veo a Start Frame (Chef standing) and an End Frame (Chef walking into the distance - which you created in Nano Banana Pro earlier), the AI has to connect the dots. It acts like a train on a track. It has no choice but to go from Image A to Image B.
When to use this:
Complex actions.
Big camera moves.
Changing focus (Rack Focus).
Part 5: How Does Nano Banana Pro Help With Video Transitions?
One of the hardest things to do is describing movement in words. Sometimes I stare at the screen and don't know what to type to get the video I want.
Here is a trick I use that saves me hours. I use an AI assistant like Claude or ChatGPT to write the video prompts for me.
Mastering this kind of delegation is exactly what gives you an edge; if you want to push this further, you should grab these 10 GPT-5.2 mega prompts to outsmart other users and fix weak contexts instantly.
The Workflow
Take your two images: The Start Frame (e.g., The Macro shot of the robotic eye) and the End Frame (e.g., The Medium shot of the chef face).
Upload them to ChatGPT/Claude.
Ask this question:
"I am using an image-to-video AI generator. I have uploaded a Start Frame and an End Frame. Please write a concise, descriptive text prompt that explains the camera movement needed to transition smoothly from the first image to the second image."The Result:
The AI might give you something like:

Copy that text. Paste it into Veo.
The "Rack Focus" Trick
This is a very professional cinematic technique where the focus shifts.
Image A (Nano Banana Pro): Chef is sharp, background is blurry.
Image B (Nano Banana Pro): Chef is blurry, a neon sign behind him is sharp.
Video Prompt: "Rack focus from the foreground character to the background neon sign."
By generating both states in Nano Banana Pro first, you guarantee the lighting doesn't change weirdly during the video.
Part 6: What Mistakes Should You Avoid With Nano Banana Pro?
Even with these tools, things can go wrong. Here are the mistakes I made so you don't have to.
Mistake 1: Forgetting the Foundation
I once tried to generate a "running shot" without using my Foundation Image as a reference. The chef suddenly had a beard that was black instead of gray.
The Fix: Always, always keep your Foundation Image in the reference slot. It is the anchor.
Mistake 2: Being Lazy With Prompts
If you just type "different angle," Nano Banana Pro will be confused.
The Fix: Learn the terms I listed in Part 3. Use "Low Angle," "Wide Shot," "Bokeh," "Depth of Field." The AI is smart; speak to it like a professional.
Mistake 3: The "Morphing" Hands
Hands are still hard for AI. If you do a video where the chef is chopping vegetables, his fingers might turn into carrots.
The Fix: Use the "Start and End Frame" method. Generate a perfect image of his hands before the chop, and a perfect image after the chop. Let Veo connect them. It reduces the weird morphing.
Mistake 4: Ignoring Lighting Consistency
If your wide shot is during the day, but your close-up looks like night, the video will look like a mistake.
The Fix: In your prompts, always repeat the lighting keywords. For our example, I always included "Neon lights, rainy night, blue and pink hues" in every single prompt.
Conclusion
We used to look at AI video and think, "Wow, that's cool, but it looks like a weird dream." That era is ending. With tools like Nano Banana Pro and the workflow I just showed you, we are entering the era of "AI Directing."
Let's recap what you need to do:
Create a Foundation Image: Spend time getting this perfect.
Build a Shot Library: Use Nano Banana Pro to generate 10+ angles (Wide, Low, Dutch, Macro) based on that foundation.
Animate with Purpose: Use Veo 3.1 Fast. Use "Start + End Frames" for complex moves to keep control.
Use AI to Write Prompts: Let ChatGPT describe the movement for you.
This process takes a little more effort than just pressing one button. But the result is not just a random clip - it is a story. It is your story, exactly how you imagined it.
Next Step for You:
Open Nano Banana Pro right now. Don't try to make a whole movie yet. Just try to make one character, and generate three consistent angles (Wide, Medium, Close-up). Once you do that, you will feel the power of control.
Go create something amazing.
If you are interested in other topics and how AI is transforming different aspects of our lives or even in making money using AI with more detailed, step-by-step guidance, you can find our other articles here:
Building Apps with Bolt: A No-Code Guide to Turning Ideas into Reality
Detailed Guide: How To Automatically Get Unlimited High-Quality LinkedIn Jobs*
Prompt Engineering Automation: Build a Mini AI Assistant with n8n
Discover My Ultimate AI Tools Productivity Kit for 2024*
*indicates a premium content, if any
How useful was this AI tool article for you? 💻Let us know how this article on AI tools helped with your work or learning. Your feedback helps us improve! |
Reply