- AI Fire
- Posts
- 🤖 Stop Using Zapier! Build A REAL Intelligence Agent Instead
🤖 Stop Using Zapier! Build A REAL Intelligence Agent Instead
Our n8n guide to building a system that summarizes news with AI, monitors your servers, and acts as your personal command center
Max Anh
July 24, 2025

⚡ If You Could Supercharge Your Automations, What's Your #1 Power-Up?The article positions n8n as a "pro-level" tool. If you could add one of its advanced features to your current toolkit, which would you choose first? |
Table of Contents
Stop Using Zapier! Here's Why n8n Will Change Your Automation Game Forever
There’s a specific kind of modern anxiety that comes from being a tech enthusiast. It's the feeling of drowning in an endless digital tide. You’ve got a dozen tabs open - Hacker News, Bleeping Computer, a handful of tech subreddits and the five YouTube channels you have to watch to stay current. It’s a full-time job just to keep up - and that’s before you even get to the Herculean task of managing your own home lab or personal projects.
It’s exhausting.
Enter n8n (pronounced "n-eight-n" - and yes, the name is a nerdy pun). This is the open-source automation beast that is poised to change your entire workflow and possibly your life. If Zapier and its peers are the friendly, approachable family sedans of the automation world, then n8n is a custom-built, street-legal F1 car. It’s sleeker, smarter and has a monstrously powerful engine under the hood, perfect for building a true intelligence agent. It also happens to be free and respects your privacy.
A fair warning before we begin: n8n is addictive. You will start with the noble goal of building a simple news digest and, before you know it, you’ll be down a rabbit hole, creating AI agents that can troubleshoot your home servers and order replacement parts before you even know there's an issue. Don't say you weren't warned.
Today's Mission: What This Guide Will Build
This isn't just a basic "hello world" tutorial. We are going to construct a multi-layered, intelligent system from the ground up, combining several powerful concepts into one masterclass of automation:
A smart news aggregator that uses AI to summarize articles.
An automated YouTube channel monitor that filters videos so you only see what's new.
Instant, customized Discord notifications for everything.
Powerful command-line integrations (because we’re not here to play games).
A thinking AI agent that can use the very tools we build.

Let's begin.
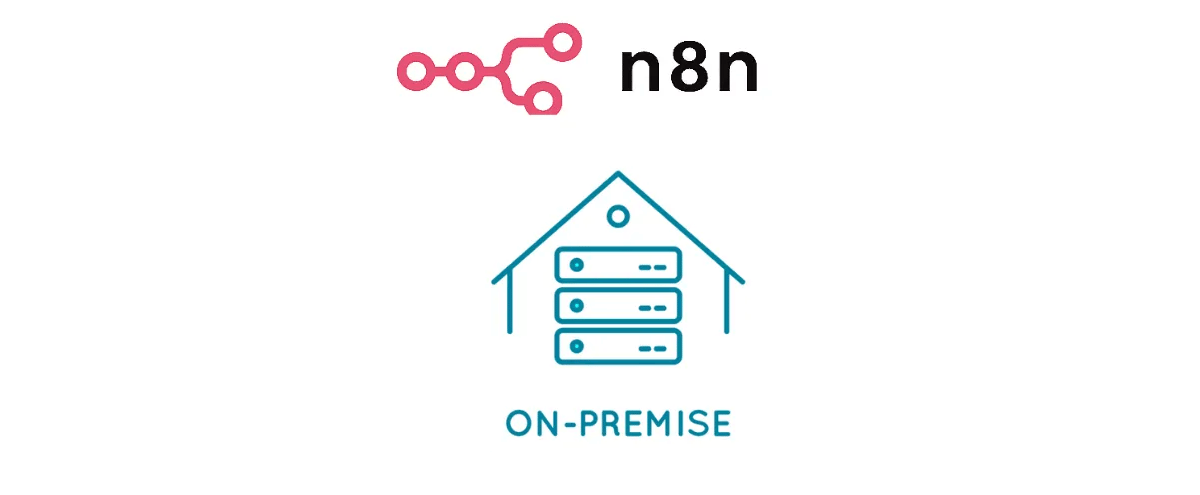
Getting Started: The Great Cloud vs. On-Prem Debate
Your first decision is a classic fork in the road for any tech project: where will this powerful new tool live? You have two main paths, each with its own distinct advantages.
The Cloud Path (Recommended for Beginners) ☁️
This is the express lane. Using a cloud provider like Hostinger or DigitalOcean to host your n8n instance is the fastest way to get from zero to automating. You don’t have to worry about managing servers, configuring networks or dealing with operating system updates. It's the perfect choice for getting your first workflow up and running in the time it takes to brew a pot of coffee.
Pros: Incredibly fast setup, far less complexity and better connectivity out of the box.

The On-Prem Path (For the Home Lab Warriors) 🏠
This is the path for the tinkerers, the builders, the people who love having complete control. Running n8n on your own hardware - whether it’s a powerful server in your rack or a humble single-board computer - gives you absolute control over your data and your automations. It’s a more complex and challenging road but for those who enjoy flexing their home lab muscles, it’s also far more rewarding.
Pros: Full control over your environment, maximum data privacy and the satisfaction of running it on your own gear.
Quick Cloud Setup: The 5-Minute Launch Sequence
For this guide, we'll assume the cloud path for its simplicity. Getting started with a provider that has a pre-built n8n image is shockingly easy. The process is less about technical skill and more about following a simple checklist.
Here’s the typical launch sequence:
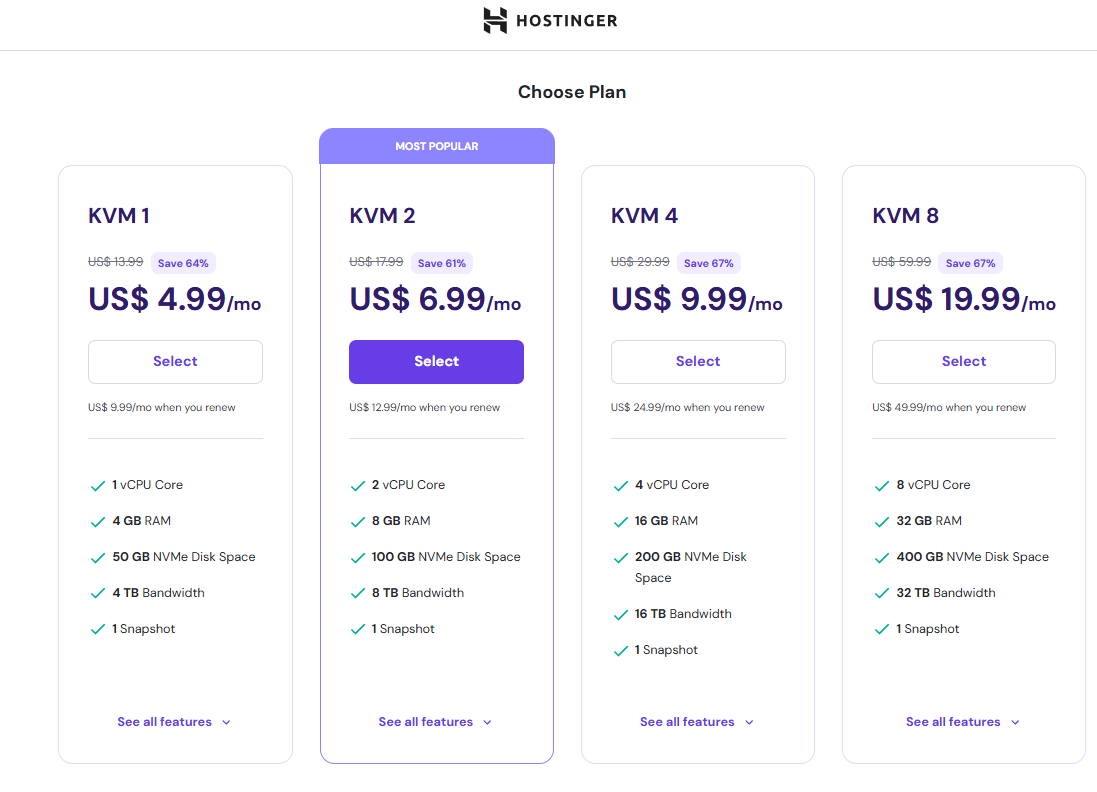
Sign Up: Start by creating an account with a cloud provider that offers a pre-configured n8n option, like Hostinger.
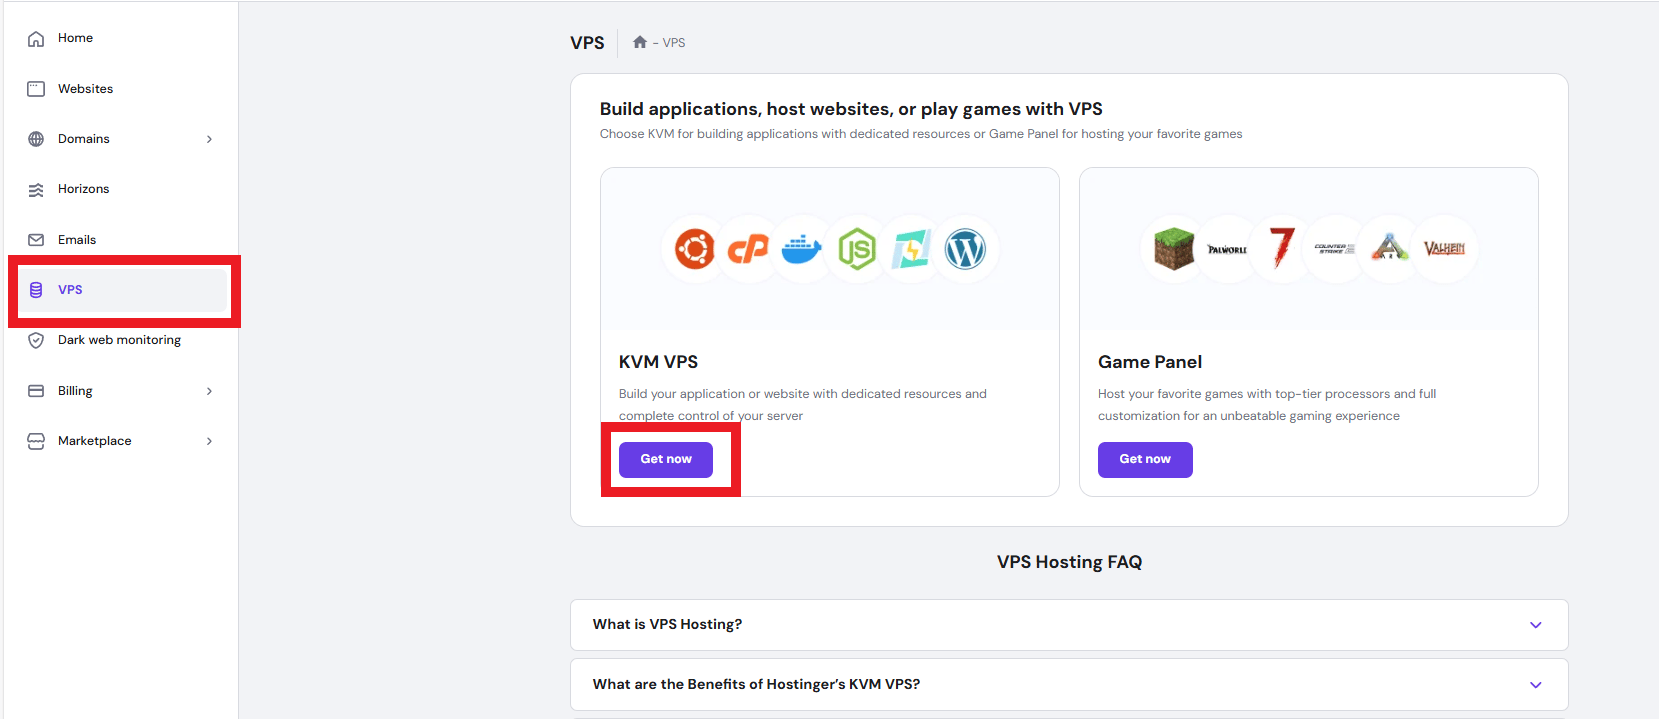
Choose the Right Plan: Look for their VPS (Virtual Private Server) options and select the one that explicitly mentions "n8n". This means they’ve done all the hard work of installing and configuring it for you. A solid plan with 2 CPU cores and 4GB of RAM is a great starting point.

Deploy and Wait: After you've paid, the provider will automatically spin up your server and install n8n. This usually takes a few minutes.
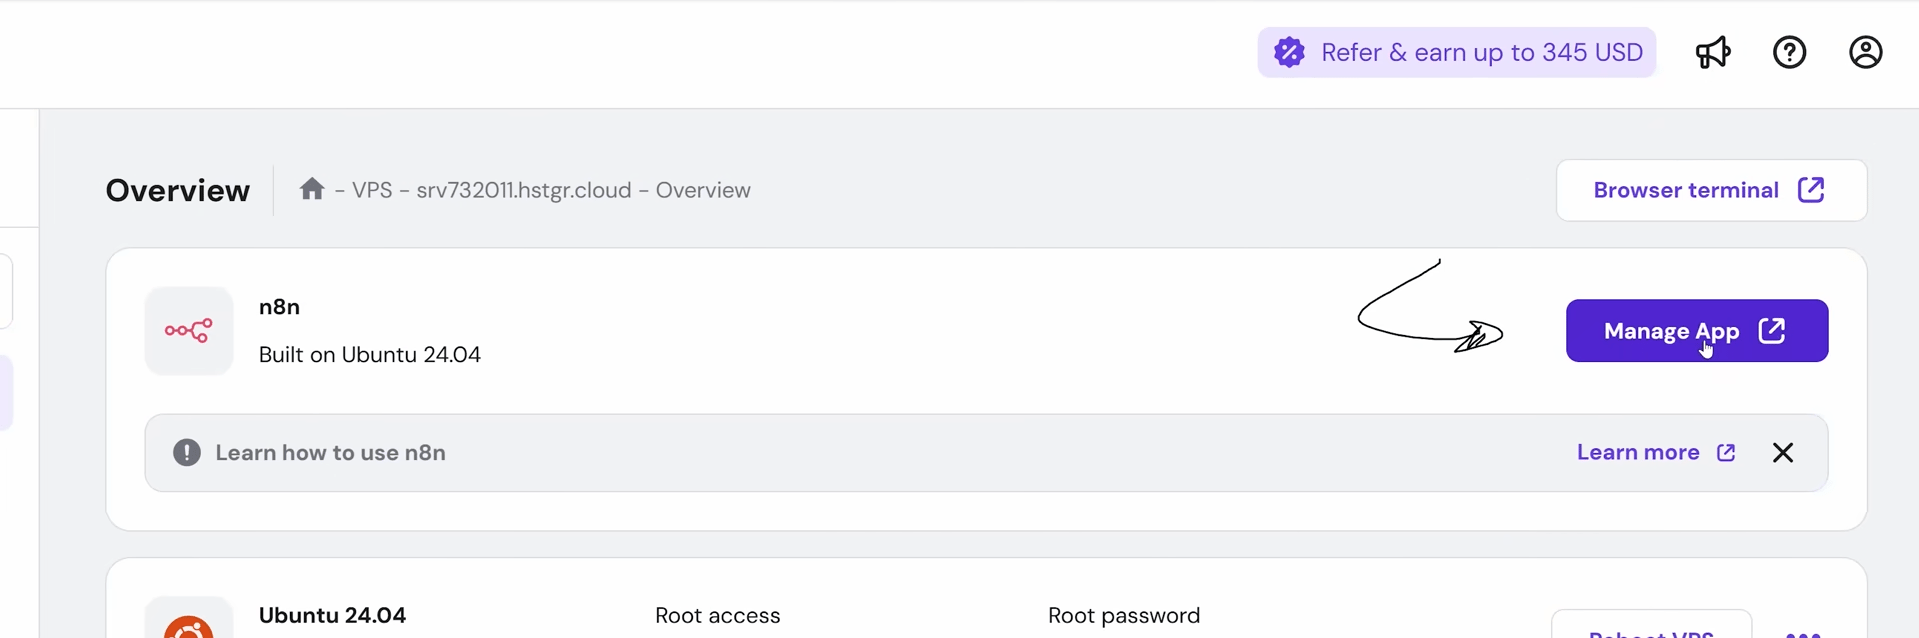
Manage Your App: Once it's ready, you'll see a button in your server console that says something like "Manage App" or "Login to n8n". Click it.
Create Your Account: This will take you to your very own n8n instance. The first thing you’ll do is create your free n8n admin account.
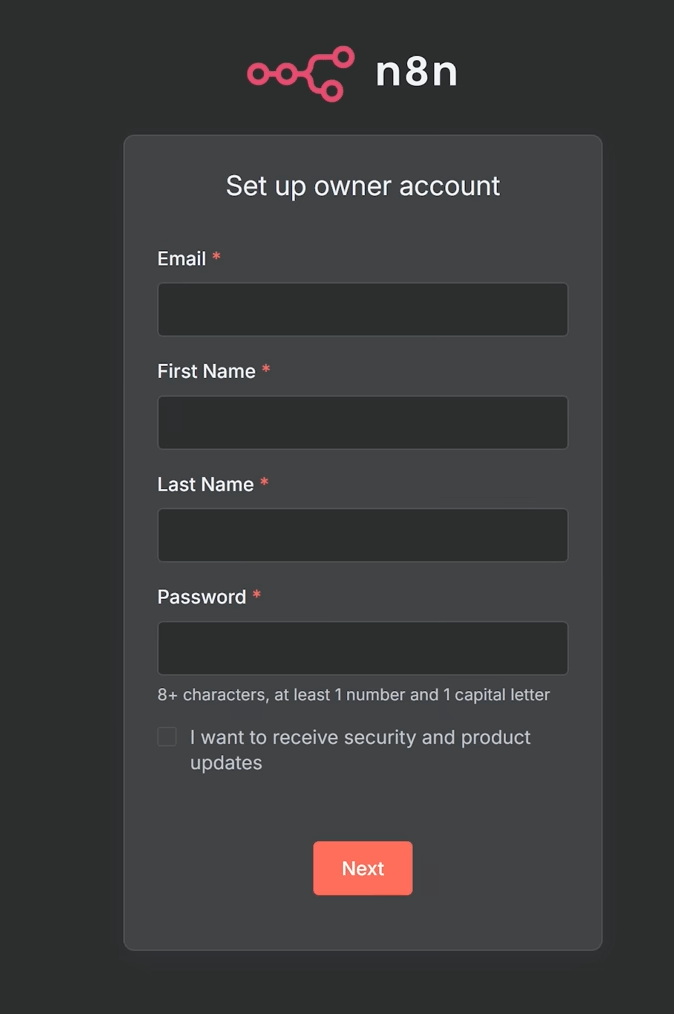
Set Up Your Admin Account: This will take you to your new n8n instance. The first and most important step is to create your main admin account to secure the instance. For some paid n8n plans, you may also need to enter a license key but the free, open-source version is ready to use immediately after setup.
And just like that, you're in. You are now the proud owner of a powerful automation engine, with a blank canvas ready for your first masterpiece. It’s time to automate everything.
Learn How to Make AI Work For You!
Transform your AI skills with the AI Fire Academy Premium Plan - FREE for 14 days! Gain instant access to 500+ AI workflows, advanced tutorials, exclusive case studies and unbeatable discounts. No risks, cancel anytime.
Your First Workflow: The AI News Aggregation Machine
Let's build something immediately useful. We’re going to create a personal intelligence agent that scours the web for news, uses AI to figure out what's important and delivers a customized briefing directly to you.
Understanding the n8n Philosophy
Think of an n8n workflow as a digital Rube Goldberg machine but one that actually works. Data enters at one end, flows through a series of "nodes" that each perform a specific task and emerges at the other end as something new and valuable.
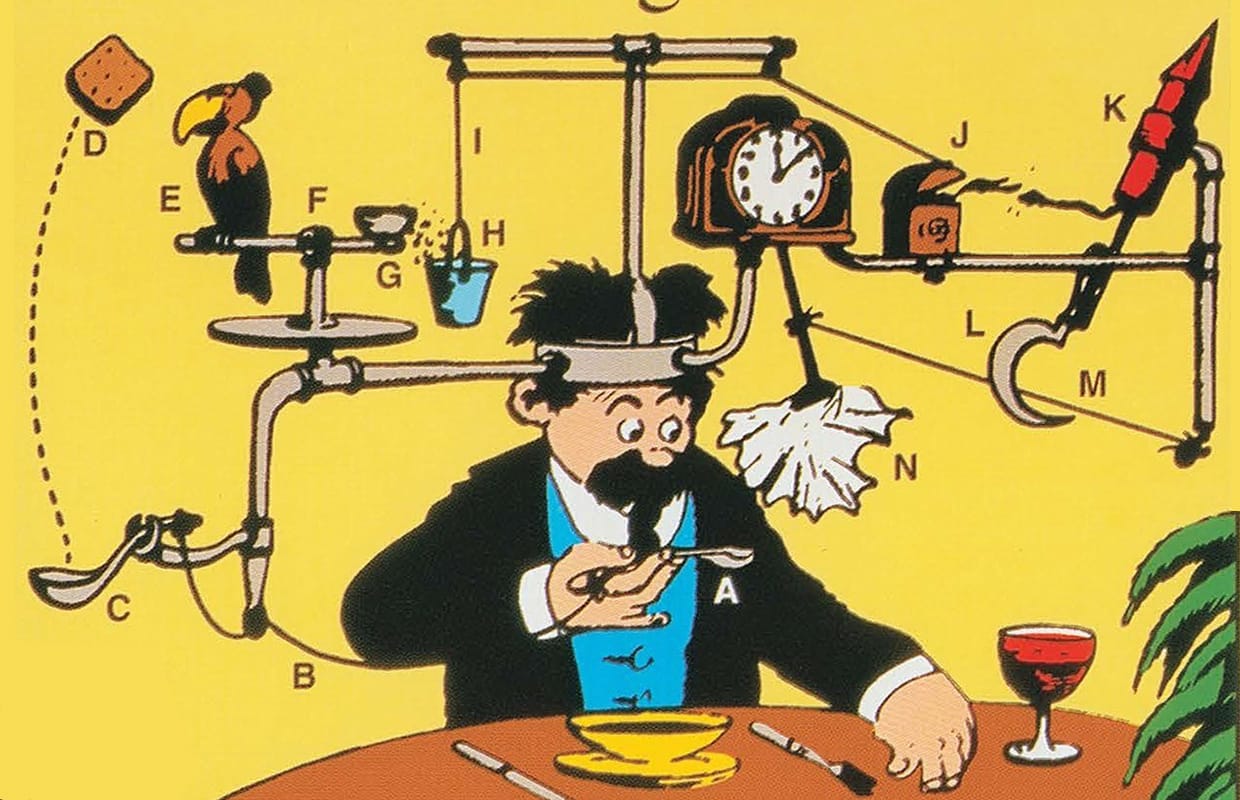
Rube Goldberg machine
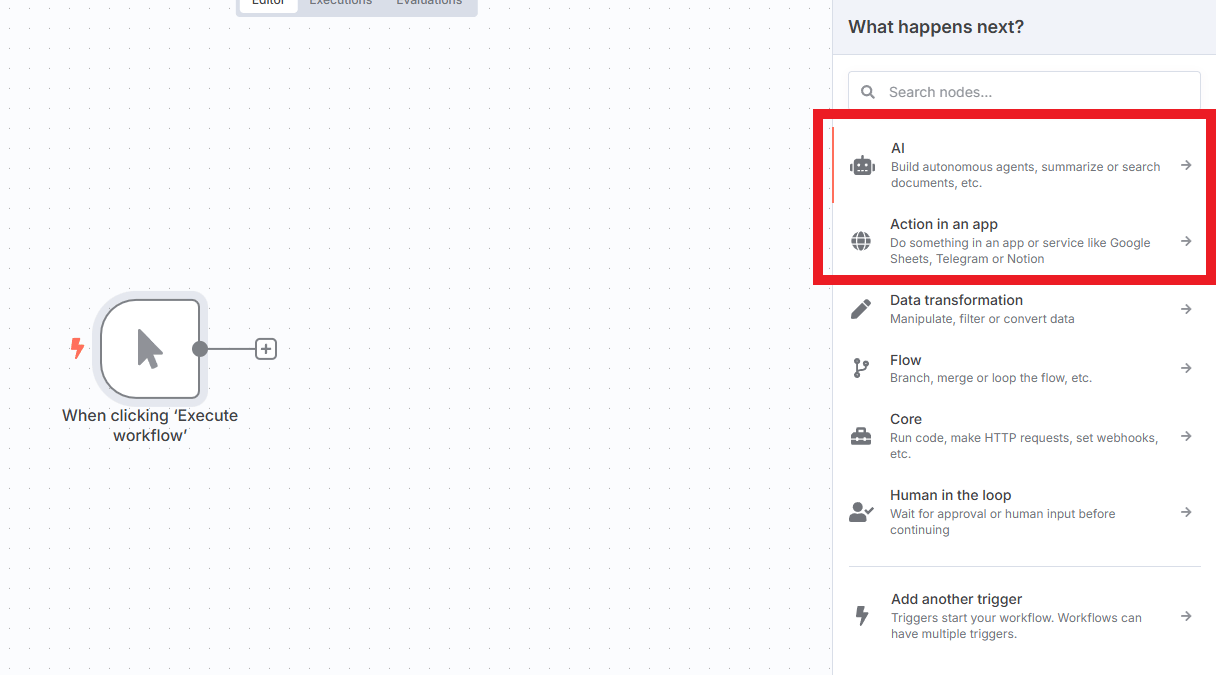
Triggers: These are the "on" switches for your intelligence agent. A workflow can be started by a manual click, a set schedule (like every morning at 7 AM) or a webhook that listens for an external signal.
Data Nodes: These are your gatherers. They reach out into the world and fetch information from RSS feeds, APIs, databases or websites.
Logic Nodes: These are the brain of your intelligence agent. They can filter, sort, merge and transform the data according to your rules.
Action Nodes: These nodes do something. They send an email, post a message to Discord, add a task to your to-do list or even execute a command on a server.
Step 1: Laying the Foundation on a Blank Canvas
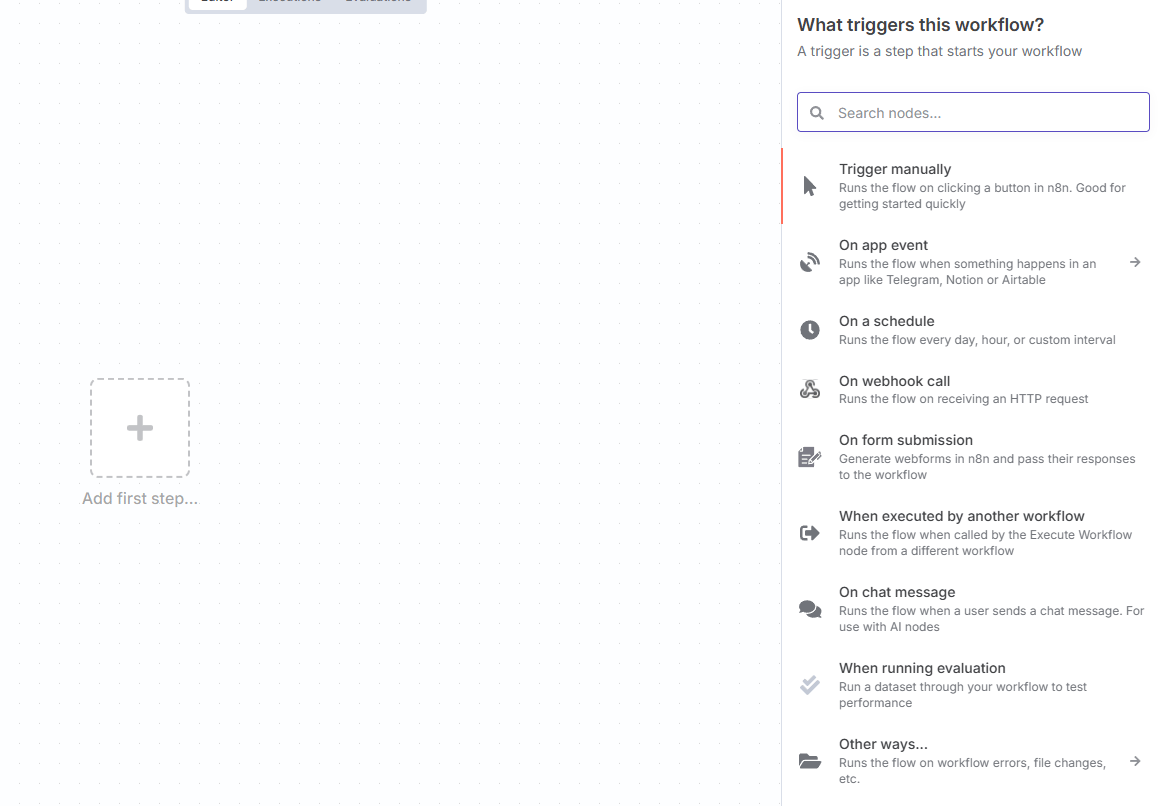
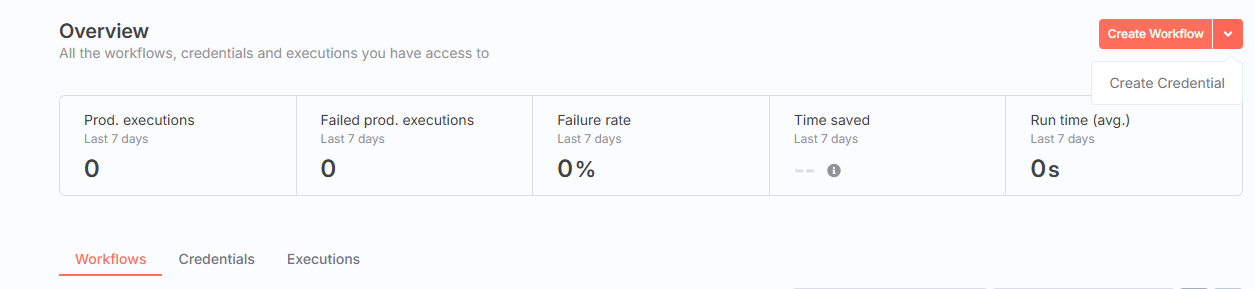
Every great creation starts with a single step. In the n8n dashboard, that journey begins by clicking the "Create Workflow" button.
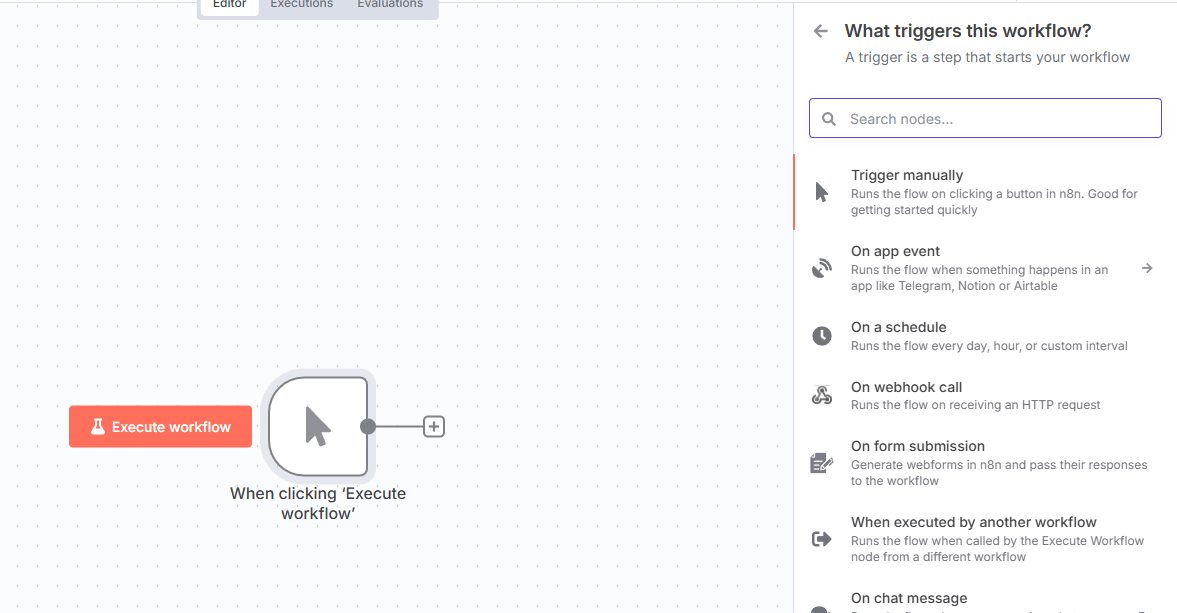
You’ll be presented with a clean, empty canvas holding a single "Start" node. Think of this as your digital LEGO baseplate - an empty space of pure potential, waiting for you to build your masterpiece.
Your first and most important move is to add a "Manual" trigger. Click the + icon that appears when you hover over your "Start" node. This node is your personal "test" button and it's the secret to building complex automations without wanting to throw your computer out the window. It allows you to run your entire workflow at any point, giving you instant feedback to make sure every part is working exactly as you expect.
Step 2: Putting Your Automation on a Schedule
A workflow that only runs when you click a button is a useful tool but the real magic of automation is making your intelligence agent run reliably in the background.
To do this, you can add a second trigger. Click the main + button on the canvas to open the node library, then search for and add a "Schedule" trigger. From there, you can set your automation to run on any schedule imaginable - every five minutes, once a day at sunrise or only on the last Friday of the month. For a daily news digest, setting it to run "Every 1 day" at your preferred time (say, 7 AM) is a perfect start.
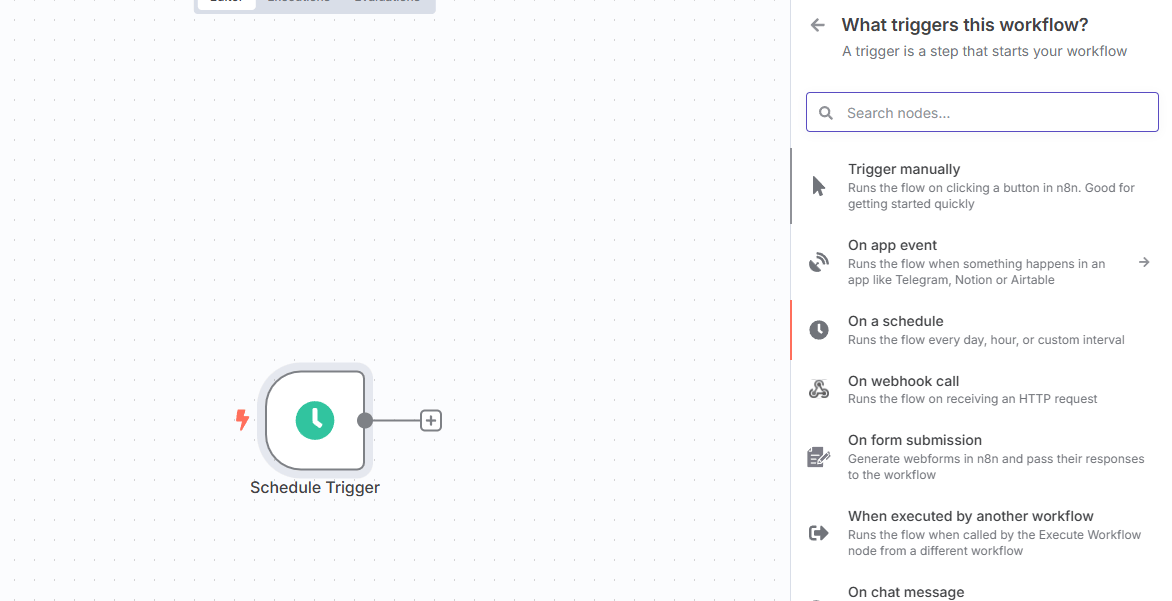
Why have two triggers? This dual-trigger setup is a professional design pattern that separates your "development mode" from your "production mode".
The Manual Trigger is for when you are building and tinkering, giving you that crucial instant feedback.
The Schedule Trigger is what turns your creation into a reliable, set-and-forget assistant that works for you 24/7.
It’s the best of both worlds, allowing for safe experimentation and dependable execution.
Step 3: Fetching the News with an RSS Reader
With our triggers in place, it’s time to get some data. This is the moment your workflow starts to come alive and interact with the outside world.
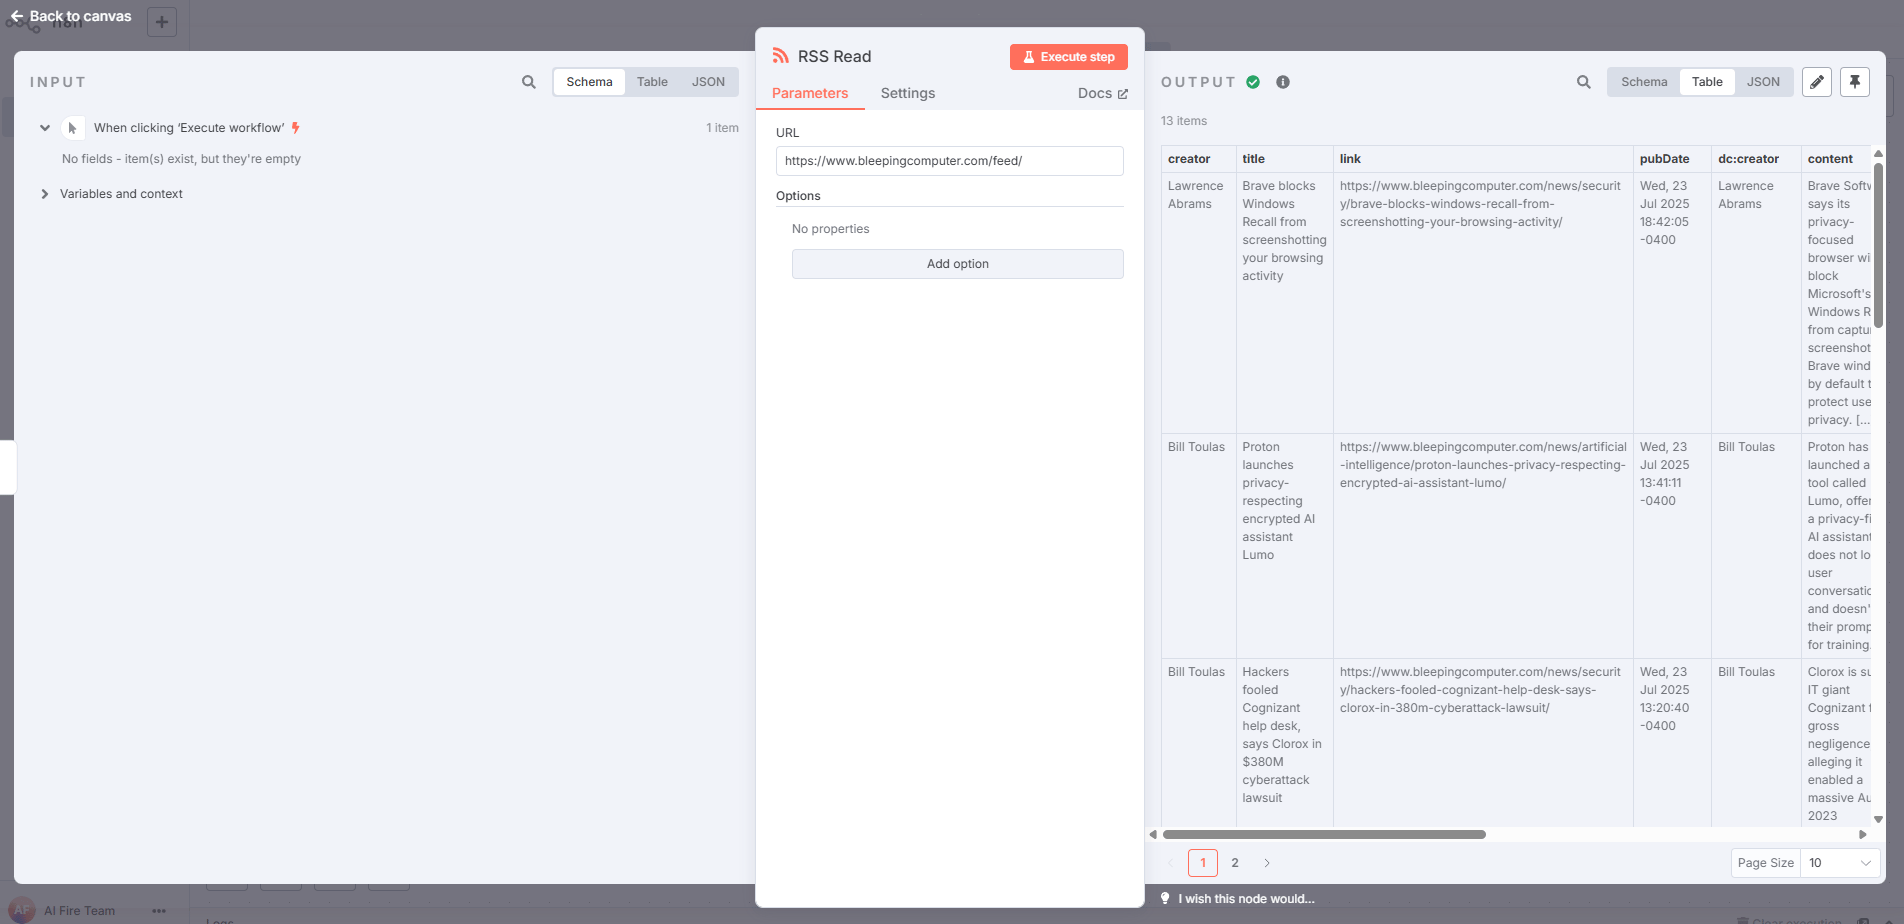
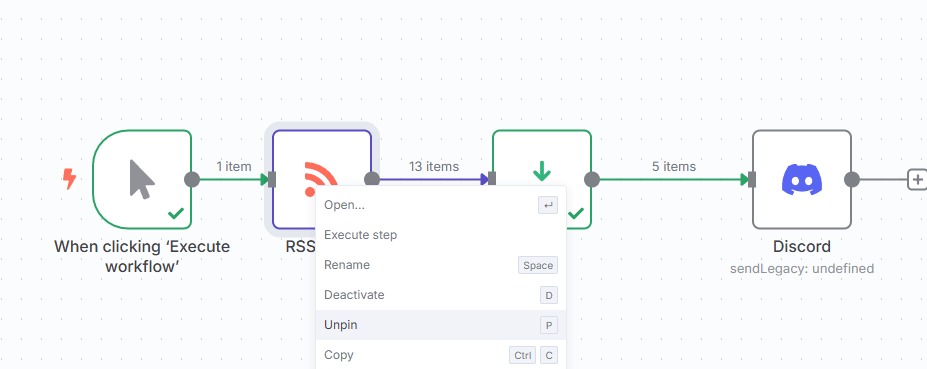
Click the “+” that appears after your trigger nodes to add your first functional node. Search for "RSS" and select the "RSS Read" node. This humble node is a powerful gateway for pulling structured data from almost any news site, blog or publication on the internet that has an RSS feed.

For this example, using the URL for a well-known tech news site like Bleeping Computer (https://www.bleepingcomputer.com/feed/) is a great way to see it in action. Simply paste the URL into the designated field.

Now for the “aha!” moment. With the RSS node selected, click the "Execute Step" button (the small play icon) in the node's settings panel on the right. In a split second, the output panel on the right will light up, filled with perfectly structured and organized data - a list of articles complete with titles, links, authors, publication dates and even content snippets. This is the moment most people realize that n8n isn't just another simple tool; it's a powerful engine for gathering and commanding information from across the entire internet.
Sending It to Discord (Your Personal Command Center)
Data is useless if it's trapped in a workflow. Let's pipe this news into a private Discord channel, creating a personal command center.
Setting Up the Discord Integration
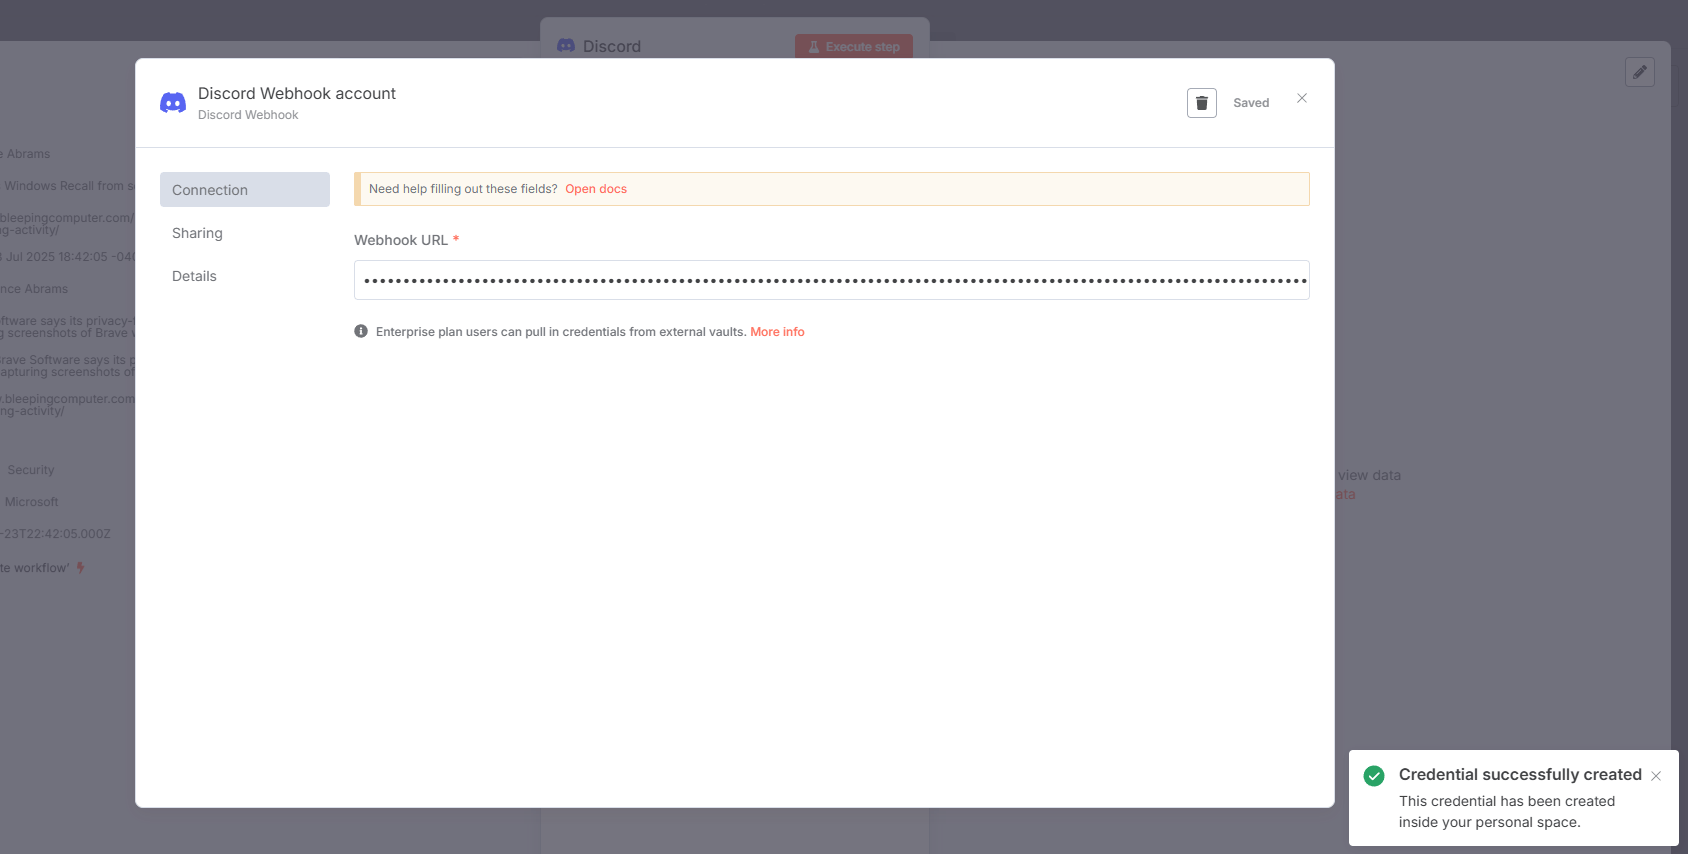
Add a new "Discord" node after your “RSS Read” node.
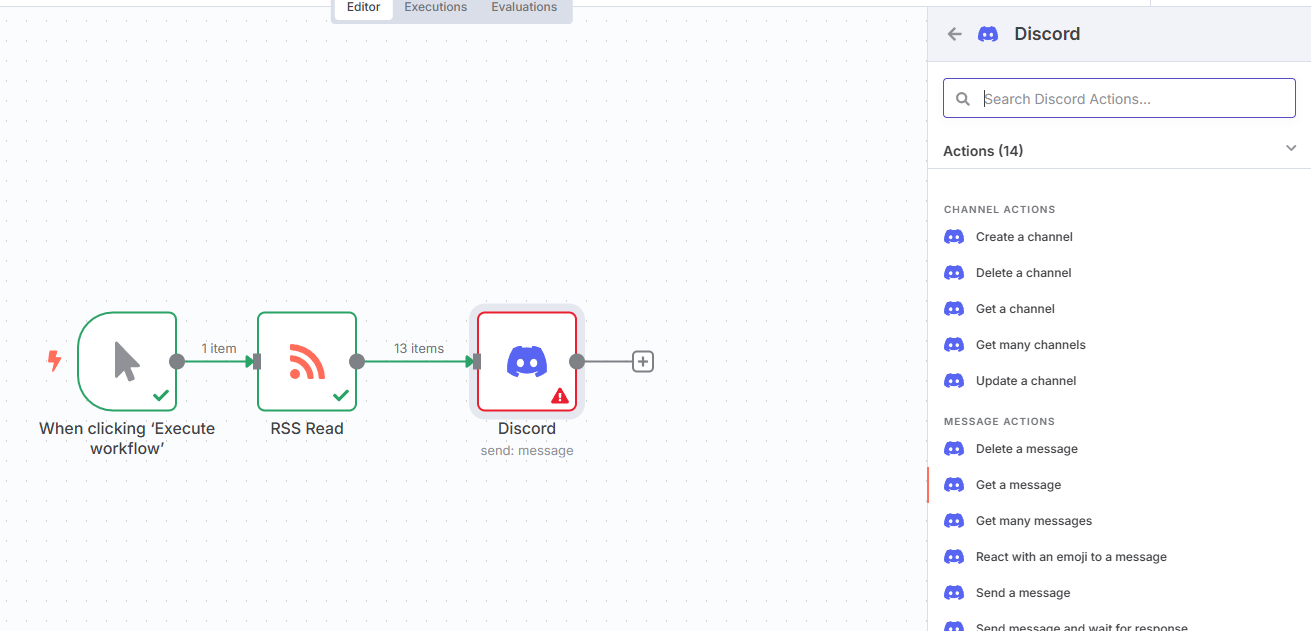
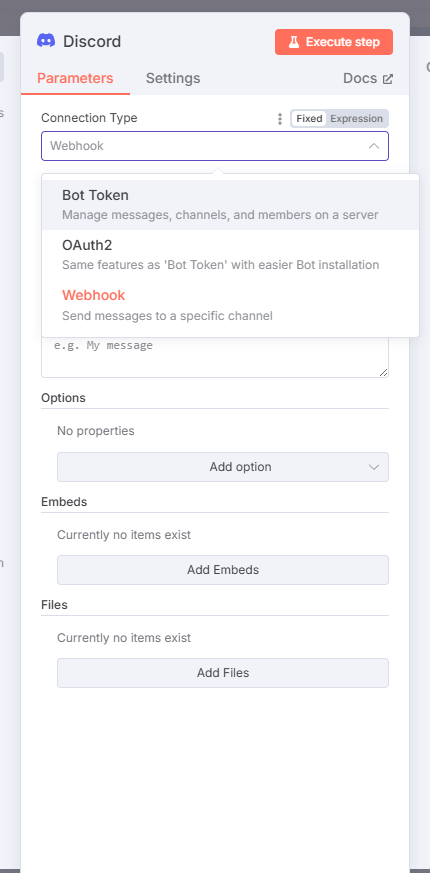
Set its operation to "Send Message" and the connection type to "Webhook".
To get your webhook URL, go into your own Discord server, create a channel like
#tech-newsand navigate toServer Settings > Integrations > Webhooks. Create a new webhook, give it a name and copy the unique URL.

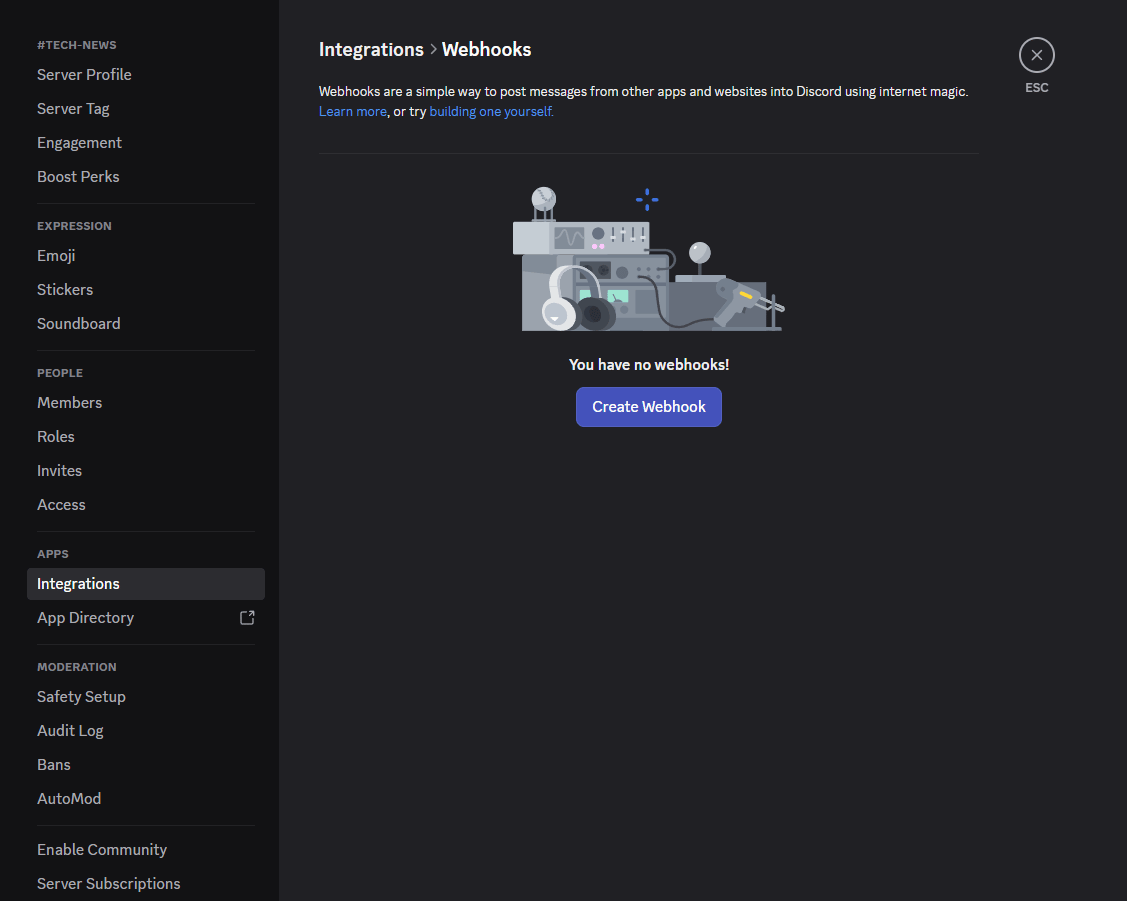

Back in n8n, click "Create New Credential", paste in the webhook URL and save it.
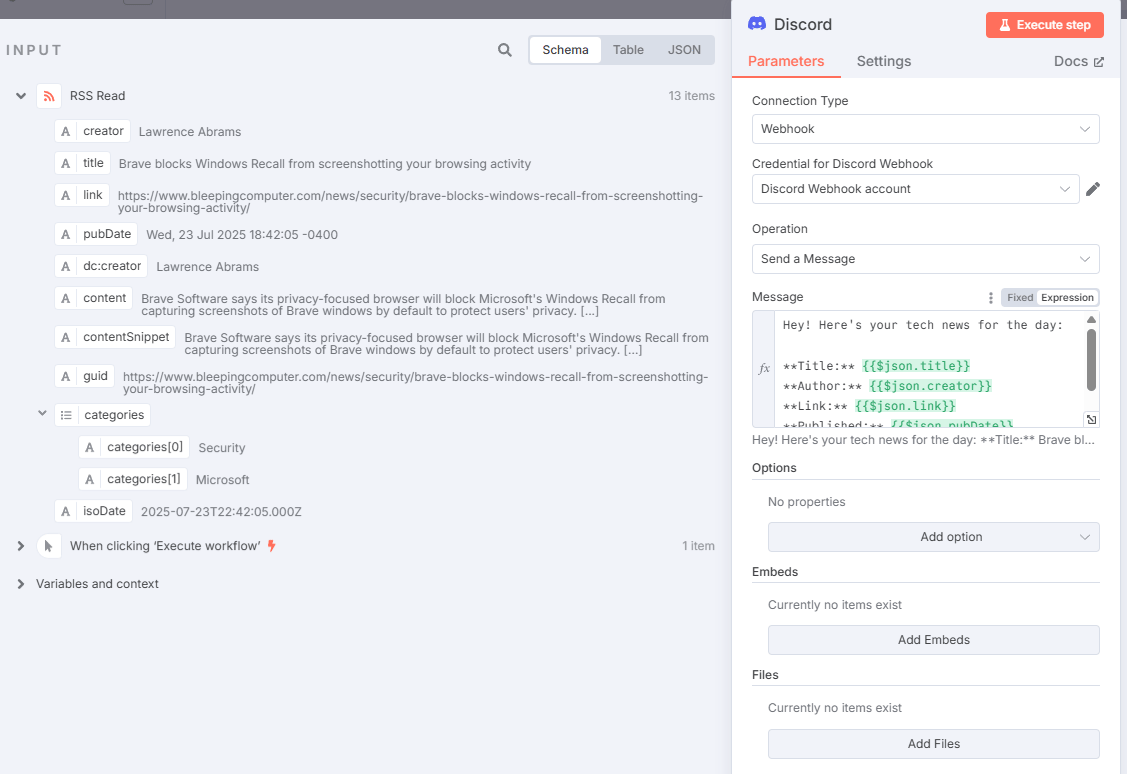
Crafting the Perfect Dynamic Message
Here’s where you can get creative. Instead of a boring message, you can use expressions to pull data from the previous nodes and create a rich, informative alert for each article.
In the Discord node's "Message" field, you can structure your message like this:
Hey! Here's your tech news for the day:

**Title:** {{$json.title}}
**Author:** {{$json.creator}}
**Link:** {{$json.link}}
**Published:** {{$json.pubDate}}

---
When you test this, your Discord channel will probably get spammed with a dozen messages at once. This is normal. n8n is running the Discord node once for each item it receives from the RSS feed. Now, let's bring some order to this chaos.
Taming the Data Beast with Limits and Filters
No one needs thirteen articles at once. We need to filter the signal from the noise.
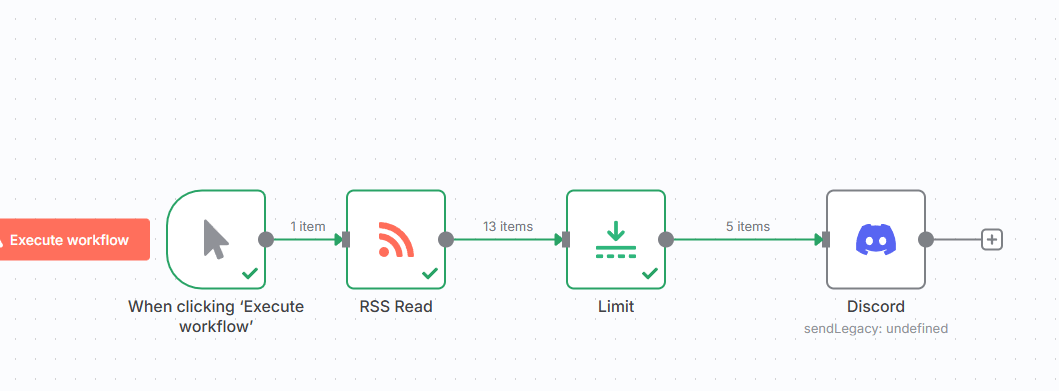
Between your RSS and Discord nodes, add a "Limit" node.
Set the limit to a more digestible number, like 3 or 5.
Test it again. Now, only the top 3-5 most recent articles will be sent.
Pro Tip: Pin Your Data! To save yourself from re-running your RSS feed fetch every single time you tweak a downstream node, click the small pin icon on the RSS node's output after a successful test. This "pins" the data, making your building process much faster.
Going Nuclear: Command-Line Integration
Alright, it's time to take the safety locks off. Most automation platforms keep you in a safe, walled garden. They give you a set of pre-approved tools and integrations and you're expected to stay within those boundaries.
This next step is the reason n8n is in a completely different league for building a true intelligence agent. We are about to add command-line execution directly into our workflow. This is the equivalent of being given the admin password to the server itself. It's the moment you stop being just a user of the software and become a true system architect.
Adding Your First System Command
The process begins by creating a new branch in your workflow. Simply click the "+" on your initial trigger node to start a parallel line of execution.
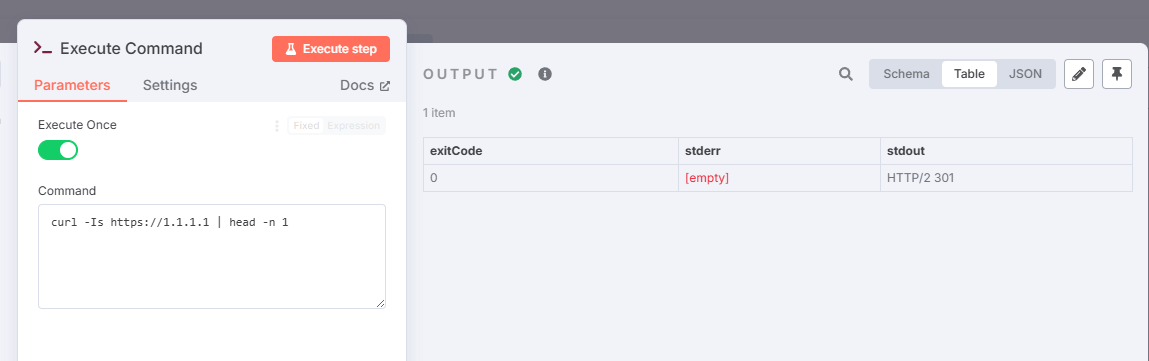
Search for the "Execute Command" node and add it. This humble node is your gateway to unlimited power.
In the "Command" field, enter a simple, classic network diagnostic command:
ping 1.1.1.1 -c 3Then, execute the node to view the output.
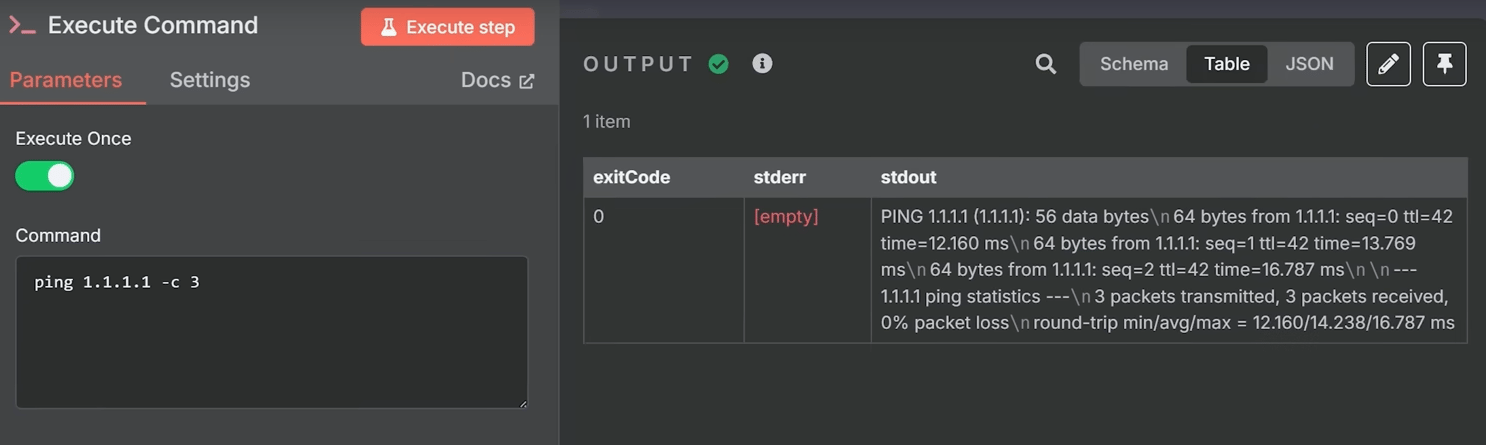
When you use n8n Cloud
You just pinged one of Cloudflare's public DNS servers from inside your visual workflow. A stream of real terminal output, showing the successful round-trip time for three data packets, will appear in your results panel.
When you use self-hosting n8n
Mind = Blown: What This Actually Means
Let's be clear about what just happened. You didn't just run a "ping test". You executed an arbitrary command on the operating system of your server. This means you can run ANYTHING you could type into a Linux terminal.
The possibilities this unlocks are staggering. You can create nodes that:
Monitor Your Docker Stack: Run
docker ps -ato get a daily report of all your running (and stopped) containers.Check System Health: Use
df -hto check for low disk space orfree -mto monitor memory usage.Run Custom Security Scripts: Have a favorite Python or Bash script that checks for vulnerabilities? You can schedule n8n to run it automatically every night and alert you if it finds anything.
Automate System Maintenance: You could (carefully!) create a workflow that runs
apt-get updateto check for new system updates.

This is the power that separates simple "if this, then that" tools from a true automation platform. You are no longer limited by the pre-built integrations someone else decided you should have.
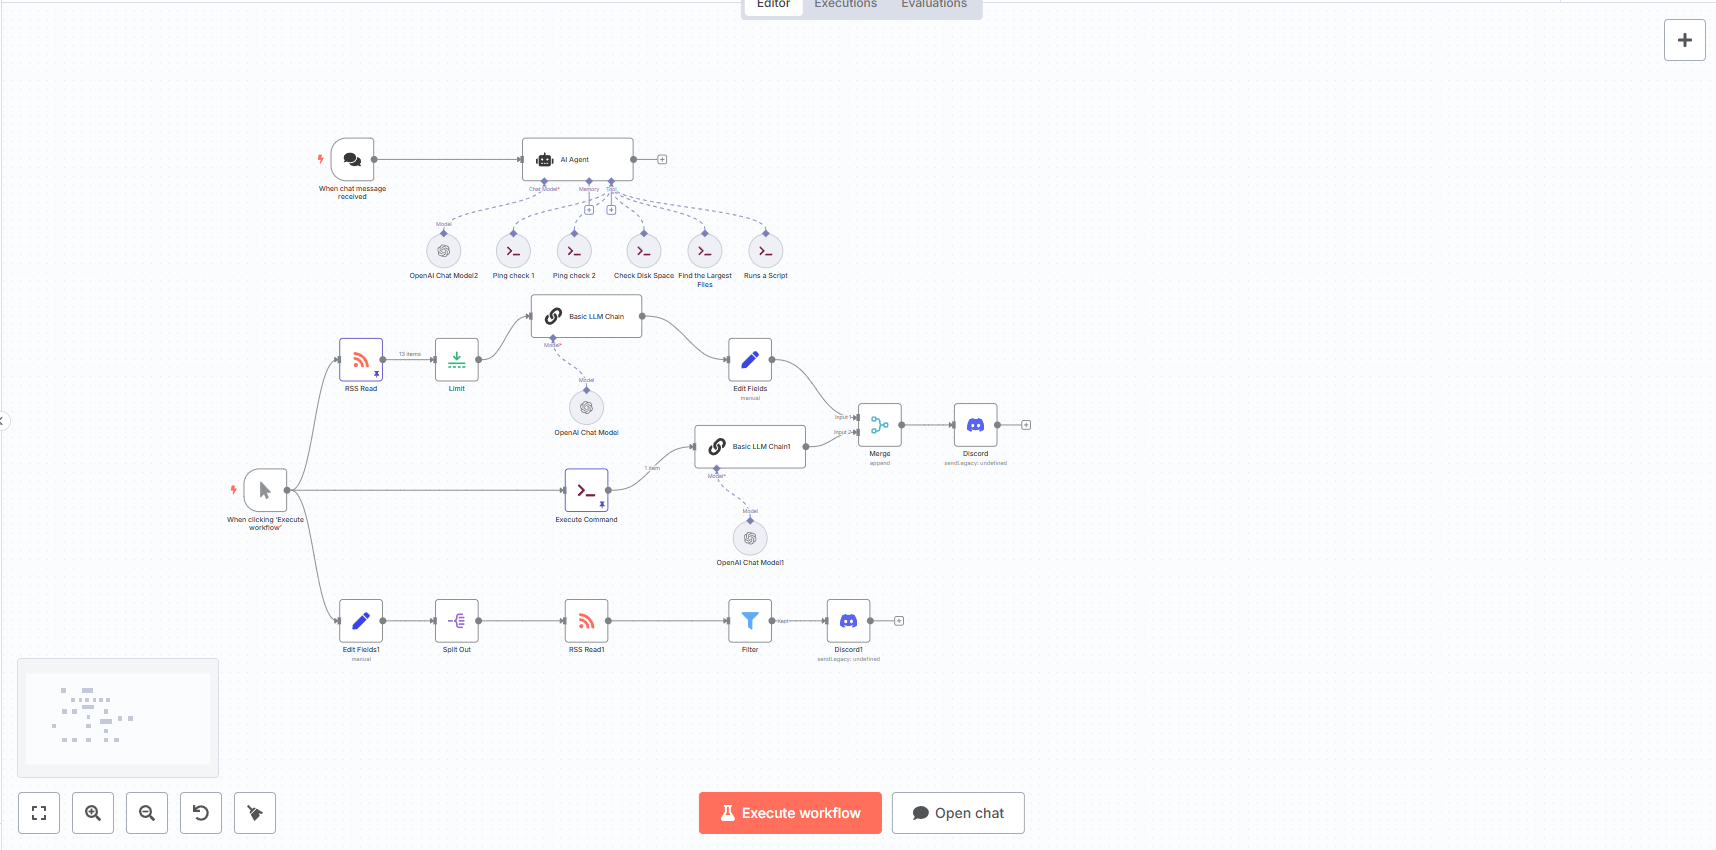
Creating the Unified Daily Briefing with a “Merge” Node
So now we have two separate streams of data: our AI-summarized tech news and our server's ping status. The final step is to combine them into a single, cohesive daily report.
Add a "Merge" node just before your Discord node.
Connect the output from your "Limit" node (the news articles) to one of the inputs.
Connect the output from your "Execute Command" node (the ping results) to the other input.
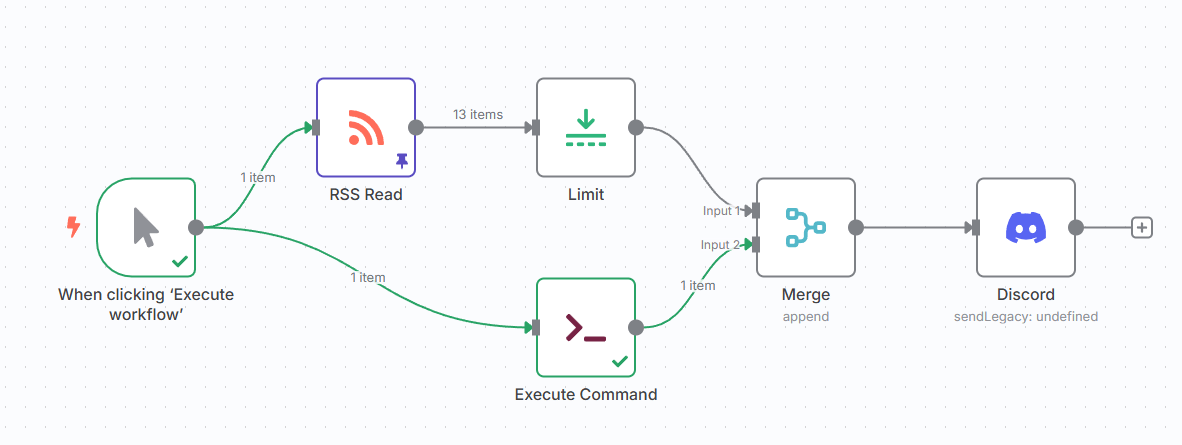
Set the "Mode" of the Merge node to "Append", which simply combines the two streams of data into one.
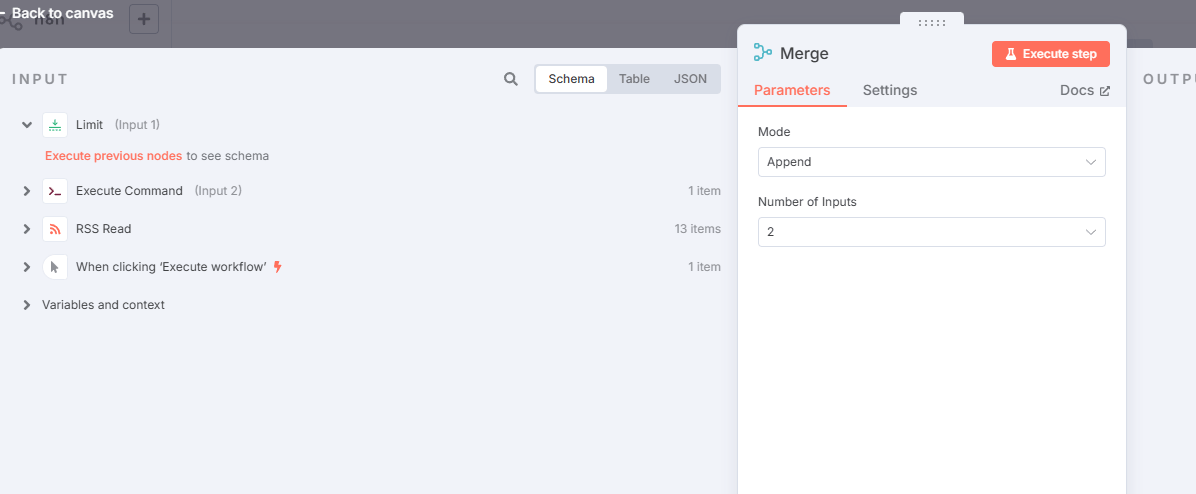
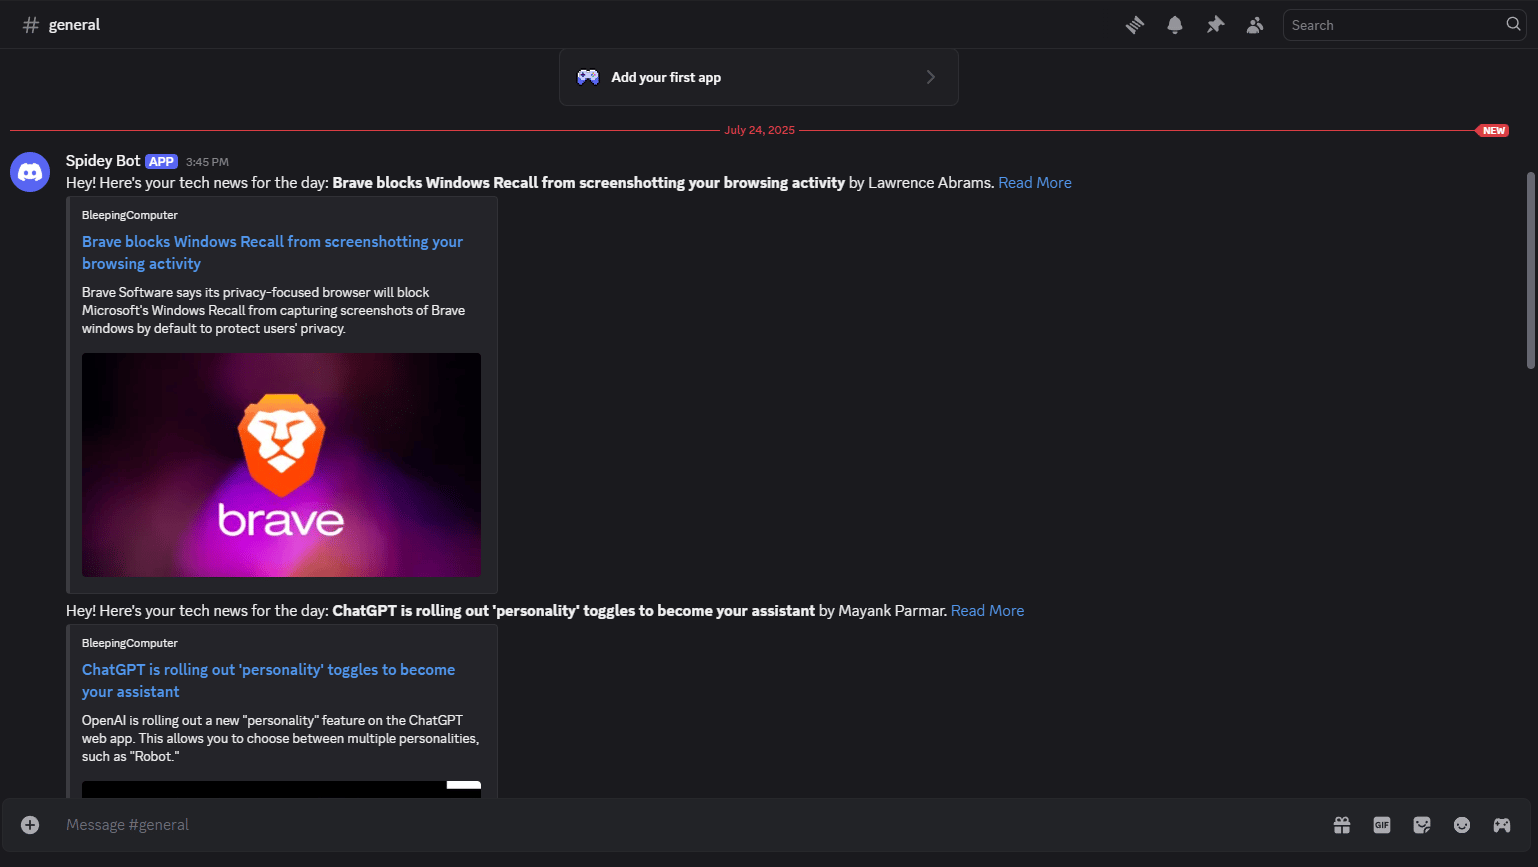
The result is a single, beautiful message delivered to your Discord channel. The top part contains your three AI-summarized news articles and right below it is a clean report from your server: Ping to 1.1.1.1: SUCCESSFUL. You've just created a single pane of glass for both your external intelligence and your internal infrastructure's health.

This level of direct system interaction and data fusion is something you simply cannot do in most other platforms. It requires a bit of caution - with great power comes great responsibility, after all - but it's what truly elevates n8n from a simple tool to an essential part of any serious tech enthusiast's toolkit.
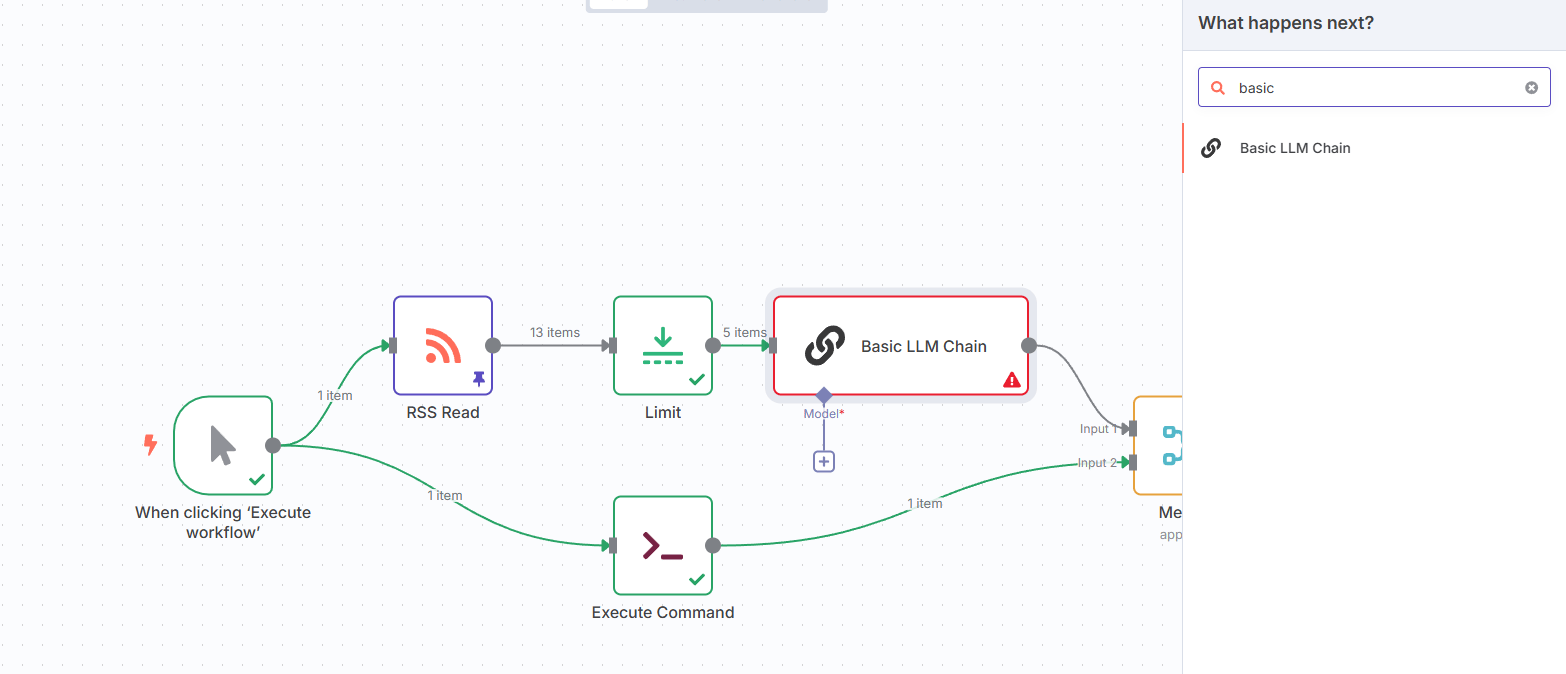
Adding AI: The “J.A.R.V.I.S.” Layer
Now, we add the brain. This is where we transform our workflow from a simple notification system into something that feels like a personal intelligence agent from an Iron Man movie.
Setting Up AI Summarization
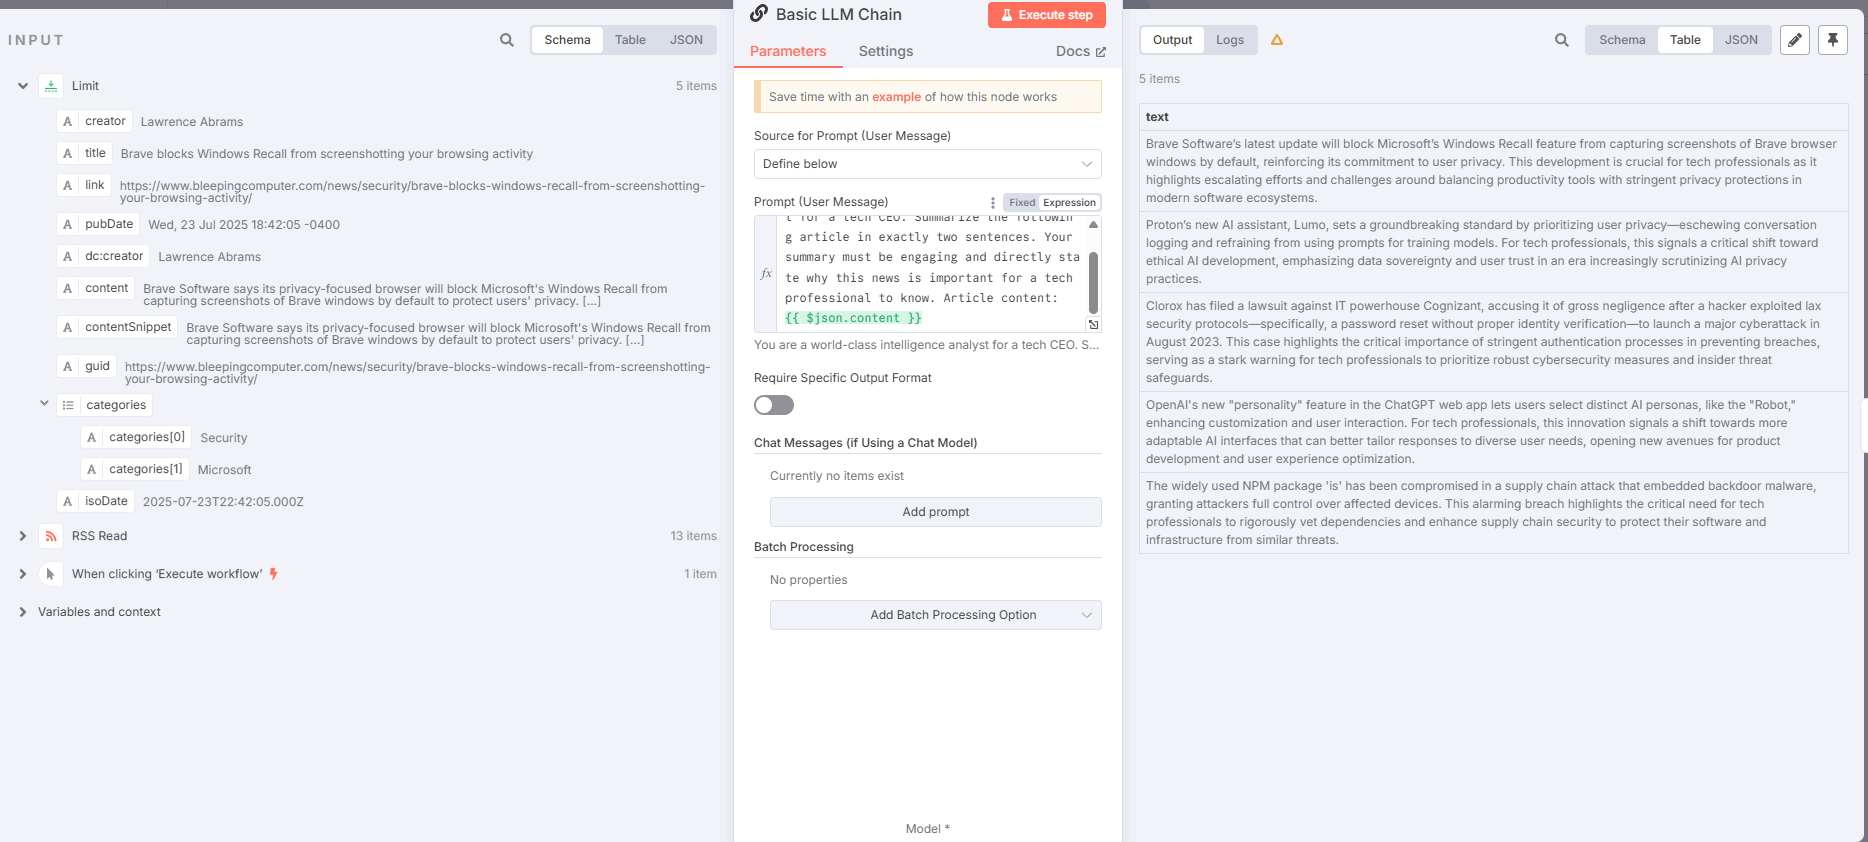
Place an AI node between your "Limit" node and your "Merge" node. The "Basic LLM Chain" is a great place to start.
Craft a precise prompt to give the AI its mission.
You are a world-class intelligence analyst for a tech CEO. Summarize the following article in exactly two sentences. Your summary must be engaging and directly state why this news is important for a tech professional to know. Article content:
{{$json.content}}
*Pro tips:
Be specific in your prompts - "2 sentences" works better than "briefly".
Give context - "for a tech professional" helps target the summary
Test different models - GPT-4 is usually worth the extra cost for quality
AI-Powered Network Monitoring
Add another AI node after your ping command to analyze the output.
You are a laid-back network admin with a sense of humor. Analyze the following ping output. If the pings were successful, tell me in a funny and reassuring way that the internet is working perfectly. If there are any errors or packet loss, be serious and flag it as a potential issue. Ping output:
{{$json.stdout}}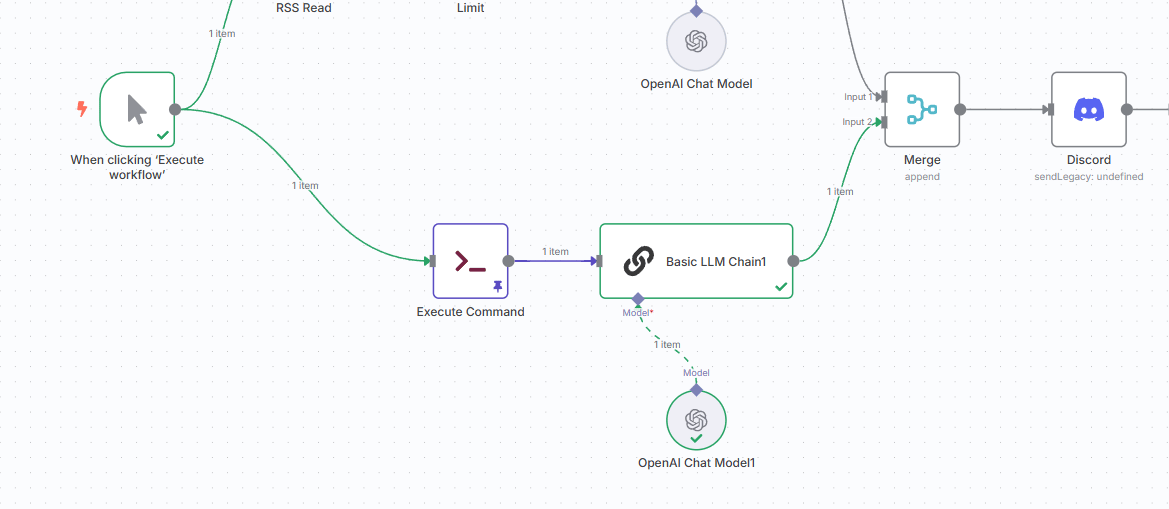
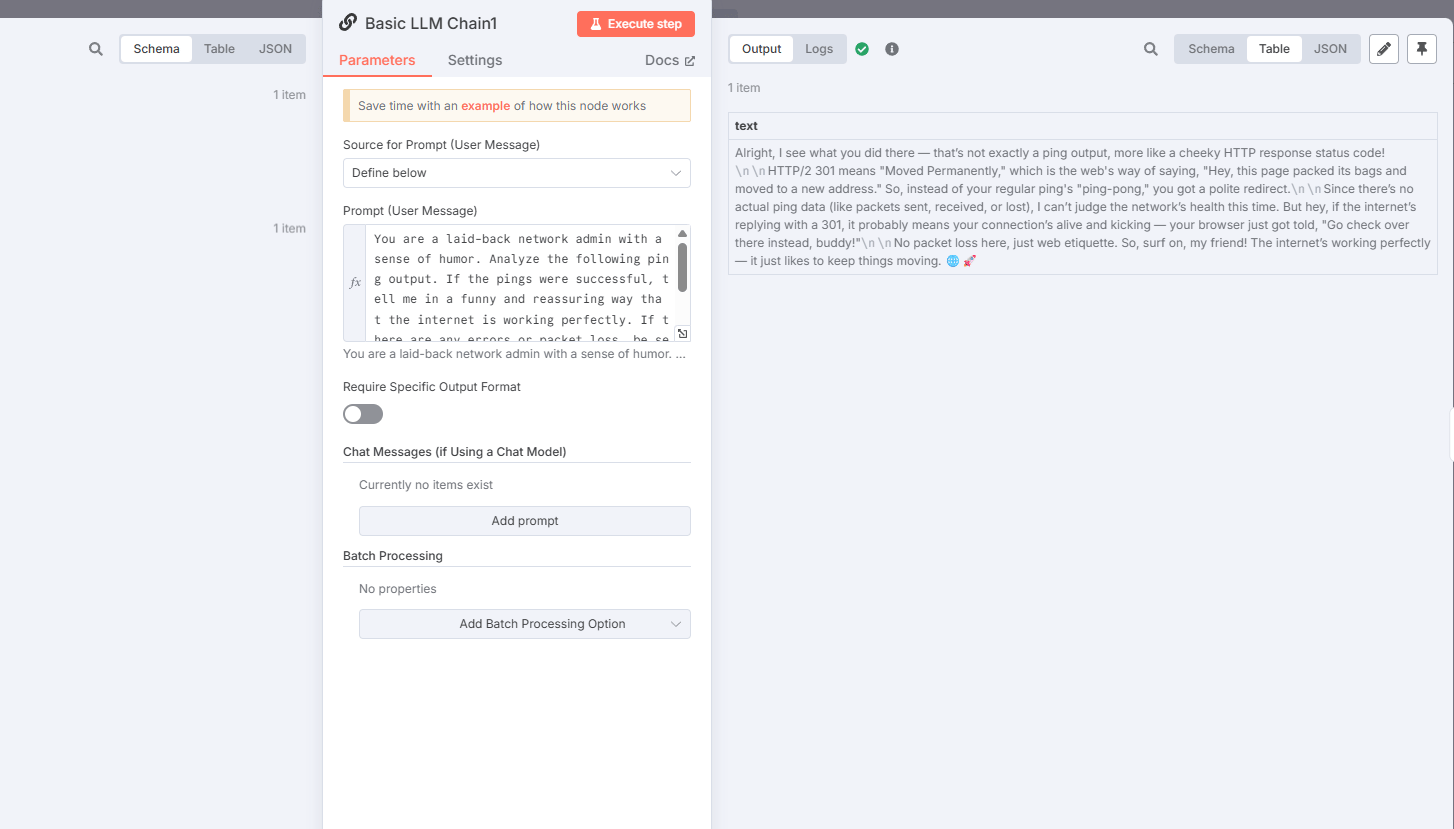
Now, your daily briefing is not just data; it's insight. You get AI-powered summaries of the news that matters and a hilarious, personalized status report on your own infrastructure. This is the kind of automation that genuinely makes your life easier and more enjoyable.
Level Up: The Automated YouTube Channel Monitor
The news aggregator is a fantastic start but it's time to level up. The last workflow handled a single stream of data. Now, we're going to build a more sophisticated intelligence agent that can monitor multiple sources, loop through them one by one and apply intelligent filtering to show you only the most relevant, up-to-the-minute information.
The mission: build a personal scout that monitors all your favorite YouTube tech channels and alerts you the moment a new video drops, so you never miss an important upload again.
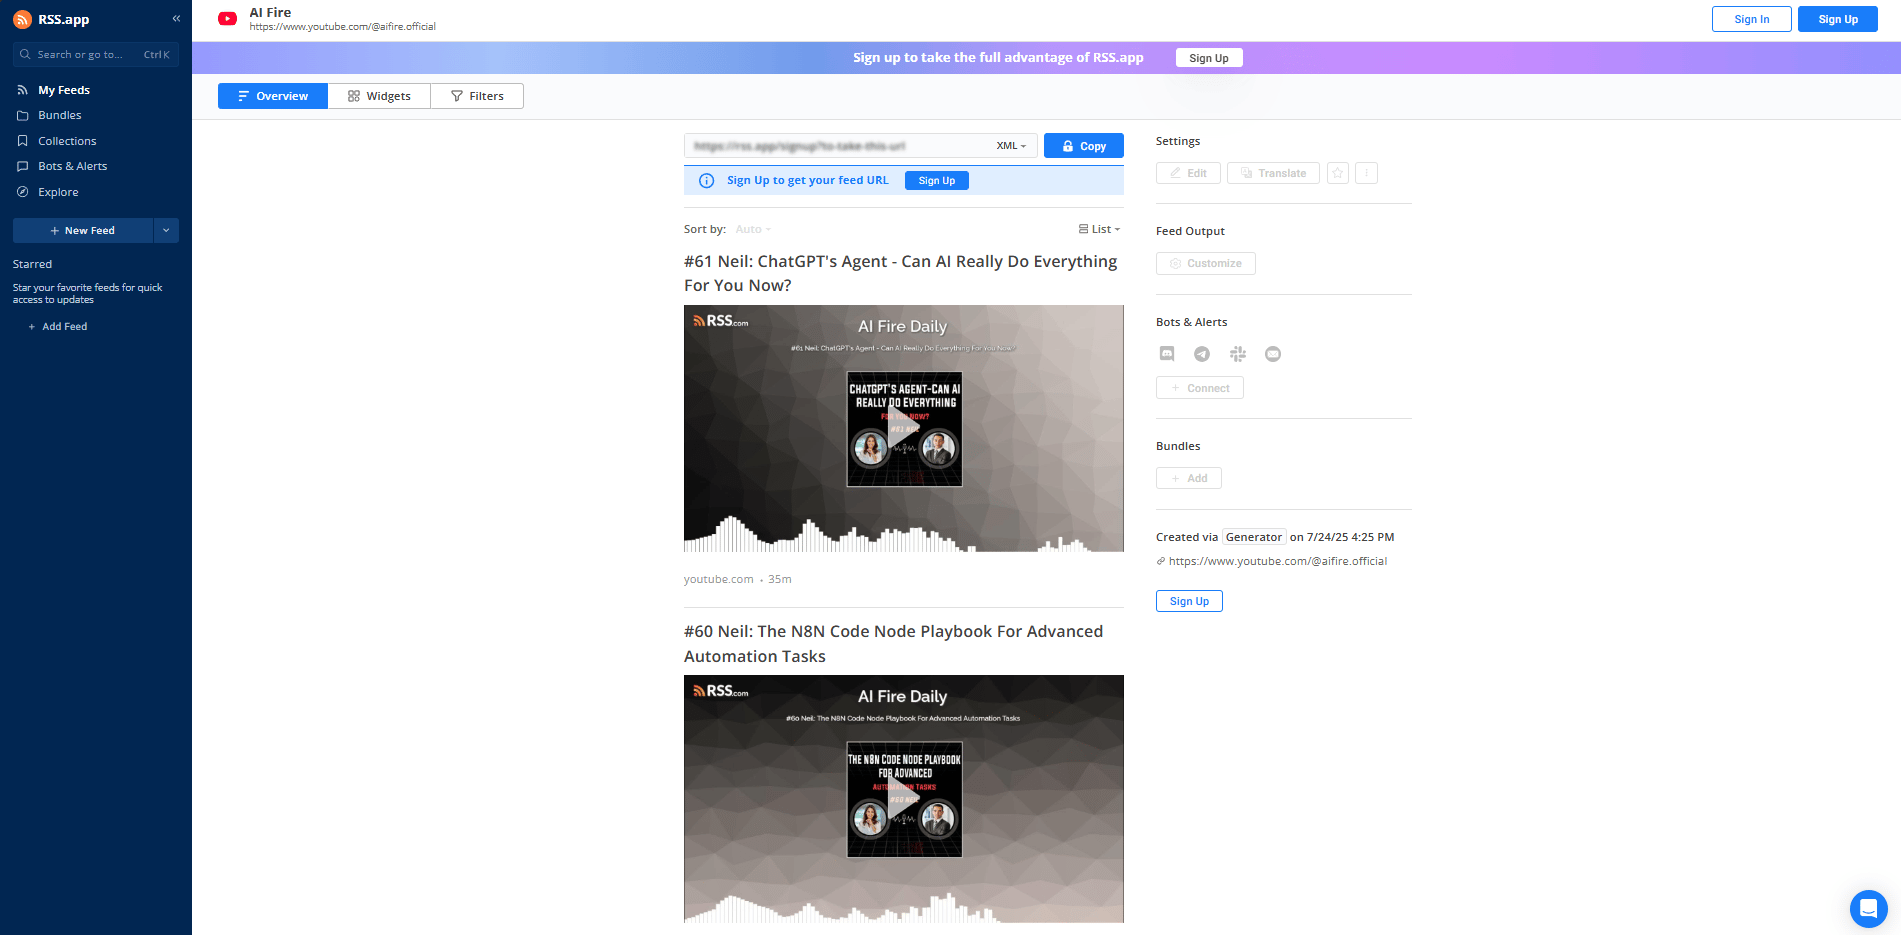
The Secret YouTube RSS Hack
Here’s a little-known secret that makes this entire workflow possible: every single YouTube channel has its own hidden RSS feed. It’s like a secret back door that lets you pull a list of their latest videos without ever having to open the YouTube website. This is the kind of "power-user" knowledge that separates simple automators from true systems architects of an intelligence agent.
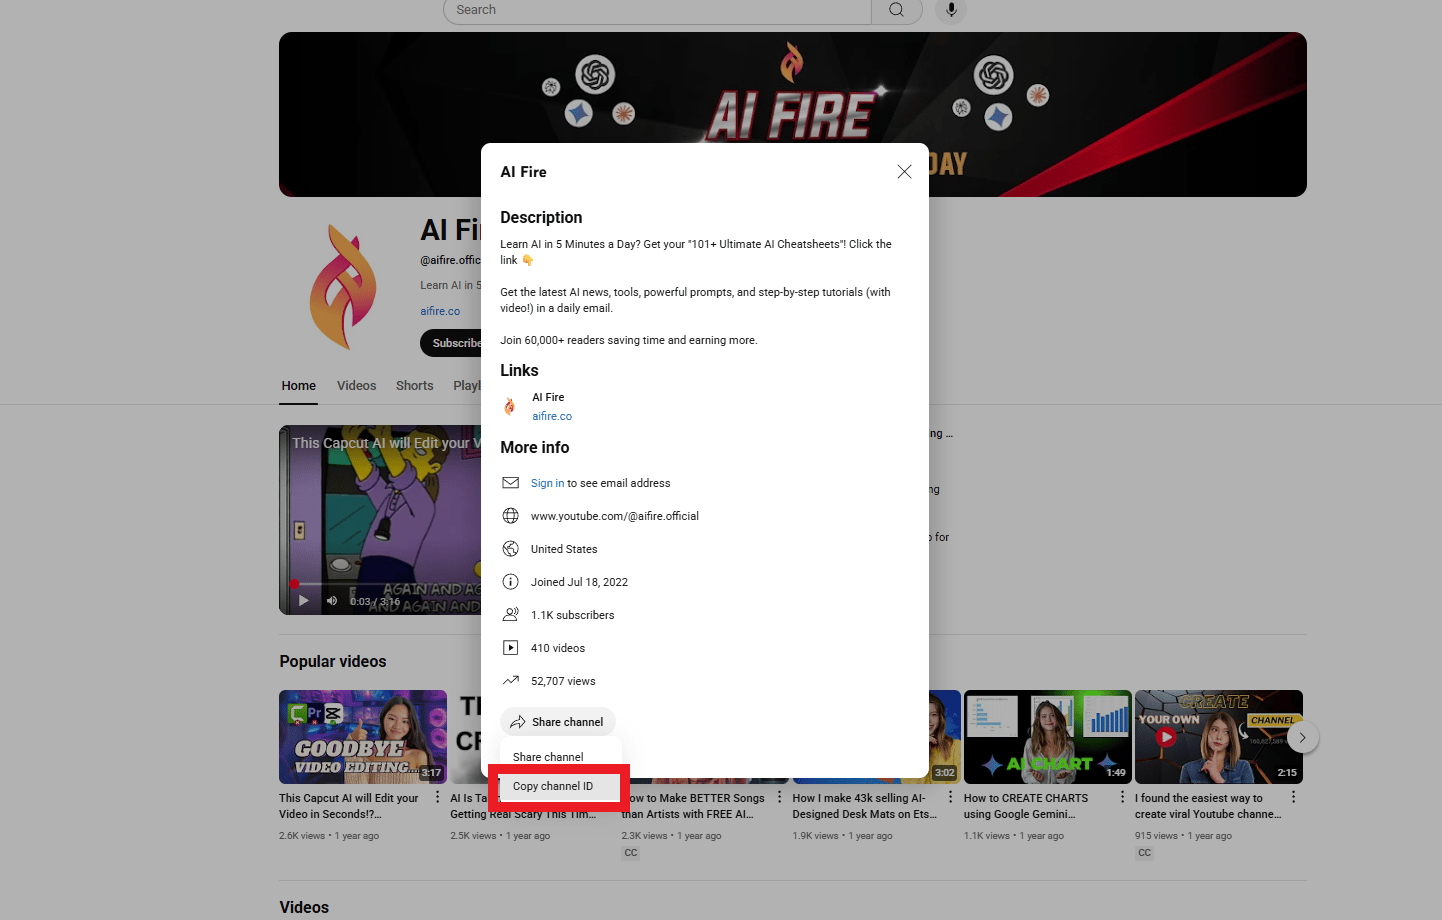
The format is straightforward. You just need the channel's unique ID, which you can find in its URL (it starts with "UC…"):
https://www.youtube.com/feeds/videos.xml?channel_id=UCUsaiN-tyiN1bsWoO46P7dA
Building the Channel Monitor: A Three-Step Process
This workflow introduces a few new, more advanced nodes that are essential for handling lists of items.
1. Step One: Create Your Watchlist
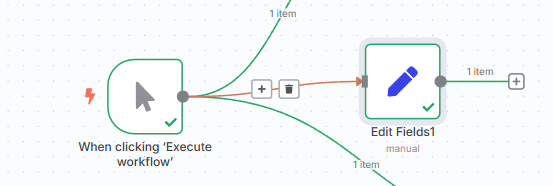
First, you need to tell n8n which channels to monitor. The cleanest way to do this is with a "Set Field" node at the very start of a new workflow. Inside this node, you can create a field called "channelIds" and set it up as an array (a simple list) containing the unique ID of each of your favorite channels. You can find a channel's ID in its URL.
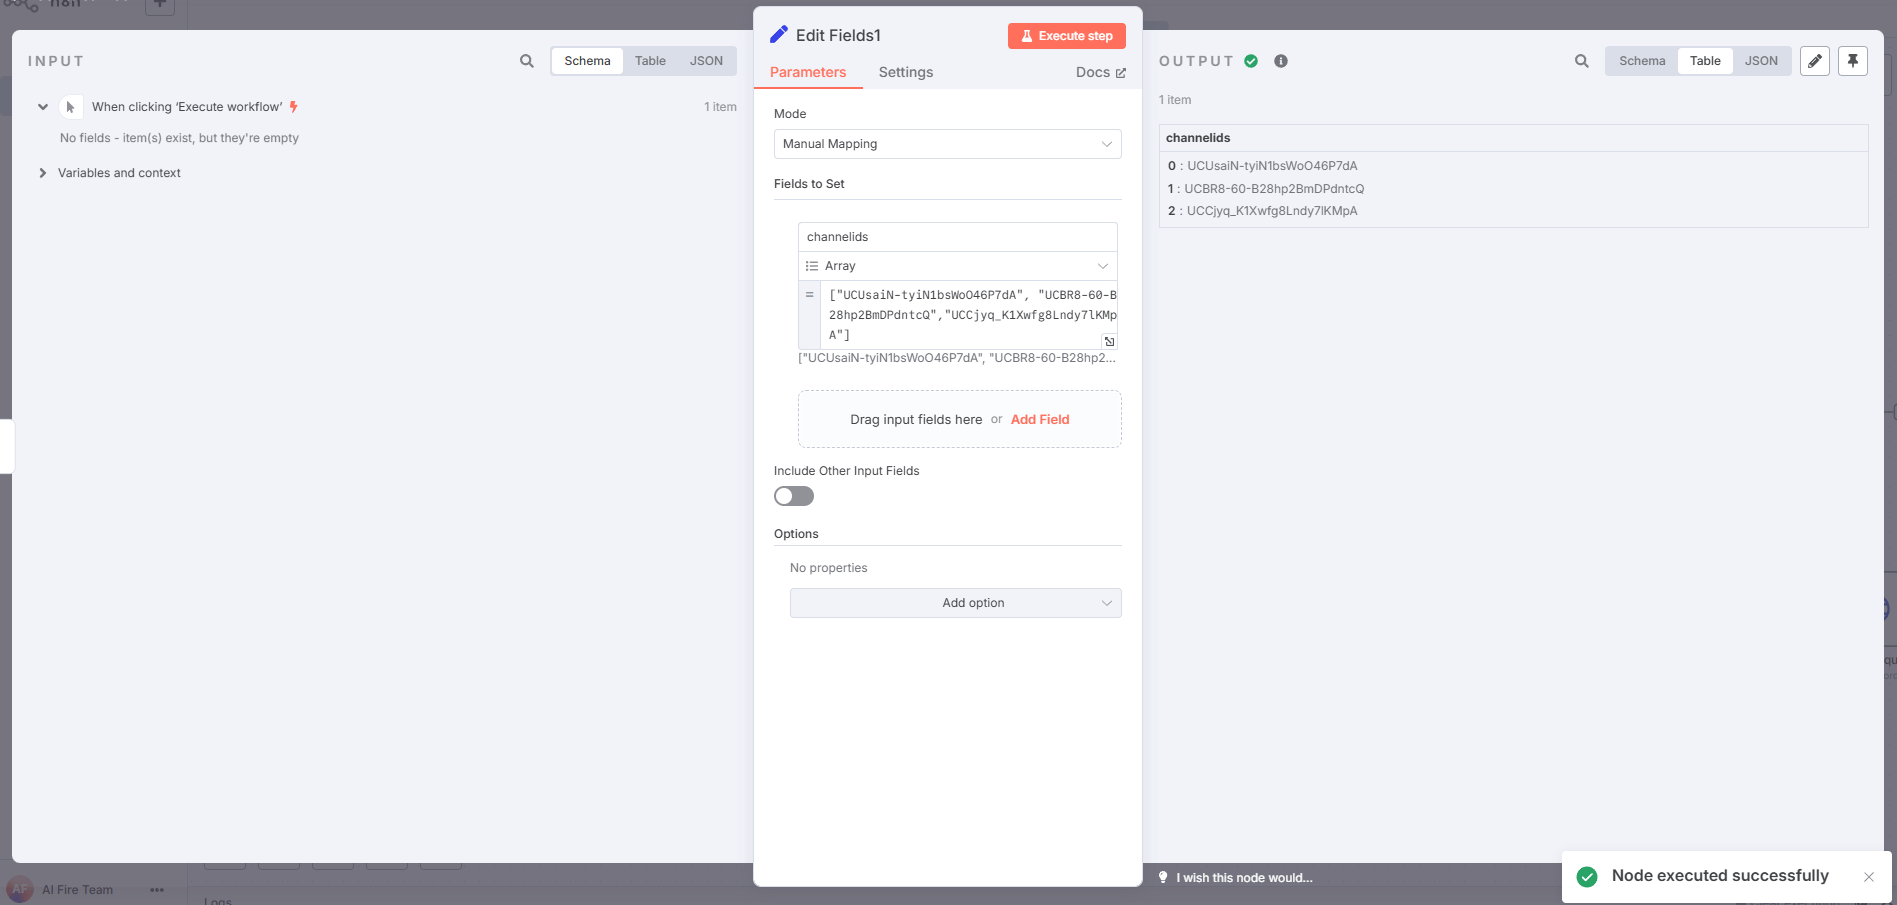
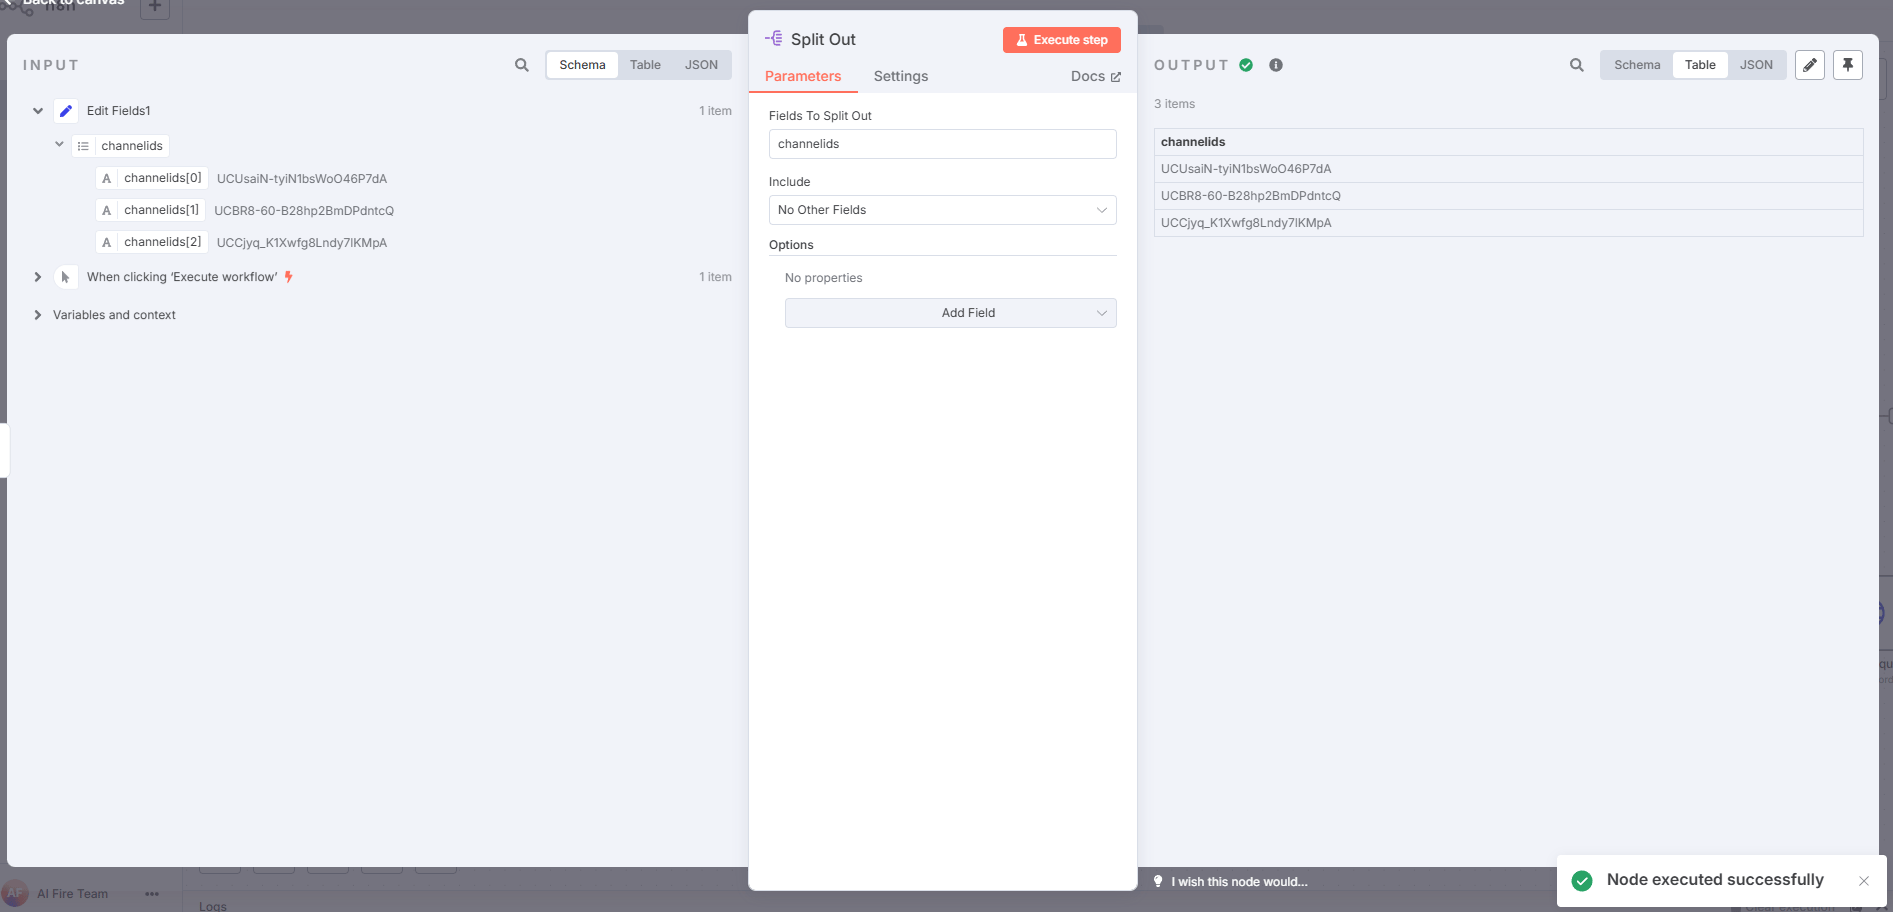
2. Step Two: The "One-by-One" Machine
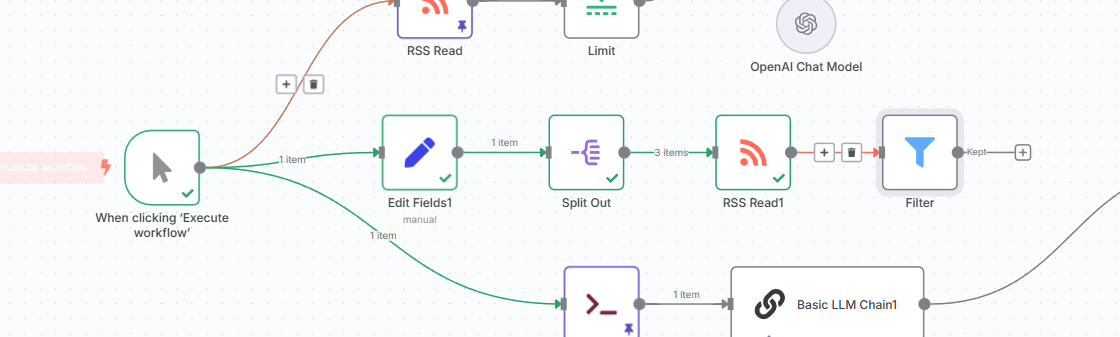
Now you have a single item: a list of channel IDs. To check each channel, you need to process that list one item at a time. This is the job of the "Split Out" node. This node acts like a machine that takes a bundle of items and places them onto a conveyor belt one by one. This is a fundamental concept in data processing, allowing your workflow to "loop" through a list and perform actions on each individual item.
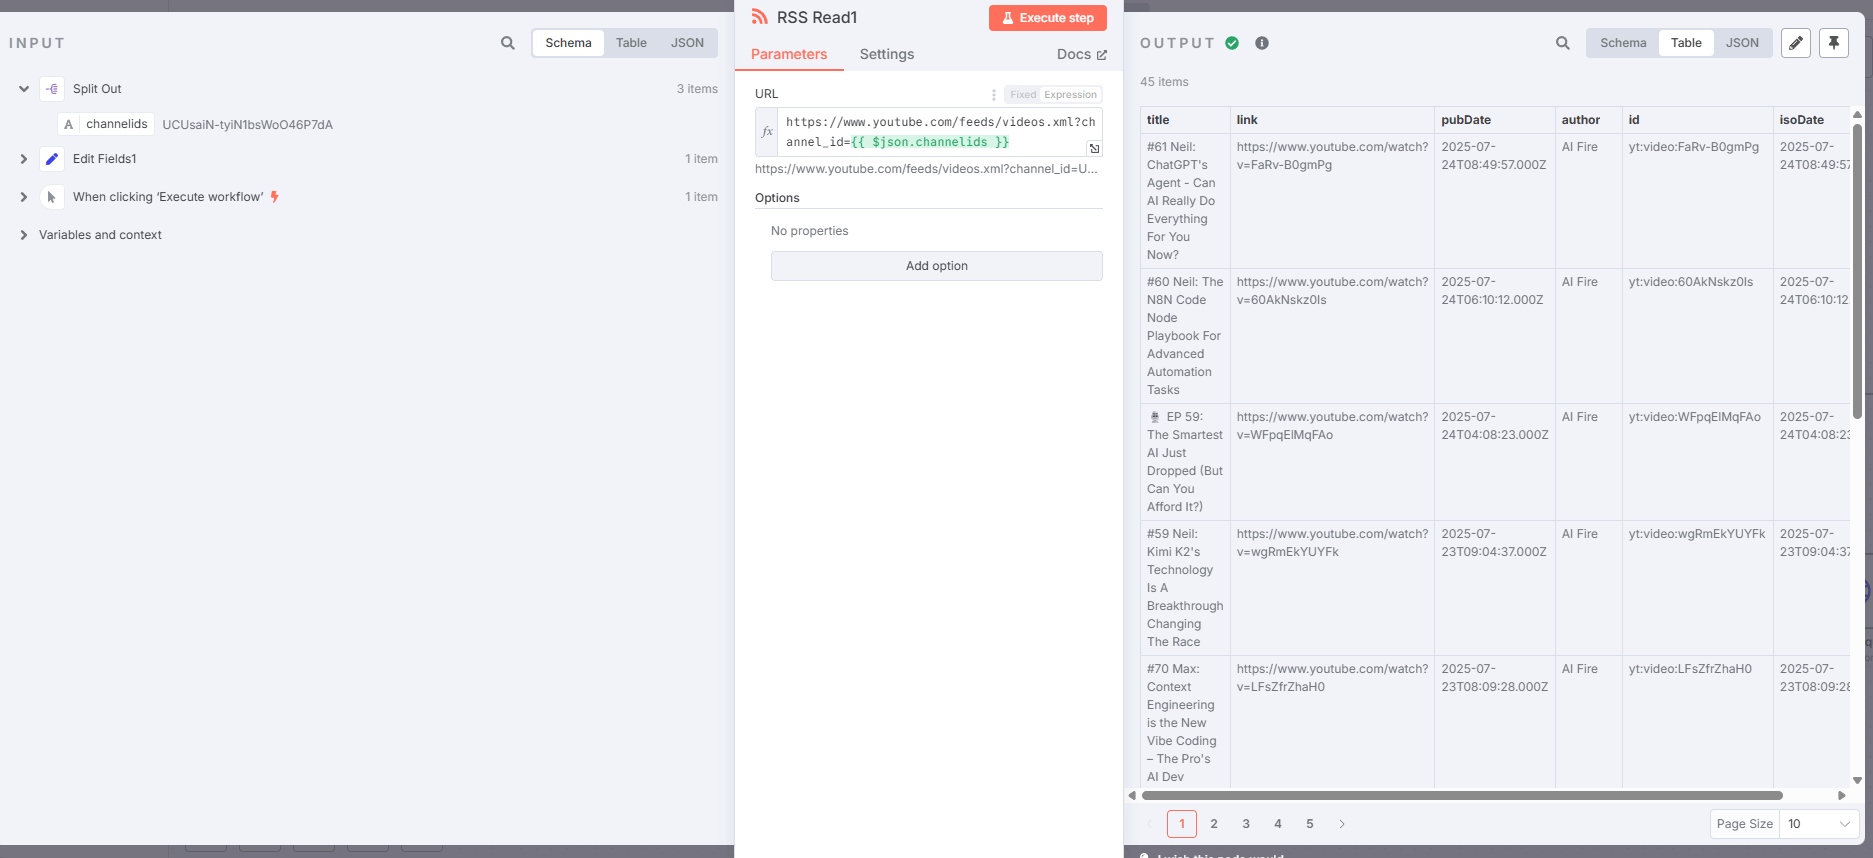
3. Step Three: Fetch the Feeds Dynamically
After the "Split Out" node, add an "RSS Read" node just like before. But this time, instead of pasting a static URL, build a dynamic one using an expression with the channel ID from the previous step: https://www.youtube.com/feeds/videos.xml?channel_id={{ $json.channelids }} . Now, as each channel ID comes down the conveyor belt, this node will fetch the RSS feed for that specific channel.
Smart Filtering: Silencing the Noise with Date Logic
If you run the workflow now, it will work but it will be noisy. It will pull the last 10-15 videos from every channel, regardless of whether they were posted yesterday or six months ago. We need to add a bouncer to the club that only lets in the new stuff.
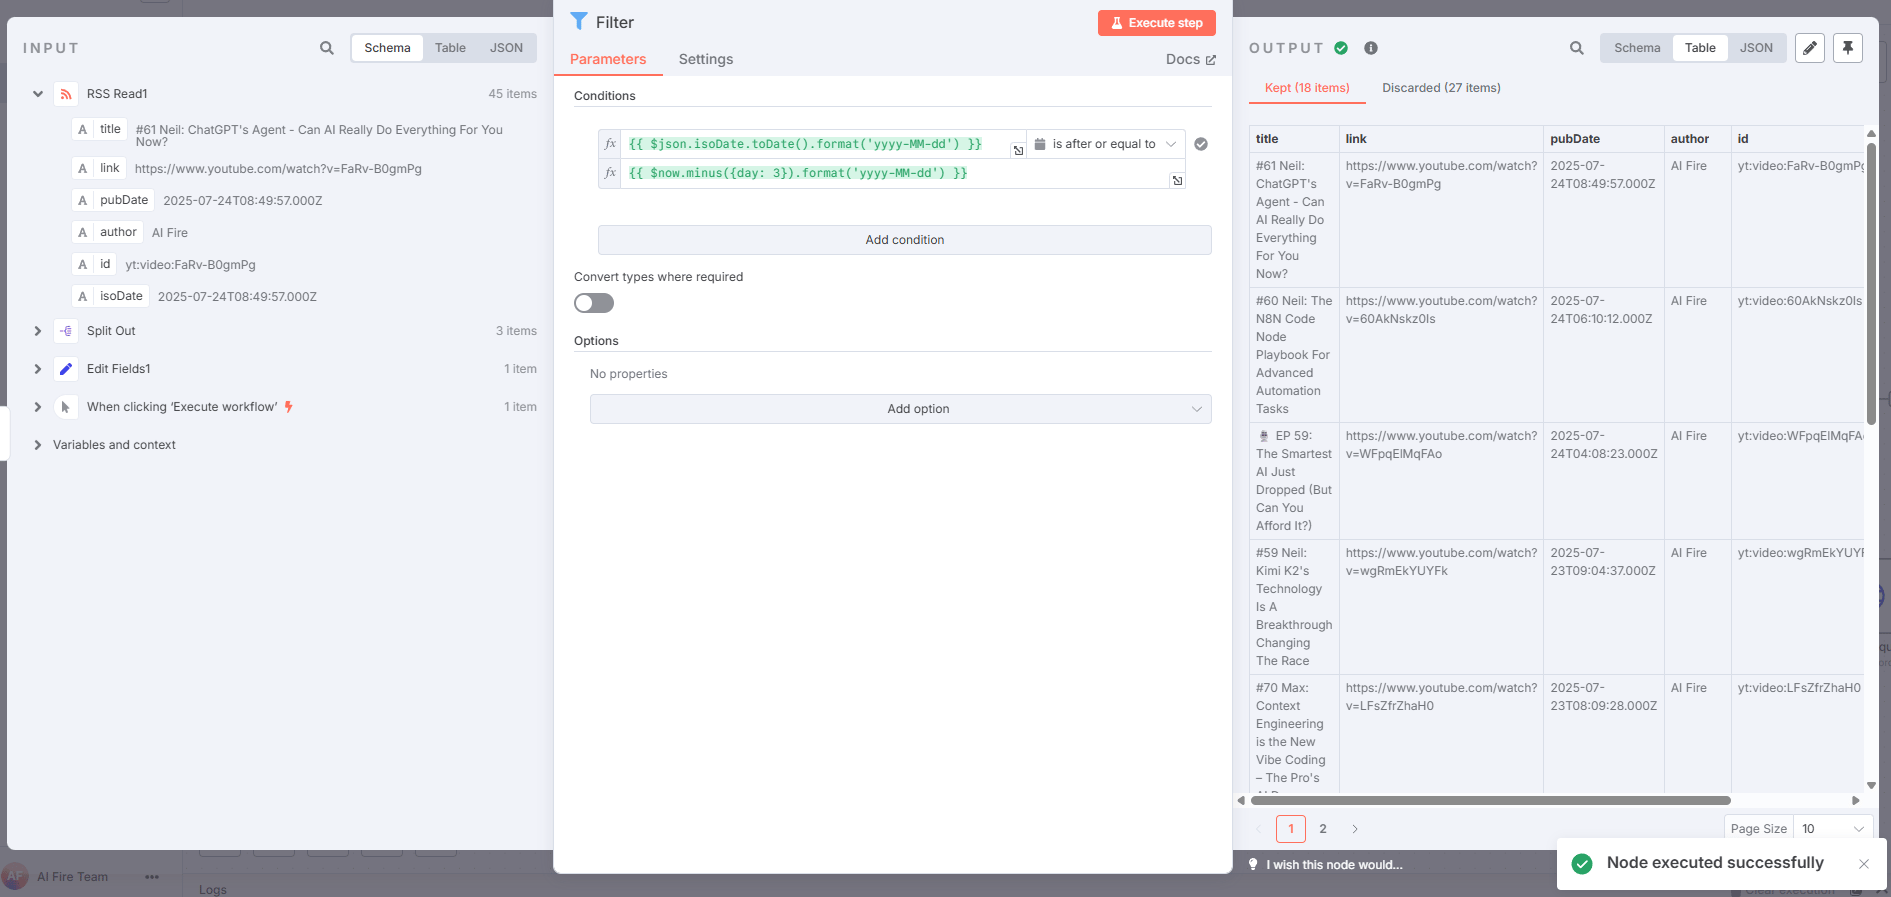
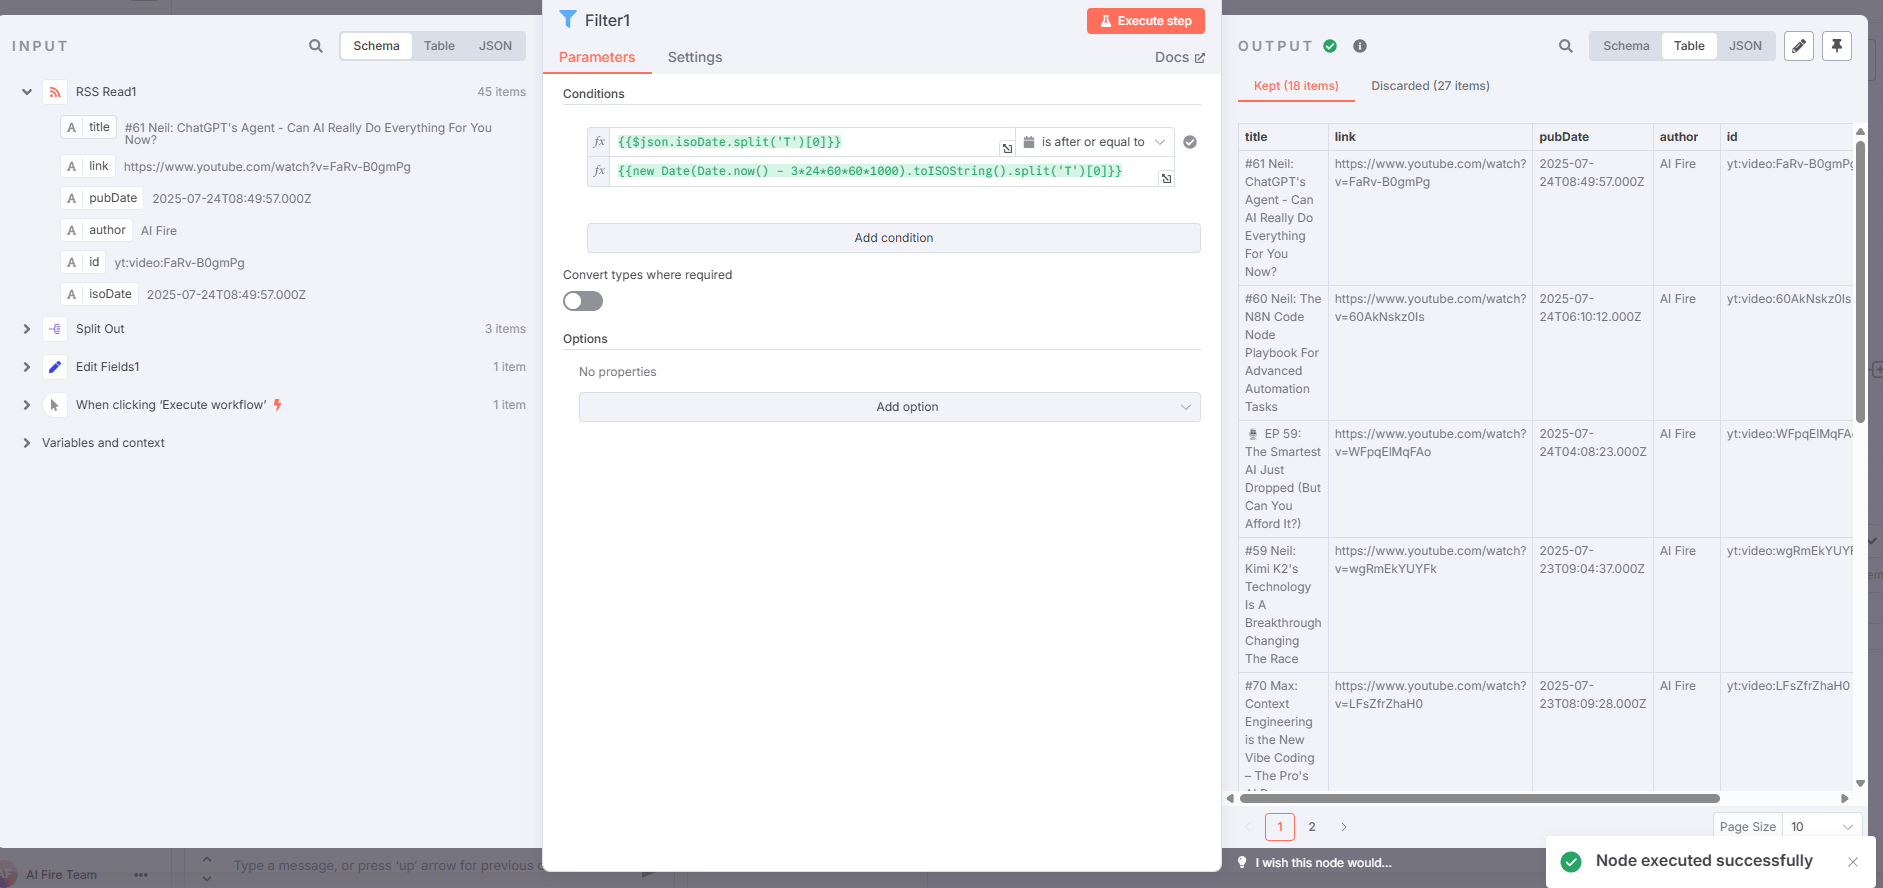
This is where the "Filter" node comes in. Add it after your RSS reader. Its job is to check every single video that comes through and only allow the ones that meet a specific condition to pass. In our case, the condition is: "Is this video new?"
You set the condition to filter by the video's publication date (the "isoDate" field) and use a special code expression to check if it was published within the last few days. The expression might look a little scary at first:
{{ $json.isoDate.toDate().format('yyyy-MM-dd') }} and {{ $now.minus({day: 3}).format('yyyy-MM-dd') }}
Deconstructing the "Scary" Date Expression
That expression looks like something out of The Matrix but it's actually very simple when you break it down. Let's translate it into plain English.
1. {{ $json.isoDate.toDate().format('yyyy-MM-dd') }}
$json.isoDate: This pulls the date (usually in ISO format, like2024-07-18T15:24:00Z) from your JSON data - for example, the date a video was published..toDate(): This converts that text date into a real date object that your automation can work with..format('yyyy-MM-dd'): This turns the date into a clean, computer-friendly string, like2024-07-18- just the year, month and day.
So, this entire line gives you the video’s publication date in YYYY-MM-DD format.
2. {{ $now.minus({day: 3}).format('yyyy-MM-dd') }}
$now: This grabs the current date and time - right now, at the very moment your automation is running..minus({day: 3}): This subtracts three days from the current date. For example, if today is July 18th, this would give you July 15th..format('yyyy-MM-dd'): Again, this cleans up the date into the sameYYYY-MM-DDformat.
So, this line gives you the date for “three days ago,” also in the clean format.
In summary:
{{ $json.isoDate.toDate().format('yyyy-MM-dd') }}= The publication date of the video, inYYYY-MM-DDformat.{{ $now.minus({day: 3}).format('yyyy-MM-dd') }}= The date exactly three days before now, in the same format.
If the answer is "yes", it means the video is new and the filter lets it pass to the next step (like a Discord notification). If the answer is "no", the video is old news and the filter blocks it, ending that branch of the workflow.
Your AI Code Translator
Don't ever feel like you need to memorize expressions like that. This is another perfect job for an AI assistant. You can simply go to ChatGPT or Claude and describe what you want in plain English:
I need to work with dates in my workflow automation (n8n Filter node). Please give me the exact code snippets (using the correct syntax for expressions or handlebars) for the following:

Convert an ISO date field from my JSON data (e.g., $json.isoDate) to the YYYY-MM-DD format.

Get the date for exactly three days ago from the current moment, also in YYYY-MM-DD format.

Please show the full expressions so I can copy and use them directly and add a short comment or explanation for each one.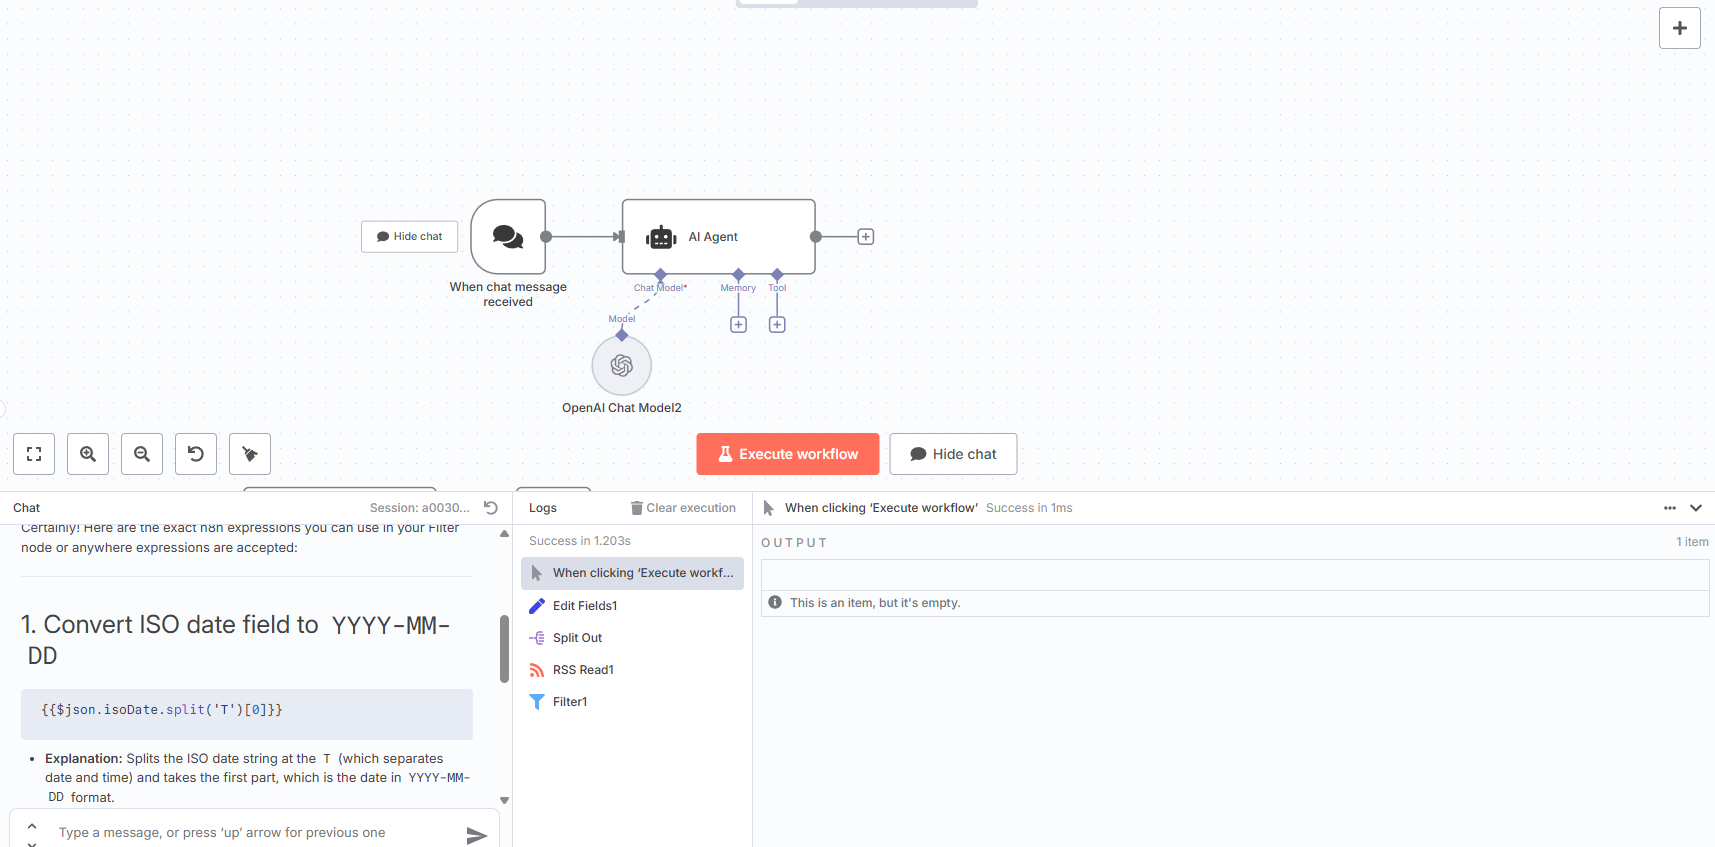
The AI will act as your personal code translator, giving you the exact expression you need. This is a powerful way for non-coders to build incredibly sophisticated logic into their automations.
The Ultimate Power Move: Building a True Intelligence Agent
Everything built so far has been about creating powerful, automated scripts. They follow a set path, executing your commands flawlessly. This next step is different. This is where we give the machine a brain and go completely off the rails into "this can't be real" territory.
Welcome to AI Agents. An AI Agent in n8n isn't just a workflow; it's a system that can think, plan and use tools to achieve a goal.
Think of it this way: a regular workflow is like a character in an old video game, locked on a fixed path. An AI Agent is like a modern NPC from a game like Red Dead Redemption 2 (that means it's super cool). It has a goal, it can perceive the world around it and it can make its own decisions about how to act. It's the difference between a script and a mind.

Creating quality AI content takes serious research time ☕️ Your coffee fund helps me read whitepapers, test new tools and interview experts so you get the real story. Skip the fluff - get insights that help you understand what's actually happening in AI. Support quality over quantity here!
Building Your First Agent: The J.A.R.V.I.S. Blueprint
The core concept behind these agents is simple. The AI looks at your goal (e.g., "Is the server working?"). Then it looks at the list of tools it has been given. It then reasons about which tool is the best one to use to accomplish that goal.
Setting one up is surprisingly straightforward:
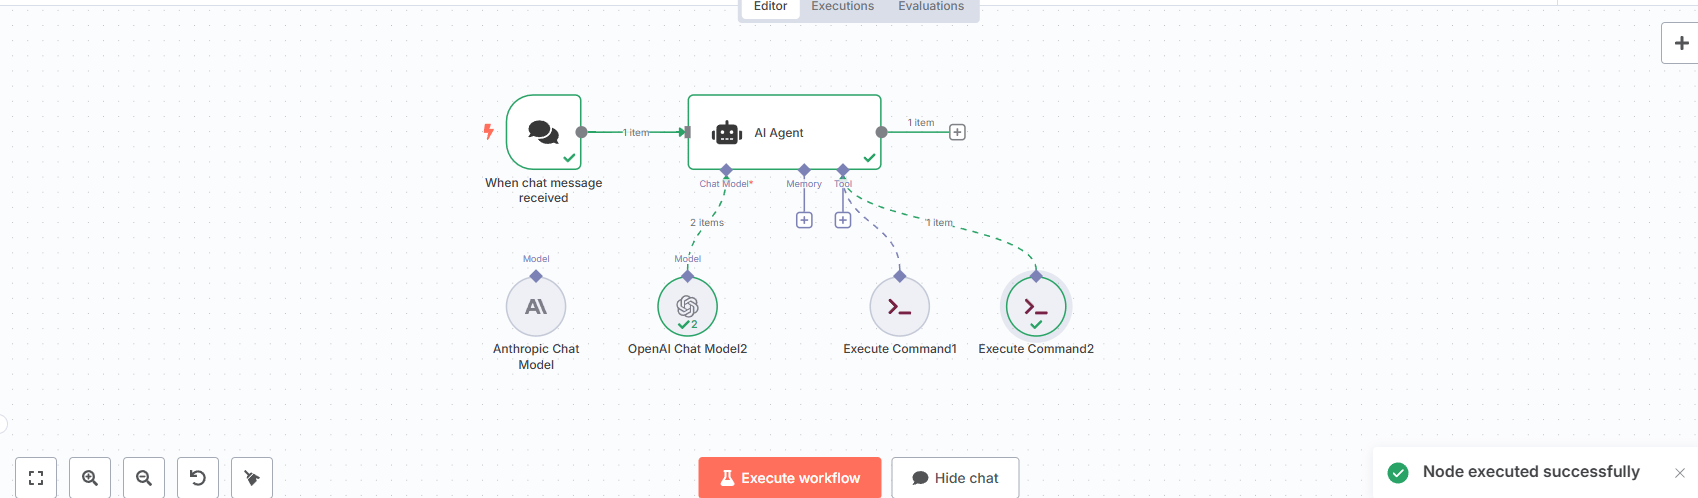
Add an "AI Agent" node to your canvas. This node will serve as the central brain.
Connect a "Chat Trigger" to it. This gives you a simple chat interface to have a conversation with your agent.
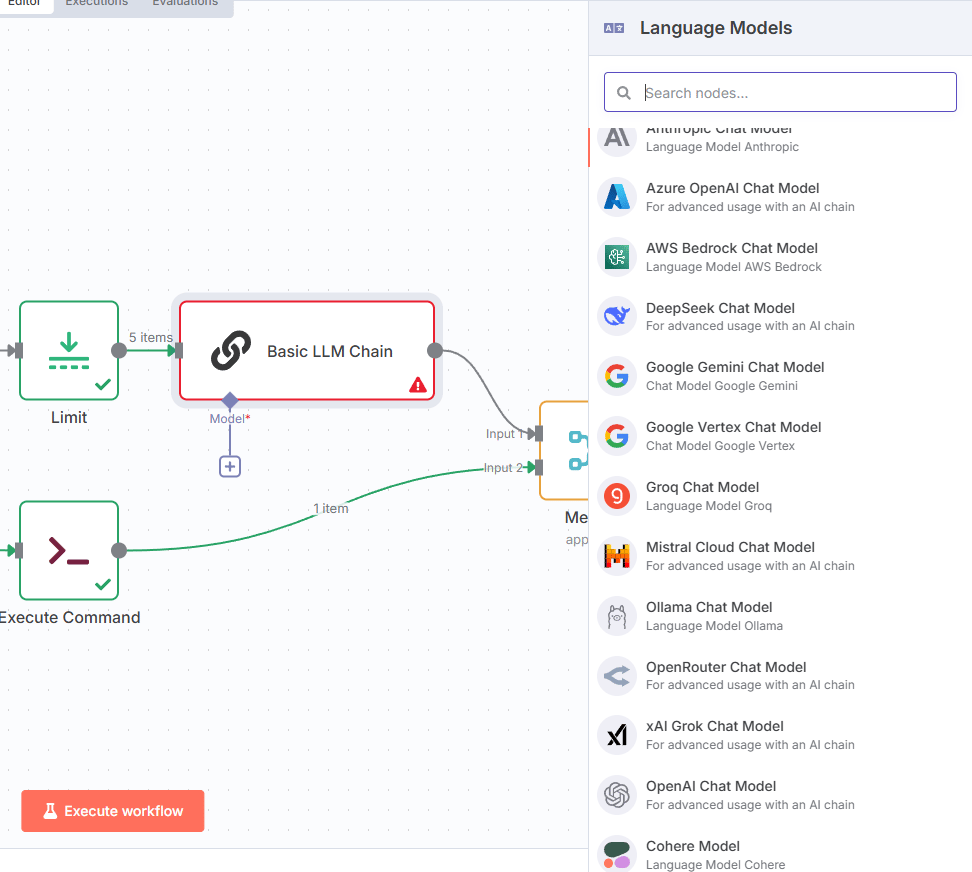
Configure your AI model. A powerful model like OpenAI's GPT-4 or Anthropic's Claude 4 is ideal for this, as the agent needs strong reasoning capabilities.
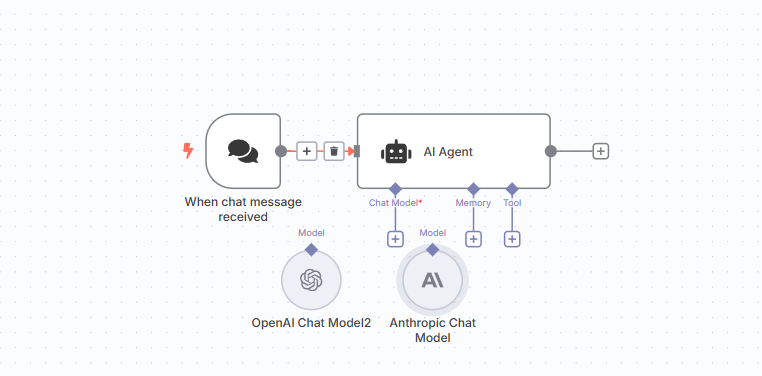
Now, with the brain in place, it's time to give it some superpowers.
Giving Your Agent Superpowers (aka Tools)
An agent with no tools is like a superhero with no powers - a lot of potential but not very useful. In n8n, "tools" are just the other nodes and workflows you've already built.
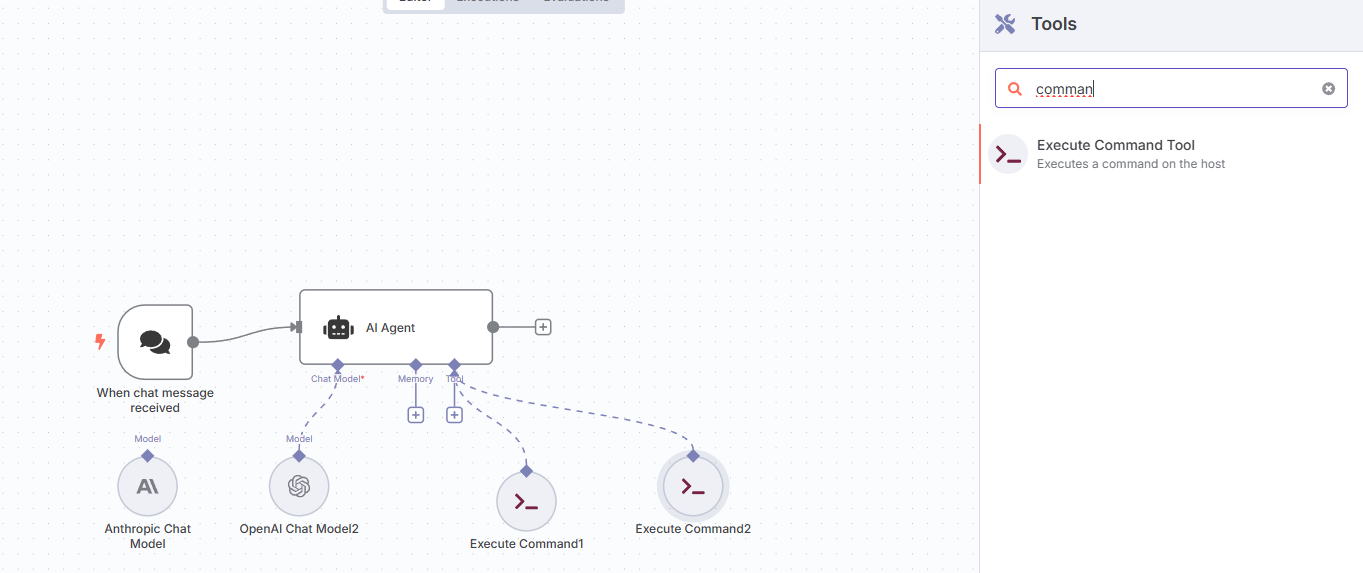
You can grant your agent access to the command-line tools from the previous step:
Tool #1: The Website Ping Tool
Command:
ping 1.1.1.1 -c 4Description: "Use this to check if a public website is up and responding. This is for testing the general internet connection".
Tool #2: The Server Health Tool
Command:
ping 192.168.1.1 -c 3(a generic local server IP)Description: "Use this to check if the main local file server is responding. The server's hostname is 'Mainframe'".
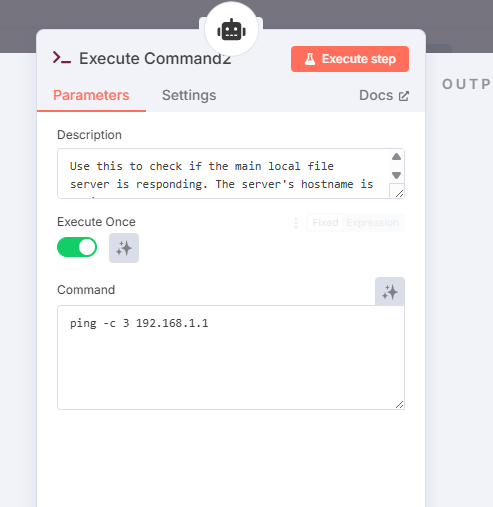
The description is the most important part. It's not for you; it's for the AI. This is how the agent learns what each tool does, so it can make intelligent decisions about when to use them.
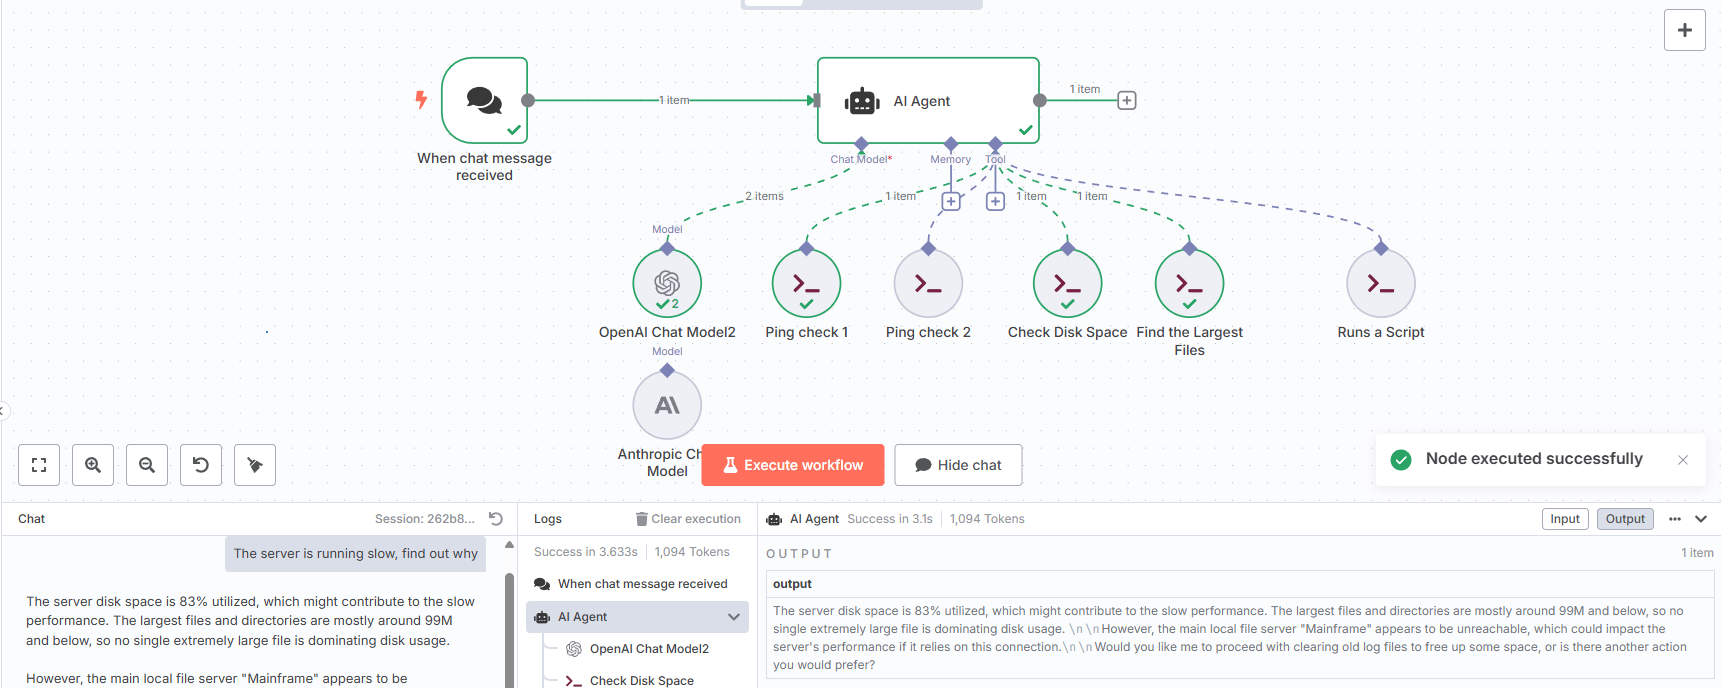
The Magic Moment: Having a Conversation with Your Infrastructure
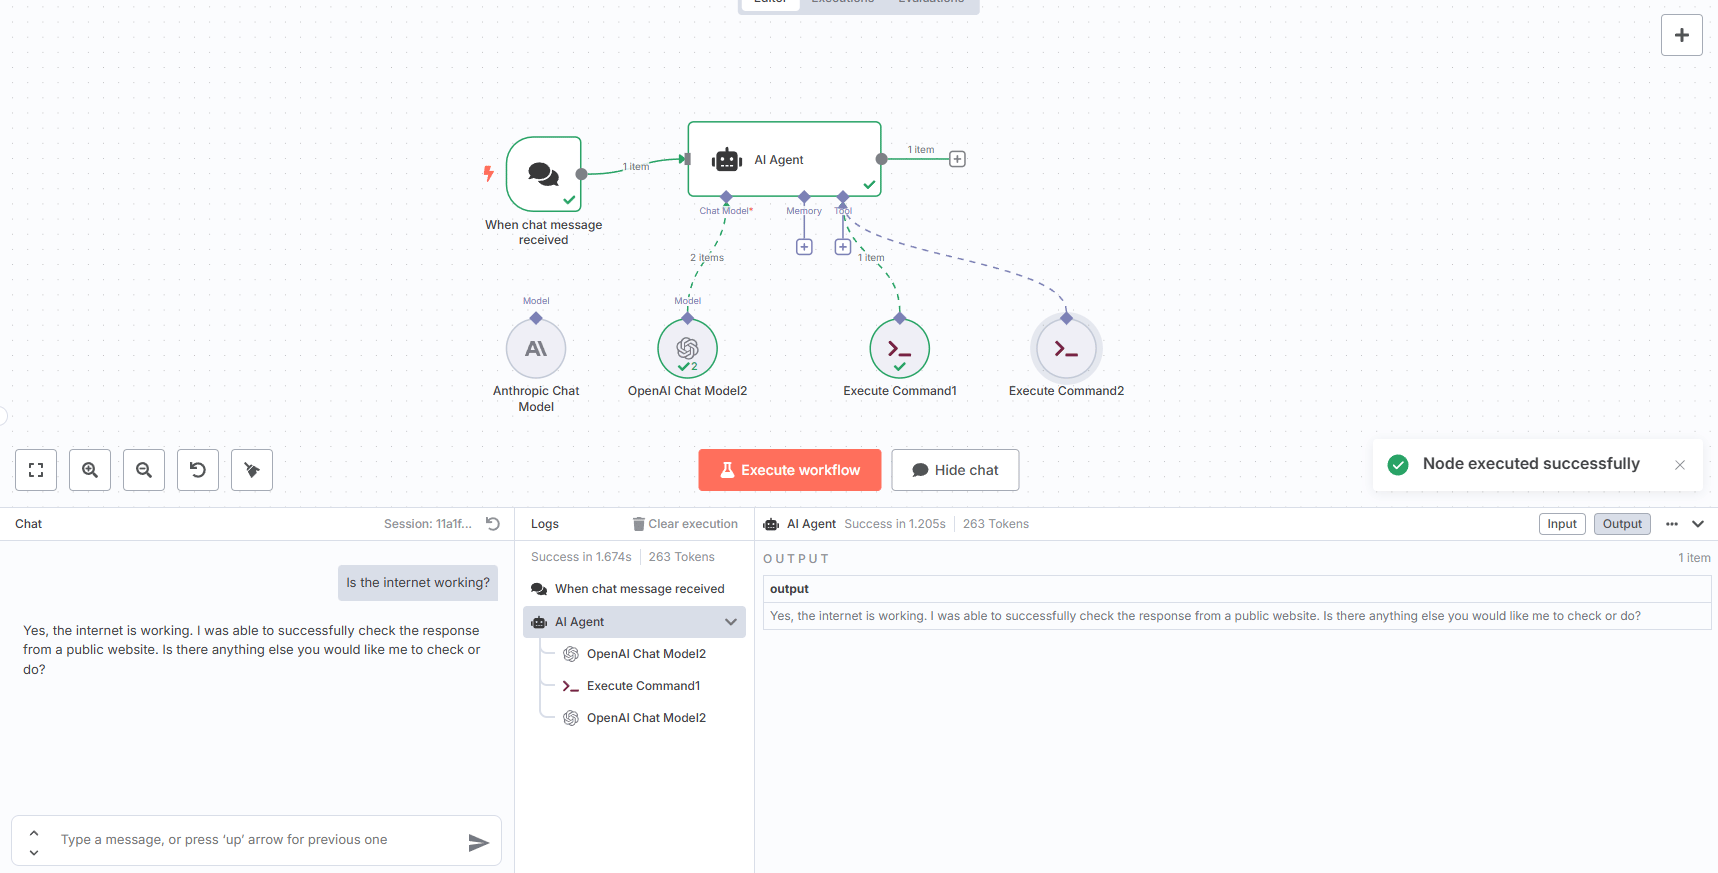
Now for the payoff. Open the chat interface and start talking to your agent in plain English.
You: "Is the internet working?"
The Agent's Thought Process: (Behind the scenes, you can see it think) "The user is asking about the 'internet.' My 'Website Ping Tool' is described as being for 'testing the general internet connection.' This is the correct tool".
The Agent's Action: It automatically runs the
ping 1.1.1.1 -c 4command.The Agent's Response: "Yes, the internet connection appears to be stable. I am receiving successful pings from the public server at 1.1.1.1".
Try another one:
You: "Check if the Mainframe is up".
The Agent: It intelligently chooses the "Server Health Tool" because you used the keyword "Mainframe" from its tool description. It runs the local ping and gives you a status update.
You can even give it a complex request:
You: "Give me a full network status report".
The Agent: It might be reasonable to assume that to provide a "full" report, it needs to run both tools. It will execute the website ping, then the server ping and then synthesize the results into a single, cohesive answer.

This Is Just the Beginning: Scaling Your Agent's IQ
This is where the real fun begins. That two-tool agent is just the starting point. Each new tool you add is like discovering another island in an endless archipelago of possibilities.
Imagine giving your agent a "Server Medic" toolbelt:
A tool to check disk space (
df -h).A tool to find the largest files on the server (
find / -type f -size +1G).A tool that runs a script to safely clear old log files (
/scripts/clear_logs.sh).
You could then have a conversation like this:
You: "The server is running slow, find out why".
Agent: (Runs disk space check) "Disk space is at 83% capacity. The largest files appear to be old log files".
You: "Okay, clean them up".
Agent: (Runs the log clearing script) "The old logs have been cleared. Disk space is now at 65%".
Or what about a "Cybersecurity Analyst" agent? You could give it tools to run network scans, check firewall rules or analyze authentication logs for failed login attempts. You could literally ask it, "Have there been any suspicious activities on the network today?"
You are no longer just an automator, telling a machine to follow a script. You are the creator of an intelligent, autonomous system. You are building your own personal J.A.R.V.I.S. to help you manage your digital world.

The Automator's Code: Essential Best Practices
As you build more complex workflows, following a few best practices will save you from headaches.
Save Early, Save Often: Get in the habit of hitting
Ctrl+Safter every few changes. A browser refresh can wipe out 30 minutes of brilliant work in a heartbreaking instant.Pin Your Test Data: After you successfully test a node that fetches data (like an RSS feed), click the small pin icon on its output. This keeps the test data available for downstream nodes, so you don't have to re-run the fetch every single time you tweak a filter or an AI prompt. This saves a massive amount of time and API costs.
Duplicate for Experimentation: Before you try a major, potentially breaking change, duplicate your workflow. This gives you a safe sandbox to experiment in. It’s like saving your game before you walk into the boss room.
Watch Your AI Tokens: When you're testing AI nodes, the token usage can add up quickly. Pinning the input data to an AI node is crucial, as it allows you to refine your prompt multiple times without actually making a new API call and burning through your credits until you're ready.

Your Next Quest: Ideas to Spark Your Imagination
What you've built here is just the beginning. The possibilities are as vast and varied as the thousands of limestone karsts dotting the bay in Ha Long Bay. Here are a few ideas to get you started on your next adventure.

Advanced AI Ideas:
Create an intelligence agent that reads the full text of news articles, rates them on a scale of 1-10 based on your predefined interests and only sends you the 9s and 10s.
Build an agent that fetches the transcript of a new YouTube video, asks an AI to summarize the key points and then decides if it's worth your time to watch.
Home Lab Automation:
Create a master "health check" agent that monitors server health, disk space and running containers and can even try to restart a crashed service automatically before alerting you.
Build a chatbot interface for your entire infrastructure, allowing you to ask questions like "What's the IP address of my Plex server?" from your phone.
Integration Ideas:
Connect your home security cameras to an AI image analysis tool to get alerts only when it detects a person, not a stray cat.
Automate your social media by having a workflow that takes your latest blog post, asks an AI to write three different tweets about it and schedules them.
The Troubleshooter's Guide: Common n8n Issues & How to Fix Them
Even in the most well-designed workflows, things can go wrong. Here’s how to fix the most common issues.

"Connection failed" errors: This is almost always a credentials issue. Double-check your API keys. Also, ensure the service you're connecting to hasn't blocked your server's IP address, which can sometimes happen with cloud providers.
Workflows not triggering on schedule: First, check the simple thing: is the workflow "Active"? There's a toggle in the top right corner. If it is, check the "Executions" log for any error messages that might explain why it's failing to run.
AI responses seem weird: 99% of the time, this is a prompt problem. Use the JSON view in the node's output to see the exact data that was sent to the AI. You'll often find that you've passed the wrong data or formatted it incorrectly.
Too many notifications: Your automations should reduce chaos, not create it. If you're getting spammed, go back and add more aggressive "Limit" and "Filter" nodes. Be ruthless about only letting the most important information through.
🎉 You Did It! Welcome to the Automation Revolution
Take a moment and look back at the blank canvas where this all started. Now, look at the intelligent, multi-layered system you just built. You've done more than just follow a tutorial; you've learned the fundamentals of a new and powerful way of thinking.
You are now part of an exclusive club of builders, creators and tinkerers who understand that the digital world isn't just something to be used - it's something that can be commanded.
What You've Accomplished Today
Let's be clear about the superpowers you just unlocked:
✅ You didn't just sign up for a service; you deployed your own private automation engine, giving you complete control.
✅ You didn't just read the news; you built an AI-powered intelligence agent to analyze the world for you.
✅ You didn't just run a command; you gave your workflow direct access to its own operating system.
✅ And most importantly, you didn't just write a script; you gave an AI a brain and the tools to think for itself.
This is the moment in The Matrix where you stop seeing the bullet and start seeing the code. The world of digital tasks - APIs, websites, servers and data streams - no longer looks like a series of disconnected chores. It now looks like a system of systems, a giant LEGO set waiting for you to connect the pieces in new and creative ways.

The journey doesn't end here. This is just the beginning. With over 400 pre-built integrations and the power to create your own, the possibilities aren't just endless; they're as vast and varied as the thousands of limestone islands dotting the waters of Ha Long Bay. Each one is a new idea, a new workflow, waiting to be explored.
The community of n8n builders is out there, sharing incredible and inspiring creations every day. But the most important workflow is the one you build next.
You now have a superpower. The question is no longer if you can automate something but simply what you will choose to automate first.
Happy Automating! 🤖
If you're looking for my workflow template, congratulations, you've found it. Just click on it, copy the template data and paste it into your new blank workflow in n8n. I hope you have fun with it!
If you are interested in other topics and how AI is transforming different aspects of our lives or even in making money using AI with more detailed, step-by-step guidance, you can find our other articles here:
Beyond Basics: 10+ n8n Nodes For Killer Automated Workflows!*
Stop "Prompting" AI Coding Assistants! Do THIS Instead
*indicates a premium content, if any
How would you rate this article on AI Automation?We’d love your feedback to help improve future content and ensure we’re delivering the most useful information about building AI-powered teams and automating workflows |
Reply