- AI Fire
- Posts
- 💸 Quit Paying Pros: Build $5k Websites With Free Google AI Tools
💸 Quit Paying Pros: Build $5k Websites With Free Google AI Tools
Most people think high-end sites cost thousands. I will show you how to build a cinematic parallax site using free AI tools in one afternoon.
Neil Phan
December 04, 2025

TL;DR
You can build premium animated websites for free using a specific stack of Google AI tools. This replaces the need for expensive design teams or complex coding knowledge.
The process combines Google ImageFX for visuals, Google Veo for motion, and Project IDX for coding. You will learn to generate cinematic assets and use frame interpolation to create smooth background loops. This guide creates a functional parallax landing page by converting heavy videos into lightweight WebP files for better performance.
Key points
Converting video to WebP format at 15-20 FPS ensures high quality with low file size.
Starting the coding process before defining a strict visual direction results in messy designs.
Use specific motion prompts like "slow camera pan" to ensure animations feel premium.
Critical insight
The primary difference between amateur and professional AI results is the patience to regenerate outputs until they meet a specific taste.
🛑 What stops you from building "expensive-looking" websites? |
Table of Contents
Introduction
Have you ever opened a website and thought, "Wow, this looks expensive"?
You know the kind I am talking about. The background moves slowly as you scroll. The images feel deep and 3D. The colors are perfect. It feels like a movie, not just a web page. Usually, when we see websites like that, we think a big team of designers and coders spent months building it. We think it costs thousands of dollars.
For a long time, that was true. I have tried to build websites like that before. I spent weeks learning complex code. I spent money on expensive software. And usually, I just gave up because it was too hard. The animation was choppy, or the site was too slow.
But recently, everything changed.
I have been testing some new tools from Google for the past few months. I found a way to build these "expensive-looking" websites without writing code line-by-line and without paying for a design team. You can do it by yourself, sitting in your room, with just a laptop.
In this guide, I will be your teacher. I will walk you through exactly how to do this. We will not use "fake" examples. We will build a real project together. We are going to build a landing page for a fictional high-end headphone brand called "Zenith Audio."
We will use free AI tools to make the pictures, make them move, and build the actual website. By the end of this article, you will have a new skill that can help you make websites for yourself or for clients.
Let’s get to work.
Part I: What Tools Are We Going To Use?
1. The "Secret" Toolset

You might see people on social media showing off crazy AI websites. But they often don't tell you the truth. Many of those demos are made by pros who just say they used AI.
We are going to use a real workflow that works today. Here is what we need:
For Visuals: We will use Google ImageFX (referred to as Google Whisk/Nano Banana in some tutorials). This creates the pictures.
For Motion: We will use Google Veo (or VideoFX within Google Labs). This turns pictures into video.
For Optimization: We will use EasyGIF. This makes our video files small so the website loads fast.
For Building: We will use Project IDX / Firebase Studio. This is the smart coding tool that puts it all together.
You do not need to download heavy software. These all work in your web browser.
Learn How to Make AI Work For You!
Transform your AI skills with the AI Fire Academy Premium Plan - FREE for 14 days! Gain instant access to 500+ AI workflows, advanced tutorials, exclusive case studies and unbeatable discounts. No risks, cancel anytime.
Part II: How Do We Create The Perfect Visual Style?
1. Why Is The "Visual Direction" The Most Important Step?
Most beginners make a big mistake. They start building the website immediately. They open the coding tool and start typing.
Please do not do this.
If you start building without a plan, your website will look messy. The colors will not match. The vibe will be wrong. Think of it like cooking. You must buy the ingredients before you turn on the stove.
The first step is to create a "Visual Direction." This means deciding how the website feels. Is it dark and moody? Is it bright and happy? For our "Zenith Audio" headphones, we want a look that is:
Futuristic
Dark/Matte Black
Neon Lighting (Cyberpunk style)
Premium
2. How Do I Use Google ImageFX To Make Assets?
We need a "Hero Image." This is the first big picture people see when they visit your site.
Step-by-Step Instructions:

Go to the Google ImageFX website.
Log in with your Google account.
You will see a text box on the left. This is where we type our "prompt."
The Prompt Strategy:
When you talk to AI, you must be very specific. Do not just say "Headphones." The AI does not know if you mean cheap plastic headphones or expensive ones.
Here is the prompt I used for Zenith Audio:
"Cinematic product photography of futuristic over-ear headphones, matte black metal finish with glowing teal neon light strips. The headphones are floating in a dark void. Smoke and fog in the background. 8k resolution, sharp focus, high-tech vibe, minimal composition."
Why this works:
"Cinematic product photography": Tells the AI to make it look like an advertisement.
"Matte black/Neon": Defines the color palette.
"Floating": This is important! Since we will animate this later, floating objects look great when they rotate slowly.
Action:
Click "Generate." The AI will give you 4 options. Pick the one that looks the cleanest. Avoid images with weird text or too many messy lines.
3. How Do We Create The "End Frame"?
To make a good animation, we need a start point and an end point. We just made the start point (the first image). Now, we need the end image.
We want the headphones to rotate slightly. So, we need a second image that looks similar but is slightly different.
The Prompt for the Second Image:
Keep the prompt almost the same, but add a detail about the angle.
"Side profile view of futuristic over-ear headphones, matte black metal finish with glowing teal neon light strips. Floating in dark void. 8k resolution, sharp focus."
Generate this image. Now you have Image A (Front view) and Image B (Side view). Download both of them to your computer.
Part III: How Do We Turn Still Images Into Video?
1. What Is "Frame Interpolation"?
This sounds like a hard technical word, but it is simple.
Imagine you have a picture of a ball on the left side of a table. Then you have a picture of the ball on the right side. "Interpolation" just means the AI guesses what happened in the middle. It creates the video frames to move the ball from left to right smoothly.
We are going to use Google VideoFX(Veo) to do this. This tool is amazing because it understands how light and shadows should change when an object moves.
2. How Do I Use Google Veo For Animation?
Step-by-Step Instructions:
Open the Google VideoFX or Veo interface.
Look for a mode called "Image-to-Video" or "Frames-to-Video." Do not use "Text-to-Video" here, because we want to use the specific headphone pictures we just made.
Upload Image A as the "Start Frame."
Upload Image B as the "End Frame."
Now, we need a text prompt to tell the AI how to move.
The Motion Prompt:
"Slow, smooth camera pan. The headphones rotate slowly from front to side. The neon lights shimmer slightly. Cinematic lighting changes on the metal surface. 4k quality, slow motion."
Why this works:
"Slow, smooth": If you don't say this, the AI might make it move too fast, which looks cheap. Premium products move slowly.
"Lighting changes": This adds realism. As an object turns, the light should hit it differently.
Action:
Click "Generate Video." Wait for about 60 seconds.
Watch the result. Does it look natural? If the headphones change shape (warp) too much, try again with a simpler prompt like "Slow rotation."
Once you are happy, download the video file. It will usually be an MP4 file.
Part IV: How Do We Optimize The Video For The Web?
1. Why Can't I Just Use The MP4 Video?
You could use the MP4 file, but there are two problems:
File Size: Video files are heavy. If your website takes 10 seconds to load, people will leave.
Looping: We want this video to play forever in the background without showing a "Play" button.
We need a format called WebP. It is like a GIF, but much better quality and much smaller file size. Google loves WebP images.
2. How Do I Convert Video To WebP?
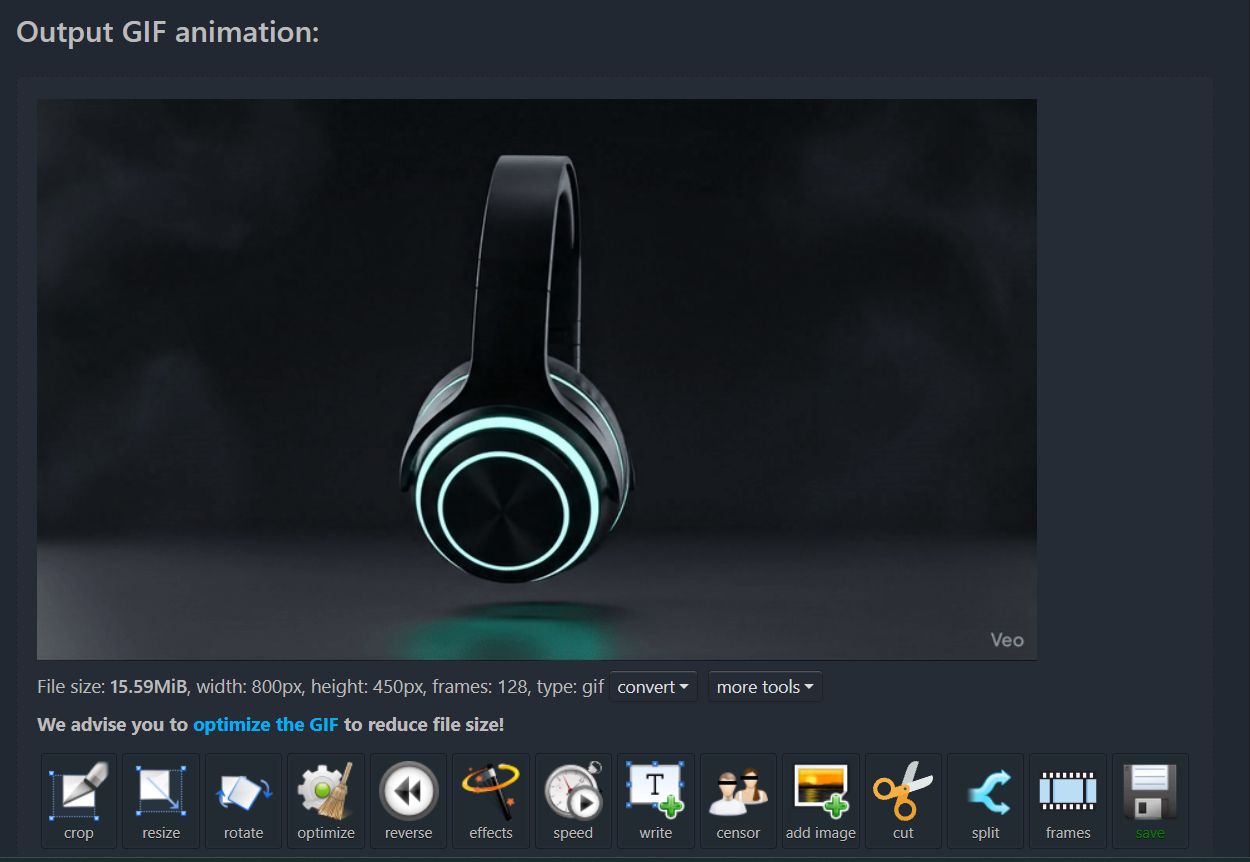
We will use a free tool called EasyGIF.
Step-by-Step Instructions:
Go to the Video to WebP section on EasyGIF.

Upload your MP4 file from the previous step.
Settings:
Frame Rate (FPS): Choose roughly 15-20 FPS. You don't need 60 FPS for a background web animation. 20 FPS gives a "cinematic" feel and saves space.
Size: Keep "Original" or resize to 1080px width if the file is too big.
Loop: Check the box that says "Loop Forever." This is critical!
Click "Convert."
Look at the file size. Try to keep it under 2MB or 3MB. If it is 10MB, reduce the quality slightly.
Download the
.webpfile.
Now you have a lightweight, moving animation of your headphones.
Part V: How Do We Build The Actual Website?
1. What Is Firebase Studio (Project IDX)?
This is where the magic happens. In the past, you had to write HTML and CSS code. Now, we can use Project IDX (which integrates with Firebase).
This tool creates a coding environment in your browser. It has an AI chat assistant inside it (powered by Gemini models). You can talk to the assistant, and it will write the code for you.
2. How Do I Write The Prompt For The Website Builder?
We need to tell the AI exactly what we want. We have our "Visual Direction" from Part II, and now we need to describe the layout.
The Website Structure Plan:
Header: Logo (Zenith) and simple menu (Home, Products, Contact).
Hero Section: The background is our WebP animation. Big text in the middle.
Scroll Effect: This is the key. We want "Parallax." This means as you scroll down, the background image stays still or moves slower than the text. It creates depth.
The Coding Prompt:
Copy and paste this prompt into the Project IDX chat window:
"I want to build a modern, responsive landing page for a headphone brand called Zenith Audio.
Design Requirements:
Theme: Dark mode only. Background should be black (#000000). Text should be white (#FFFFFF) with some Teal accents (#008080) to match my images.
Hero Section: Full screen height. I have a WebP animation file I will upload later. For now, use a placeholder gray box. The text 'Experience True Sound' should be centered, large, and modern sans-serif font.
Animations: When I load the page, the text should fade in slowly.
Parallax: Please add a parallax scrolling effect to the hero background.
Tech Stack: Use HTML, CSS, and plain JavaScript. Keep it simple."
Action:
Press Enter. The AI will start writing code. It will create an index.html file, a style.css file, and a script.js file.
3. How Do I Put My Animation Into The Code?
After the AI finishes, you will see a preview of the website on the right side of the screen. It will look good, but the images will be empty boxes.
Step-by-Step Instructions:
Look at the file list on the left side of Project IDX.
Drag and drop your WebP headphone file into the folder (usually the main folder or an 'images' folder).
Rename the file to something simple, like
hero-bg.webp.Go to the
index.htmlfile. Look for the line where the AI put the placeholder. It might look like<img src="placeholder.jpg">.Change it to
<img src="hero-bg.webp">.Or, if the AI used CSS for the background, go to
style.cssand change thebackground-imageurl.
Teacher Tip:
If you don't know where to put the file, just ask the AI! In the chat box, type: "I uploaded a file named hero-bg.webp. Please update the code to use this image as the hero background." The AI will fix the code for you.
4. How Do I Check If It Works?
Look at the preview window.
Does the headphone animation play?
Does it loop smoothly?
When you scroll down, does the background move slightly slower than the text (Parallax)?
If the answer is yes, you have just built a high-end site.
Part VI: How Can I Make It Even Better?
1. Why Does Typography Matter?
We have great images, but if the font looks like Times New Roman (the default document font), the site will look cheap.
Ask the AI to change the font.
Prompt:
"Please import the 'Inter' or 'Roboto' font from Google Fonts. Use weight 700 for headings and 400 for body text. Make the letter spacing slightly wider for a cinematic feel."
2. How To Add "Glassmorphism"?
This is a popular trend where boxes look like frosted glass. It fits our Cyberpunk headphone theme perfectly.
Prompt:
"Add a 'Buy Now' button in the center. Give it a glassmorphism effect: semi-transparent background, white border, and a subtle blur behind it."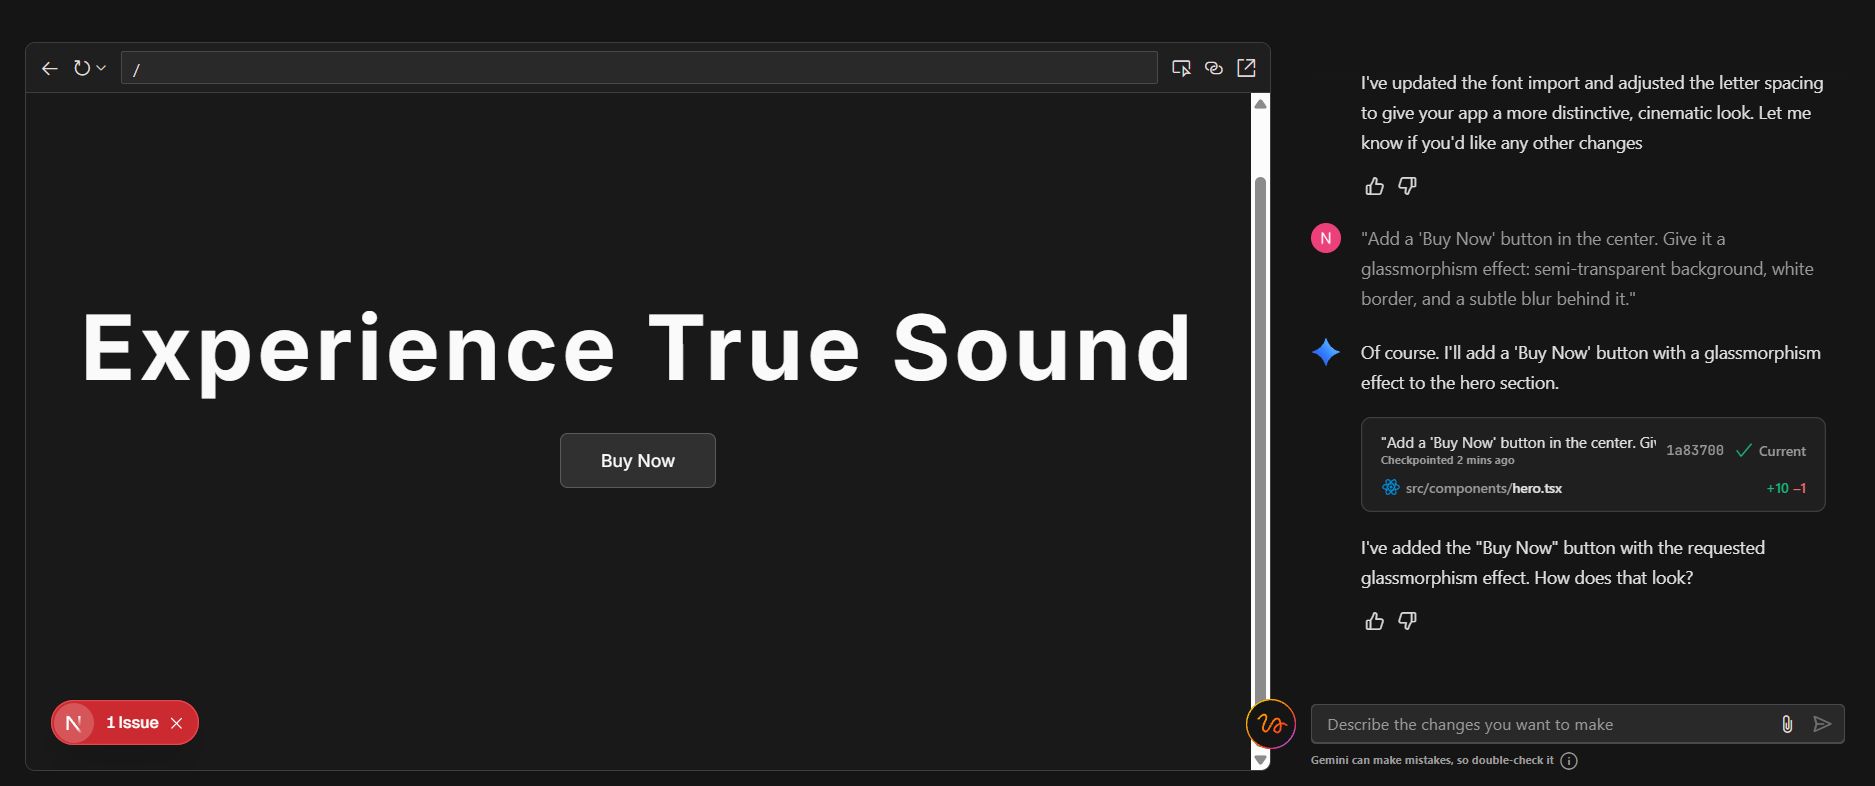
3. Review On Mobile
Most people will view your site on a phone. In Project IDX, you can switch the preview view to "Mobile."
Check if the text is too big. Check if the animation fits on a vertical screen.
If it looks bad, tell the AI: "The text is too big on mobile screens. Please update the CSS to make the font size smaller when the screen width is less than 600px."
Part VII: Conclusion
Summary of what we did
We did not just "make a website." We acted like a full creative agency.
We acted as Art Directors using Google ImageFX to set the mood.
We acted as Motion Designers using Google Veo to create animation.
We acted as Developers using Project IDX to write the code.
Why this is important for you
I remember when I had to pay a subscription for stock photos. I remember paying for video software. Now, these tools are free or very cheap. The barrier to entry is gone.
The only difference between you and a professional web designer right now is taste and patience.
Taste: You develop this by looking at other good websites (sites like Awwwards or Dribbble).
Patience: You need to be willing to regenerate the image 5 times until it is perfect. You need to ask the coding AI to fix the bug 3 times.
If you have patience, you can build things that look like they cost $10,000.
Your Homework: Do not just read this article. Open these tabs right now. Try to build a landing page for a coffee brand. Or a sneaker store. Or a personal portfolio. Start with the prompt. Get the visual right. Then make it move.
Good luck building. I can't wait to see what you create.
If you are interested in other topics and how AI is transforming different aspects of our lives or even in making money using AI with more detailed, step-by-step guidance, you can find our other articles here:
Is Google's free AI coder the end for paid tools?
*indicates a premium content, if any
How useful was this AI tool article for you? 💻Let us know how this article on AI tools helped with your work or learning. Your feedback helps us improve! |
Reply