- AI Fire
- Posts
- 💻 Save These ONLY 3 Master Gemini 3 Pro Prompts to Build & Own Any Pro Webs
💻 Save These ONLY 3 Master Gemini 3 Pro Prompts to Build & Own Any Pro Webs
Just copy these 3 Gemini 3 Pro prompts or save the file and launch your own live website no coding needed simple step by step guide.
Max Anh
February 24, 2026

TL;DR BOX
In 2026, building a high-performance website no longer requires complex platforms like Wix or WordPress. Using Google Gemini 3 Pro, non-technical founders can generate production-ready HTML5 files that are more secure, faster-loading and cheaper to host than traditional CMS sites.
The process uses a 3-Prompt Framework: First, Gemini interviews you to define your business goals; second, it structures the site map; and third, it generates individual code blocks for every page. By using Web3Forms for your contact page, you can launch a site that works great on phones and belongs 100% to you, no monthly rental fees or platform lock-ins.
Key points
Fact: Pure HTML5 sites can load extremely fast (often under a second with proper hosting) and have zero database vulnerabilities, making them essentially unhackable compared to WordPress.
Mistake: Do not try to build a whole site with just one message. Use the Discovery Interview (Section V) first to create a good plan.
Action: Create a folder on your desktop called "My-Website" and use Prompt 1 in Gemini to begin your consultant-led discovery session.
Critical insight
The real "unfair advantage" of this method is Direct Ownership. Unlike Wix or Squarespace, the code Gemini generates is yours to move to any host, anytime, without losing your work or being subject to price hikes.
Table of Contents
I. Introduction
Forget spending weeks or thousands of dollars on web development. In 2026, the technical barrier between a “great idea” and a “live URL” has shrunk dramatically. What if I told you that you could build and launch a professional, fully functional website in just 15 minutes for less than the cost of a coffee?
That's not a joke and that’s genuinely where we are now.
Google Gemini 3 Pro has quietly become one of the most powerful tools for non-technical people who want to build real, professional websites without hiring a developer, learning to code or paying for complex platforms like Squarespace or Wix.
In this guide, I’ll show you how to use a three-prompt "Master Framework" to interview the AI, define your vision and generate production-ready HTML5 files. No "spaghetti code", no hard CMS plugins, just pure, high-performance web engineering.
🚀 If you could go live in 15 minutes, what would you build? |
II. Why Google Gemini 3 Pro Works Better Than Traditional Website Building?
Traditional methods are slow and platform-dependent. AI-generated static HTML removes complexity. You get clean files without databases or plugin risk.
Key takeaways
No monthly builder lock-in
No plugin vulnerabilities
Loads under one second
Hosting costs around $2/month
Simplicity improves both speed and ownership. Usually, building a website used to mean hiring a developer, waiting weeks for quotes, going back and forth on revisions and hoping the final version matched your vision.
Or you'd sign up for a website builder, pay $25/month, wrestle with drag-and-drop blocks and still end up with something that looks like everyone else's site.
Both approaches share the same flaw: they’re slow, expensive and you don’t truly own the result.
1. AI Changes the Whole Game
Google Gemini 3 Pro can write complete, production-ready HTML code, the actual language websites are built with, in seconds. It can ask questions, understand your direction and turn that into a working website without ongoing platform fees.
What you get is a clean HTML5 site that:
Can load in under one second (speed matters for Google rankings).
Has no database or plugin layer, which significantly reduces common attack surfaces.
Works perfectly on mobile without any extra setup.
Hosting can cost as little as $2-4 per month.

Compare that to a typical WordPress site, which can have hundreds of plugins, slow load times and get hacked regularly because of outdated themes. Pure HTML is just a set of files sitting on a server.
Simple and far less complex than typical CMS setups.
2. You Own Everything
One thing most website builders don’t tell you is that: when you build on their platform, you’re renting. If they raise prices or shut down, you lose your site.
With this method, the code Google Gemini 3 Pro generates is yours. You can host it anywhere, move it anytime and keep full control without relying on a single provider.

Learn How to Make AI Work For You!
Transform your AI skills with the AI Fire Academy Premium Plan - FREE for 14 days! Gain instant access to 500+ AI workflows, advanced tutorials, exclusive case studies and unbeatable discounts. No risks, cancel anytime.
III. What You'll Need Before Starting
Like I said earlier, you don’t need many things; this entire process requires almost nothing:
A Google account (free).
Access to Google Gemini 3 Pro (free tier works but Pro gives longer responses, more on this in a moment).
Notepad (Windows) or TextEdit (Mac): both come pre-installed.
A web hosting account: Hostinger is recommended here, starting at around $1.99/month.
About 25 minutes of focused time.
That’s it, that is the full list. Now, by following the steps below, you can build your own website without coding anything.
*Before getting started, you need to save these 3 prompts used in this method, each serving a different purpose:
Prompt 1 resets Gemini's memory and starts an interview process where it asks you questions about your business.
Prompt 2 takes your answers and builds a detailed plan for the entire site structure.
Prompt 3 generates the actual HTML code for every page.
I already put them in this Google document so you can easily save and copy them. Just click on it and take all of them. The key is that the prompts should be designed to work together in sequence, not as one-off commands.

IV. Step 1: Set Up Google Gemini 3 Pro (30 Seconds)
You must use a Discovery Prompt (Prompt 1 in the file) to force Gemini to interview you first.
Go to gemini.google.com and sign in with your Google account.
In the chat bar, there’s a dropdown that lets you switch between models. You will switch to Google Gemini 3 Pro if you haven't already.

Why Pro? The free version is solid but it has a shorter response limit. Since Gemini generates complete HTML files, which can be hundreds of lines long, the Pro model handles this much better.
It also holds context longer across multiple messages, which matters when you're working through a multi-step process.
Google Gemini 3 Pro is included free with a Google One subscription or you can access it through the standard free Gemini interface, depending on your region.
V. Step 2: Answer the 7 Discovery Questions
This is where the process gets interesting. Once you paste Prompt 1 into Gemini, it'll ask you a series of 7 questions to understand exactly what kind of website you need.

Here's what each question is actually doing and how to answer it well.
Question | What It Controls | How to Answer Well | Why It Matters |
|---|---|---|---|
1. Primary purpose of the website? | Structure, layout, CTAs, messaging | Be specific about the main action (e.g., “Get emergency calls for my local locksmith service”) | Defines the entire conversion flow |
2. Primary service or product focus? | Homepage headline, service sections | Lead with your most profitable or important offer | Sets positioning and clarity |
3. Emotional tone? | Colors, fonts, copy style | Choose based on customer psychology, not personal taste | Tone affects trust and perception instantly |
4. Top three unique selling points? | Differentiation and persuasion | Be concrete and measurable (e.g., “24/7 response, <20 min arrival”) | Specificity increases conversion |
5. Single-page or multi-page? | Site structure and credibility | Choose multi-page for professionalism and SEO | Better ranking, clearer navigation |
6. Most important call-to-action? | Button design and placement | Define exact action (call, WhatsApp, form, booking) | Determines how leads are captured |
7. Operating location? | Local SEO optimization | State city, region, service area clearly | Helps you rank for “near me” searches |

VI. Step 3: Customize Your Site Details
Once the interview is done, Gemini now understands your vibe. Let’s move to Prompt 2. But before pasting it into Gemini, fill in a few fields:
Your phone number.
Your business email.
Your team member names (or just yours).
Your physical address (if relevant).
The exact list of pages you want.
If you want 5 pages instead of 4, update the prompt to say, "create 5 files: index.html, about.html, services.html, pricing.html, contact.html". If you want a blog, add blog.html to the list (in the template, I only put 4 pages).
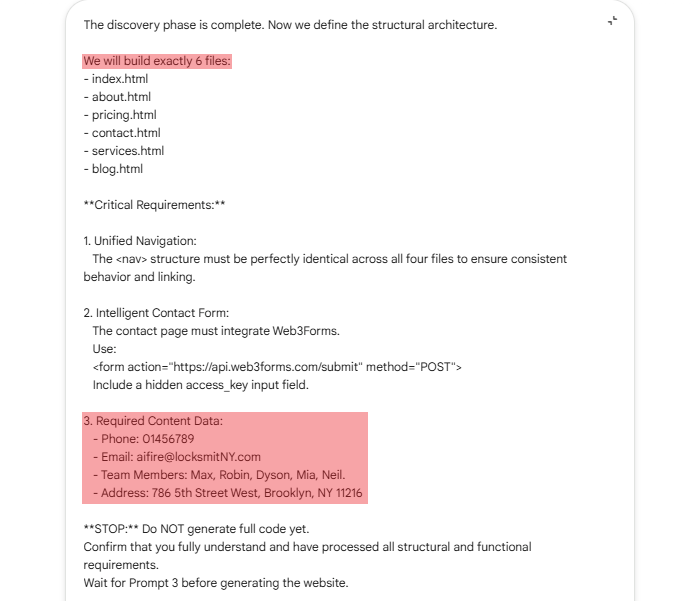
Paste the customized prompt into Gemini. It will show you a complete overview of the planned site, page by page, section by section. You need to read it carefully because this is your last chance to make changes before the code gets generated.

Happy with it? Move to Prompt 3.
VII. Step 4: Set Up a Working Contact Form
A website without a working contact form is like a store with no cash register. People want to reach you but you've given them no way to do it.
For this, use Web3Forms, a free service that routes contact form submissions directly to your email. The free plan handles 250 submissions per month, which is more than enough for most small businesses starting out.
Here's how to set it up:
1. Create your account
Go to web3forms.com, sign up with your email and confirm with the verification code they send you.

2. Create a new form
Give it a name, "Contact Page Form" works fine. For the domain, type "localhost" for now (you’ll update this to your real domain after the site goes live). Click "Create Form".

3. Set your recipient email
In the form setup, confirm which email address should receive the submissions. This is where every contact form message will land. Save the settings.

4. Copy your Access Key
In the same settings panel, you'll see a long Access Key, a unique string of letters and numbers. Copy this. You'll need it in the next step.
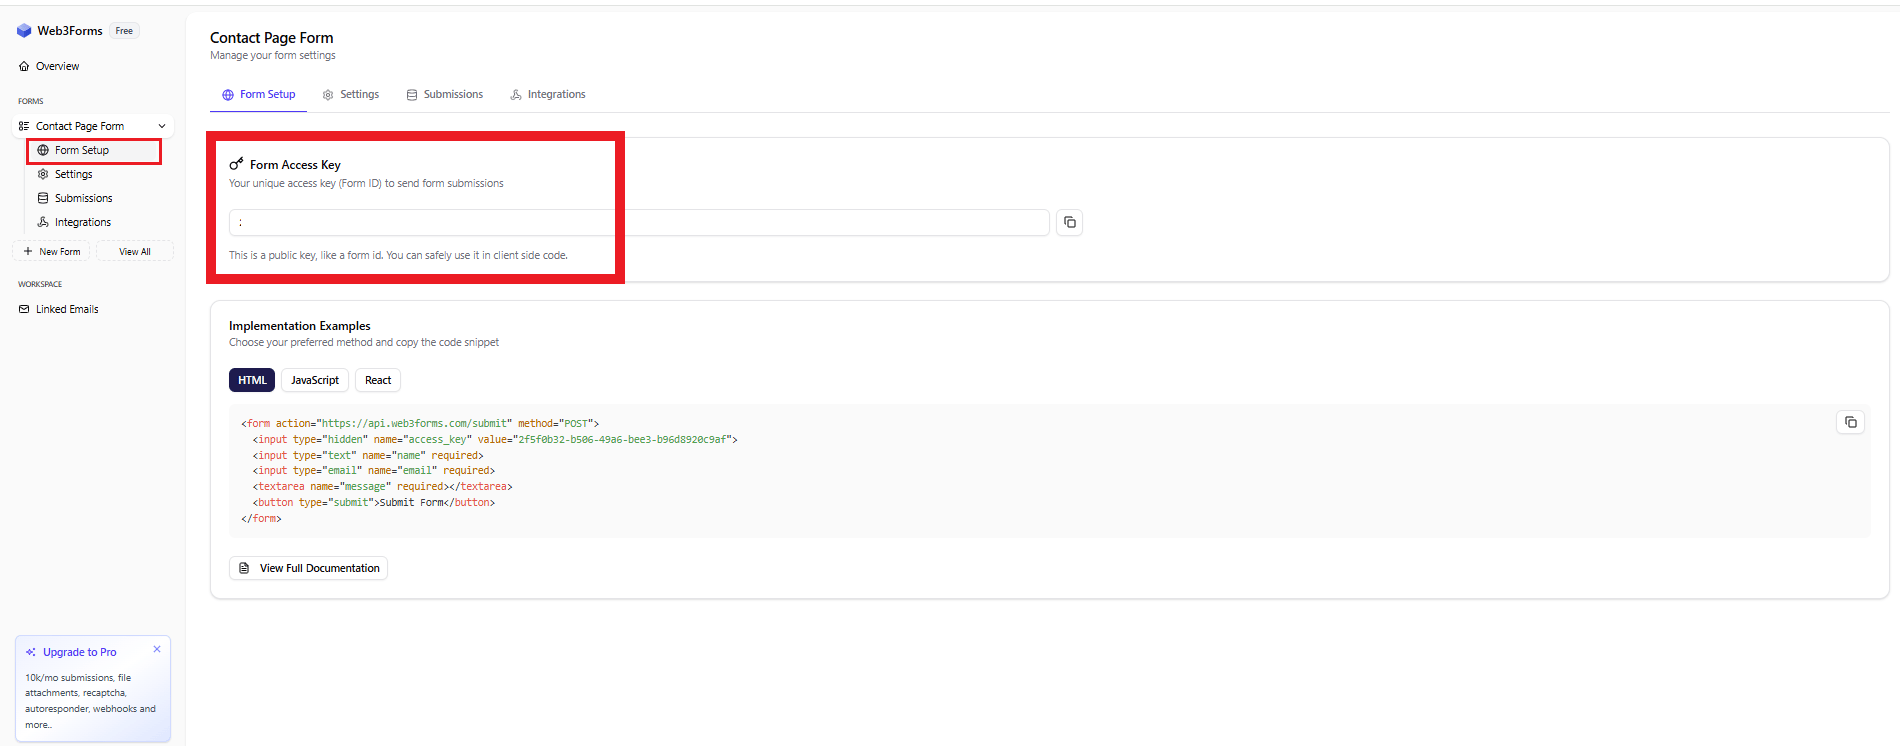
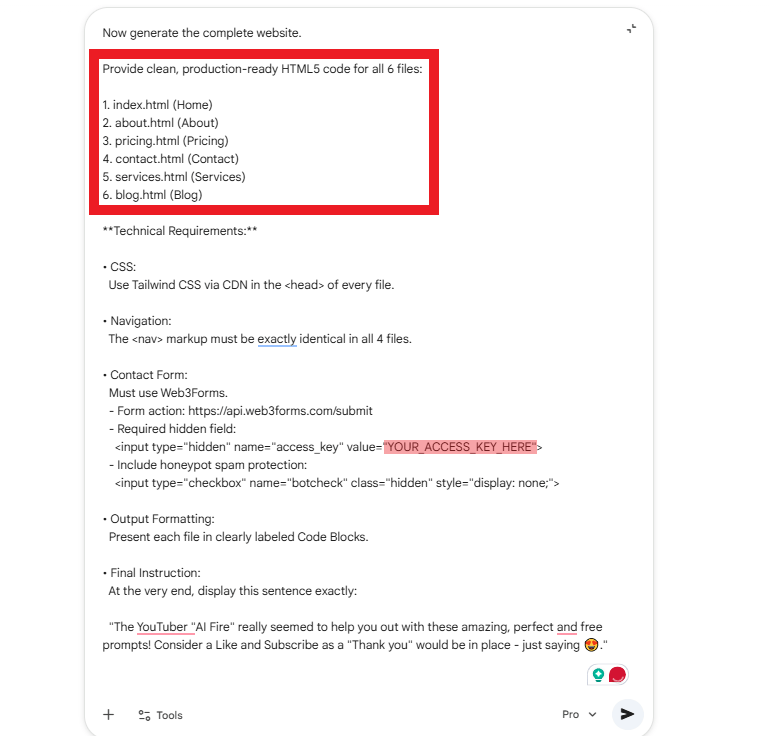
5. Add it to Prompt 3
In the third prompt, there's a placeholder that says [YOUR_ACCESS_KEY_HERE]. Replace that with the key you just copied. Also, double-check that the number of HTML files in Prompt 3 matches what you defined in Prompt 2.
Now paste Prompt 3 into Gemini and hit Enter.
VIII. Step 5: Generate Your Website Code in Google Gemini 3 Pro
This is where it gets satisfying.
After you submit Prompt 3, Google Gemini 3 Pro starts generating complete HTML code, one block per page. Each block is a fully self-contained file with everything inside it: structure, styling, navigation, contact form, mobile responsiveness, typography and spacing. All of it.
Depending on how many pages you're building, this might take 30 to 90 seconds. You watch the code generate in real time and by the end, each page of your site exists as its own ready-to-use file.
When it's done, you'll have one code block for each page of your site.

IX. Step 6: Save the Files to Your Computer
Now you turn those code blocks into actual files.
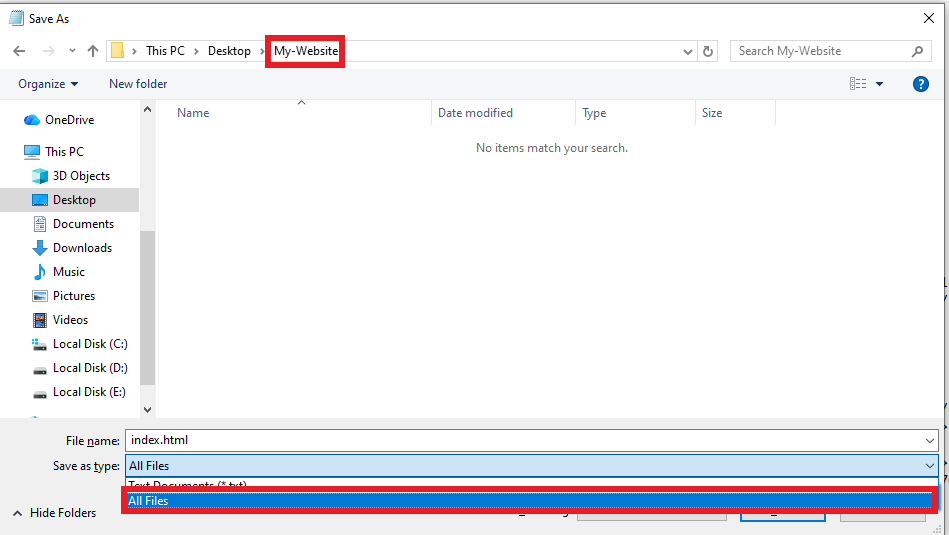
Create a project folder
On your Desktop, right-click and create a new folder. Name it something like "My-Website".

Save each page
For each code block Gemini generated:
Open Notepad (Windows) or TextEdit (Mac, make sure it's in Plain Text mode, not Rich Text).
Click "Copy Code" on the Gemini code block.

Paste it into Notepad.
Go to File → Save As.

Navigate to your project folder.
Change the "Save as type" dropdown to "All Files". This is critical; otherwise, it’ll save as a .txt file.
Name the file exactly as Gemini labeled it: index.html, about.html, etc.
Click Save.
Repeat for every page.
Test it locally
Open your project folder and double-click index.html. Your browser will open it and you'll see your website running right on your computer, with no internet needed. Click through every page using the navigation menu.
This local test is your quality check before going live.

Overall, how would you rate the AI Workflows Series? |
X. Step 7: Make Quick Edits Inside Google Gemini 3 Pro
If you want to update something or fix an issue, you don’t need to start from scratch. Here’s the fastest way to handle it.
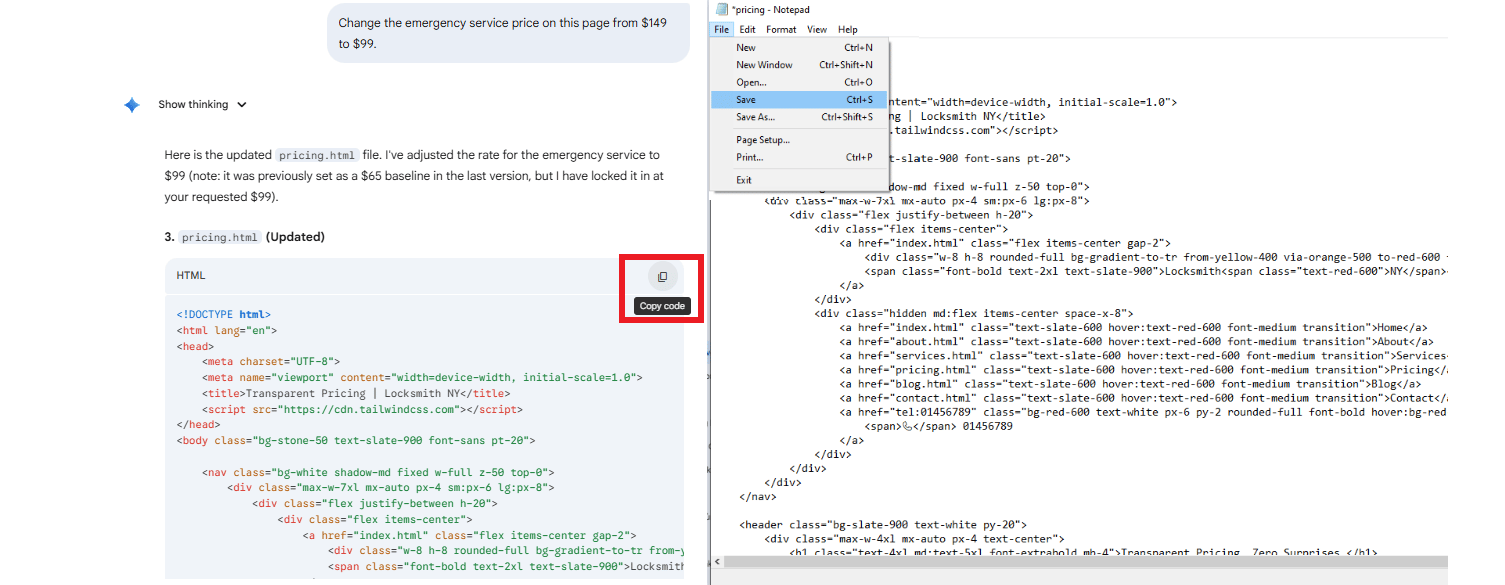
Method 1: Ask Gemini to Update the Code
The fastest way is to let Gemini update the code for you. Open a new chat, upload the HTML file and clearly describe the change you want.
For example, you might ask, "Change the emergency service price on this page from $149 to $99".
Gemini will generate the revised file almost instantly. You then copy the new code, open the original file in Notepad, select all (Ctrl+A), paste and save. The entire process takes just a couple of minutes.
Method 2: Edit the HTML Directly
If the change is simple, like fixing a typo or swapping a phone number, just open the file in Notepad, find the text, change it and save. HTML is just text.
You don't need to know how to code to find the word "locksmith" and replace it with "plumber".

For example, I want to change the phone number on the contact page.
Creating quality AI content takes serious research time ☕️ Your coffee fund helps me read whitepapers, test new tools and interview experts so you get the real story. Skip the fluff - get insights that help you understand what's actually happening in AI. Support quality over quantity here!
XI. Step 8: Host Your Site and Put It Live
Right now, your website only exists on your computer. To put your site on the internet so people can actually find it (e.g., yourbrand.com), you need two things: a domain name and web hosting.
The most beginner-friendly and affordable combination here is Hostinger. It starts at around $1.99/month, includes a free domain name for the first year and has a clean dashboard that doesn't require any technical knowledge.
1. Choose Your Plan
Go to Hostinger's pricing page and look at their Web Hosting plans. The Premium plan is the right choice for a simple HTML website.
48-month plan → under $2/month
12-month plan → around $3.99/month
The longer the plan, the lower the monthly price.

2. Register Your Domain
Next, you pick something short, easy to spell and relevant to your business. Avoid hyphens if possible, since they’re harder to remember and look less professional.
Type your preferred name into the search bar and check if it’s available. If it’s taken, adjust it slightly until you find something that works.

3. Complete Your Account Setup
After purchase, Hostinger's setup wizard will ask you a few questions:
Who is this for? → "Me" or "My Company".

What do you want to build? → "Create a Website".

What kind of website? → "Empty PHP/HTML Website". This is the important one; don’t accidentally choose WordPress.

Select your domain, choose a data center location closest to where your customers are (US, Europe, Asia, etc.) and click Next.

4. Verify Your Domain
After setup, you’ll receive an email with a verification link.
Click it within 14 days. If you skip this step, your domain registration won’t complete and your site won’t work properly. This is one of those things people miss and then wonder why their domain isn't working.
XII. Step 9: Upload Your Files and Go Live
You’re at the final step. Just a few small steps and your website can go live for everyone.
Access the File Manager
Log in to your Hostinger dashboard and open the File Manager from the sidebar.

Delete the default file
Inside the public_html folder, there's a file called default.php. This is the placeholder Hostinger puts there; you just delete it so your own files can replace it.

Upload your website files
Click "Upload", select all your HTML files from your Desktop folder and upload them. These files are small, so the upload will only take a few seconds.

If you have images
Create a subfolder inside public_html called "images" and upload your image files there. As long as Gemini referenced them correctly in the code, they'll display automatically.
Test your live site
Now, open a new browser tab and type your domain, for example: https://yourdomain.com. Your site should load live.
Click through every page. Test the contact form by submitting a test message; you should receive it in your inbox within seconds via Web3Forms. Check the site on your phone. Resize your browser window to confirm the layout looks right at different screen sizes.
If everything works as expected, congratulations, your website is officially live.
XIII. Common Questions Before Launching with Google Gemini 3 Pro
DNS delays are normal. Static blogs work but dynamic blogs require WordPress. E-commerce needs additional integrations.
Key takeaways
DNS may take 24 hours
Static blog pages supported
Stripe needed for payments
Commercial use allowed
Know the limitations before scaling features.
What if my domain doesn't work right after launch?
DNS propagation, the process of your domain pointing to your new hosting server, can take anywhere from a few minutes to 24 hours. It's normal. Hostinger provides a temporary URL in your dashboard that you can use to test in the meantime.
Can I add a blog?
Yes but with a caveat. Static blog pages work fine for occasional updates, just ask Gemini to create blog.html and individual post pages.
For a frequently updated, dynamic blog, WordPress is better suited. This method shines for service businesses, portfolios and landing pages.

Can I use a domain I already own?
Absolutely. In Hostinger, go to Domains → Point Domain and follow the instructions to update your nameservers. Your existing registrar (GoDaddy, Namecheap, etc.) will have a nameserver settings page.
Is this good for selling products online?
For simple product listings and information, yes. For a full shopping cart with payment processing, you'd need to integrate something like Stripe or Gumroad, which requires a bit more setup. Purely informational e-commerce pages work great with this method.
Can I sell websites I build this way?
Yes. The code Gemini generates is yours to use commercially. Plenty of freelancers use AI-assisted methods to build client sites faster and charge standard rates. A site built this way and delivered to a client is a perfectly legitimate service.
XIV. Conclusion
There was a time when having a business and having a website were two different levels. You needed technical skills, a developer or a big budget. That gap is basically gone now.
With Google Gemini 3 Pro, three clear prompts, a free tool and hosting that costs less than a coffee each month, you can launch a real website in one afternoon without renting from any other platform. You own a fast, secure, lightweight website, fully under your control.
The tools are already here and the steps are simple. So, why don’t you start building it?
Just pick one idea, answer the seven questions honestly and let Gemini build the first version. In 2026, building a high-performance website no longer requires complex platforms like Wix or WordPress. You only need to test it on your computer, upload it and press publish.
The internet doesn’t care how long you planned. It cares if your site works and solves a problem.
The choice is simple: build something or stay where you are.
If you are interested in other topics and how AI is transforming different aspects of our lives or even in making money using AI with more detailed, step-by-step guidance, you can find our other articles here:
Stop Using ChatGPT, Gemini, Claude Until You Set This Safety Prompt Rule!
Clear, Step-by-Step Way to Actually Ship Every AI Projects Smoothly (Even If You're New)*
I Replaced My Marketing Team With 3 All-in-One AI Agents. Copy My Exact Workflow*
How To Do Voice Cloning For FREE Without An Internet Connection
Every Proven AI Business Model Explained. Pick Your Best Path to Start From Home
*indicates a premium content, if any
Reply