- AI Fire
- Posts
- 🎨 How to Use Google Whisk for Consistent AI Characters Every Time (Full Guide)
🎨 How to Use Google Whisk for Consistent AI Characters Every Time (Full Guide)
Stop fighting with random faces. Use Google Whisk to pin down your subjects and scenes. Master the secret sidebar settings for perfect consistency.
Neil Phan
January 13, 2026

TL;DR
Maintaining character consistency in AI art is difficult, but Google Whisk solves this by allowing you to "lock" specific subjects, styles, and scenes. Using the powerful Imagen 3 model, you can drag and drop reference images to keep your character's face identical across different backgrounds and situations without needing complex prompts.
This guide walks you through mastering the tool's sidebar features, from choosing aspect ratios to applying advanced editing techniques for professional storytelling.
Key points
Feature: Drag images into the Subject, Scene, or Style boxes to lock them.
Tactic: Create your original character on a plain background for perfect AI recognition.
Control: Use the Precise Reference switch to choose between strict copying and creative freedom.
Critical insight
Don't describe your character every time; lock them once and treat them like an actor on a movie set.
What is your biggest struggle when creating AI art? 🎨 |
Table of Contents
Creating AI art is a lot of fun until you want to use the same character for a long story. It is so annoying when your character looks great in the first photo, but becomes a total stranger in the second one.
Trying to describe their look again with long paragraphs usually feels like playing a game of luck with the computer.
Everything changed when you started using Google Whisk. Think of this tool like a physical pin for your creativity.
It allows you to take a character or a style you love and pin it down so it never changes. Whether you want your character to walk in a park or fly a spaceship, they will always look like themselves.
In this post, I will take you through each step to master Google Whisk. We will go through the steps together like a team. You will be able to create exactly what is in your head.
Besides making static images, if you want to level up your skills, learning how to create any AI films or ads you need from one prompt with consistent characters and scenes is also a vital step to turn these ideas into professional cinematic projects. Let’s get started!
Part I: What Is Google Whisk And Why Do You Need It?
Google Whisk is a creative tool that solves the "AI lottery" problem, where generated characters look different every time. By allowing you to lock a character's image, Whisk ensures face and body consistency across multiple scenes without requiring complex text descriptions.
Powered by Google's advanced Imagen 3 model, it separates subjects from backgrounds, making it easy to place the same character into a park, spaceship, or office seamlessly.
While Whisk keeps your characters consistent, you should also check out how to make sure these AI photos don't look fake and look like real photography so your results never have that plastic toy feeling. Now, let’s look at the first step."
Key takeaways
Problem: Standard AI creates a new face every time you hit generate.
Solution: Google Whisk "locks" the subject so they look identical in every shot.
Tech: Uses Imagen 3, Google's most powerful image model.
Benefit: Perfect for comic books, storyboards, and consistent branding.
Instead of playing a guessing game with words, you use images as a strict blueprint.
1. Why Does Google Whisk Solve The Problem Of Inconsistent Characters?
When we use tools like Midjourney or GPT image 1.5, every time you press the "generate" button, the AI starts over from the beginning. Even if you use the exact same words, the character's face will still look a bit different. I call that the AI lottery.
Google Whisk completely changes this way of working. Instead of making you write very long descriptions with words, it allows you to use images as a guide.

Do you have a character photo you like? You just lock it. From then on, no matter where you take that character, the AI still remembers the face, hair color, and body shape clearly. This is very important if you want to make comic books, build a personal brand, or simply create a professional photo collection.
2. How Is Google Whisk Different From Other AI Websites By Google Or OpenAI?
Maybe you are familiar with Gemini by Google. Gemini is very good at understanding language, but Google Whisk is stronger at handling visual images.
The Separation: Other tools mix everything into one command. With Google Whisk, the background is the background, and the subject is the subject. You can easily put a new person into an old scene or keep the person but change the drawing style.
Imagen 3: Underneath Google Whisk is the Imagen 3 model, which is currently Google's most powerful image creation tool. It understands even the smallest requests and creates very sharp details.
Easy for Beginners: You do not need to learn how to write complicated prompts (commands). You just need to drag and drop images.
Learn How to Make AI Work For You!
Transform your AI skills with the AI Fire Academy Premium Plan - FREE for 14 days! Gain instant access to 500+ AI workflows, advanced tutorials, exclusive case studies and unbeatable discounts. No risks, cancel anytime.
Part II: How Do You Start The First Step With Google Whisk?
Start by selecting the right aspect ratio from the toolbar: 1:1 for social posts, 9:16 for stories, or 16:9 for videos. To ensure the best results, generate your initial character on a simple, plain background (like a green screen) so the AI can easily separate the person from the noise. This clean "original" image becomes the foundation for all your future consistency.
Key takeaways
Ratio: 1:1 (Square), 9:16 (Phone), 16:9 (Cinema).
Tip: Use a "plain green studio background" for your character source.
Reason: A clean background prevents the AI from confusing the person with the scenery.
Goal: Create a perfect reference asset before starting the story.
A messy source image leads to a messy final product; keep your character reference clean.
1. How To Access And Choose The Aspect Ratio In Google Whisk?
Before we start making images, We need to know what we are making them for. Do you want to post on Facebook (square), make a TikTok video (vertical), or make a computer wallpaper (horizontal)?
When you enter the Google Whisk interface, the first thing I suggest you do is look at the toolbar at the bottom. There is a small icon that lets you choose the "Aspect Ratio" (the shape of the picture).
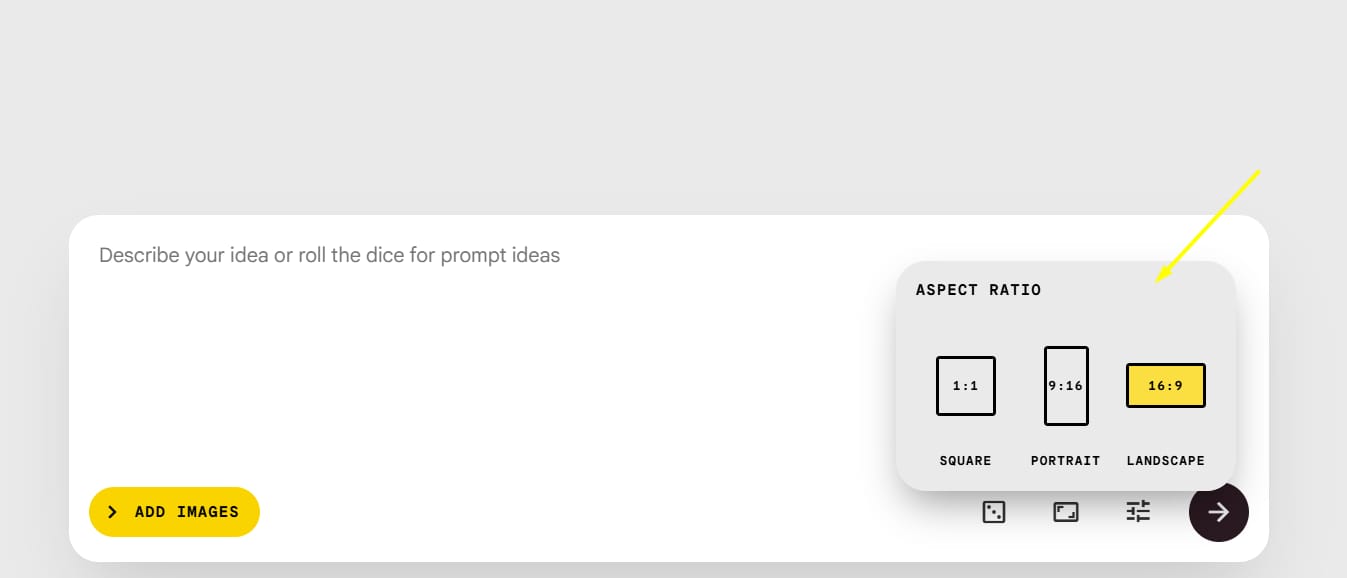
1:1 (Square): Best for profile pictures or social media posts.
9:16 (Portrait): Perfect for phones and Stories.
16:9 (Landscape): Best for YouTube videos or movie-like scenes.
2. How To Create A Perfect Original Character?
To make sure the next steps do not have errors, I have a small tip for you: Create your character on the simplest background possible. This helps the AI understand clearly who is the person and what is the scene.
Step-by-step action:
Where to type: Look at the Prompt Bar located at the center-bottom of the Whisk interface.

Workflow: You perform this action right here; there is no need to open a new chat or a separate tab. Simply ensure that the Subject, Scene, and Style boxes in the left sidebar are empty (click the 'X' to remove any existing images).
Generate: Type your character description into this bar and press Enter. The resulting image will serve as your "Original Character" for the locking process.
Advanced prompt example for a character:
A photo of a friendly young man with short messy blonde hair, wearing a simple blue hoodie, neutral lighting, standing against a plain green studio background.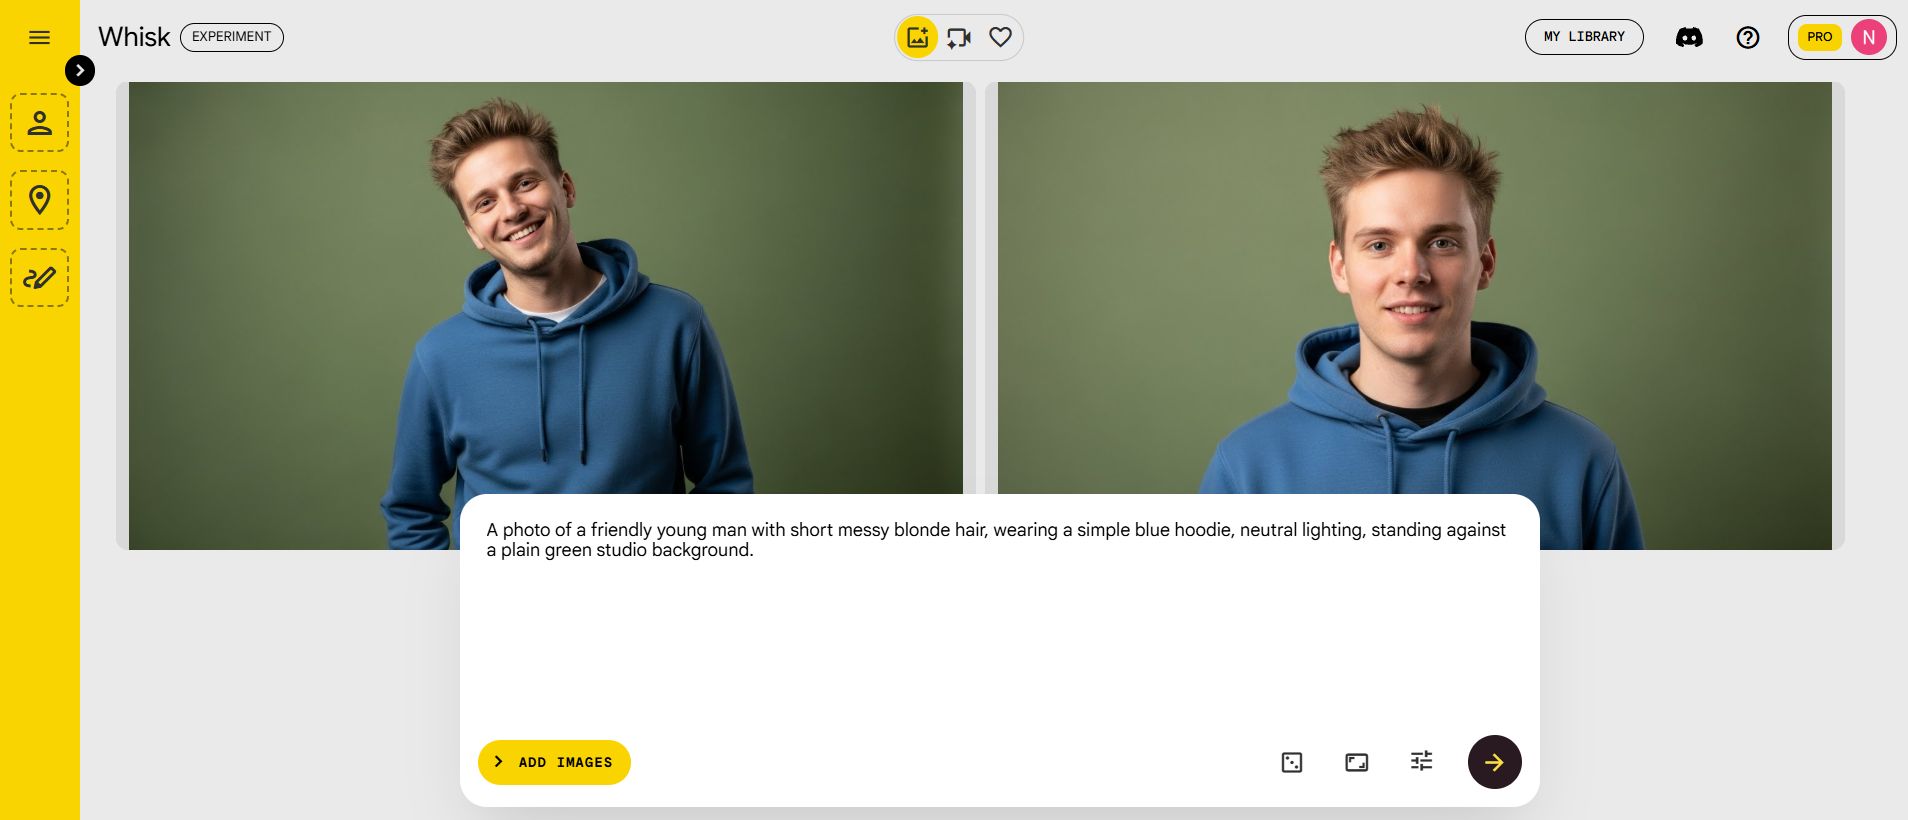
In this example, adding the phrase plain green studio background is very important. It is just like when you film a movie on a green screen.
The AI will separate this person very cleanly so that later you can put them into other backgrounds without having messy extra details.
Note: If you want to use a specific person to create your AI avatar or AI clone, simply upload your own photo instead of generating a new character.
Part III: How To Lock A Character Using The Google Whisk Sidebar?
This is the most exciting part. After you have created the picture of the young man in the blue hoodie above, look at the left side of the screen. There are three empty boxes called Subject, Scene, and Style.
I will practice this step with you:
Click on the picture of the young man you just made.
Drag it into the Subject box.

A small "tick" (checkbox) will appear. Click it to turn on the locking feature.

Now, Google Whisk knows this is the main character. No matter what you write next, it will try to keep this look the same.
When the character is sitting safely in the Subject box, you do not need to describe his appearance again. You only need to write the place where you want the character to appear.
Advanced prompt example for a scene:
Man walking through a busy street in Tokyo at night, neon lights reflecting on wet pavement, cinematic atmosphere.
When you press the generate button, the result will be that same blonde boy in the blue hoodie standing in the middle of Tokyo.
The AI did not mistake him for another person because you locked him already. I think this feature is very similar to hiring an actor and taking them to different movie sets.
Part IV: How Do You Keep The Background The Same In Google Whisk?
Sometimes you want to keep the same room or location, but you want to change the things or people inside it. This is when we use the Scene box. I think of this like building a permanent movie set. Once the background looks perfect, you can just bring different actors into the scene.
First, you should focus on creating a very detailed space. After you hit the generate button and pick your favorite image, use your mouse to drag that photo into the Scene box on the left sidebar.
Do not forget to click the small checkbox to lock it. From that moment, every new image you create will take place in this exact location.
Advanced prompt example for a background:
A hyper-realistic interior of a cozy mountain cabin at night, large glass windows showing a heavy snowstorm outside, a warm fireplace glowing with orange embers, rustic wooden walls, comfortable leather armchairs, cinematic lighting, 8k resolution.
Now the background is fixed, you can remove the picture in the Subject box and replace it with another person or another object.
Advanced prompt example for changing the subject:
A cute golden retriever puppy sitting on the floor of the room.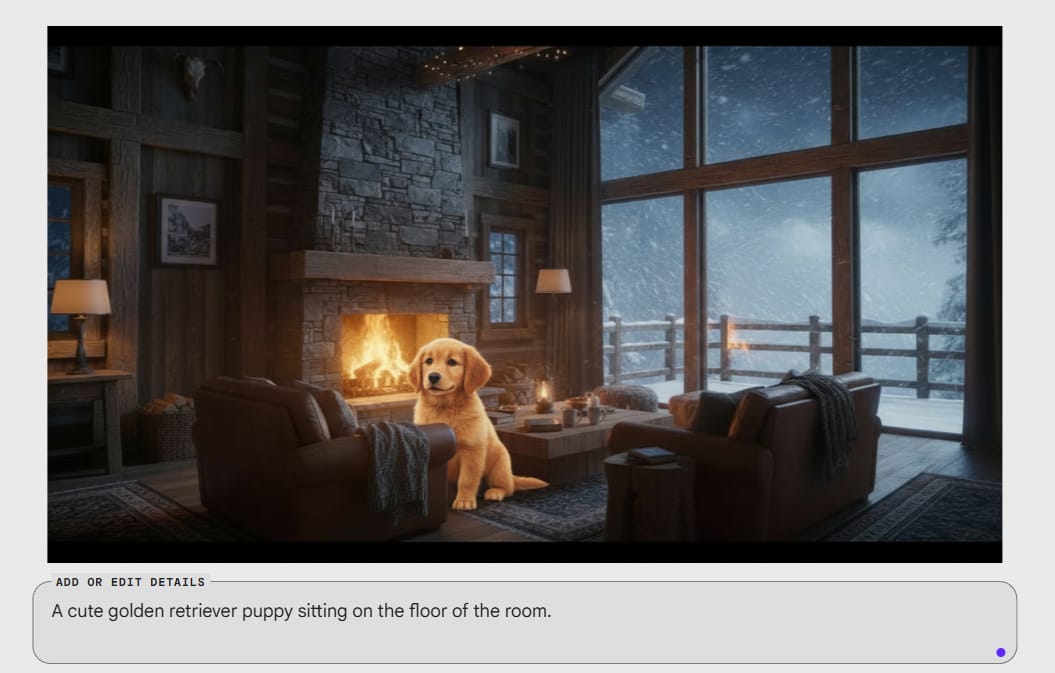
If the background you locked is a luxury living room, then when you create the image, the puppy will appear exactly in that room. Everything from the wall color to the window position will not change. This is a great way to keep a story connected.
Part V: How To Change The Art Style With Google Whisk?
1. What Does The Style Box In Google Whisk Do To The Image?
Style is the "soul" of the picture. You can make a picture look like real life, but you can also turn it into a hand-drawn painting or a cartoon. The Style box helps you do that without needing to know a lot about drawing techniques.
2. How To Apply A Style From A Sample Image To Your Project?
You can find a picture that has colors or drawing lines that you like, then drag it into the Style box.
Advanced prompt example for a style:
Whimsical claymation style, soft lighting, vibrant pastel colors, textured clay surfaces, 3D rendered look.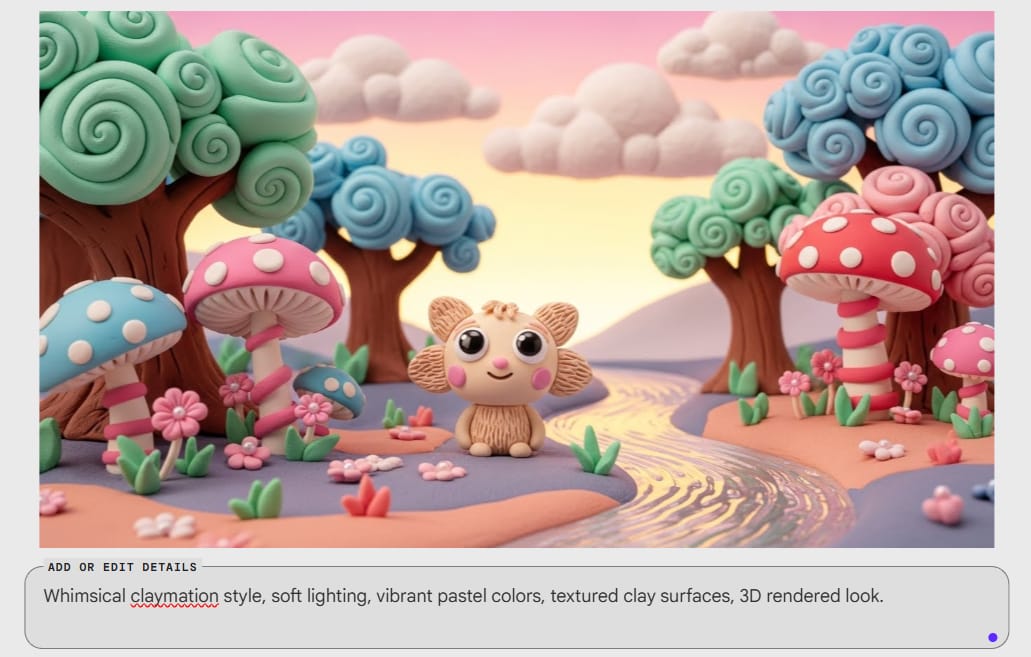
If you lock all three boxes: The Boy (Subject), Tokyo Street (Scene), and Clay Style (Style), you will get a picture of a clay Tokyo street with a very cute clay boy. This combination makes me feel like I am a director controlling every part of a movie.

Part VI: What Are The Advanced Editing Features Of Google Whisk?
1. When Should You Use The Edit And Refine Tools In Google Whisk?
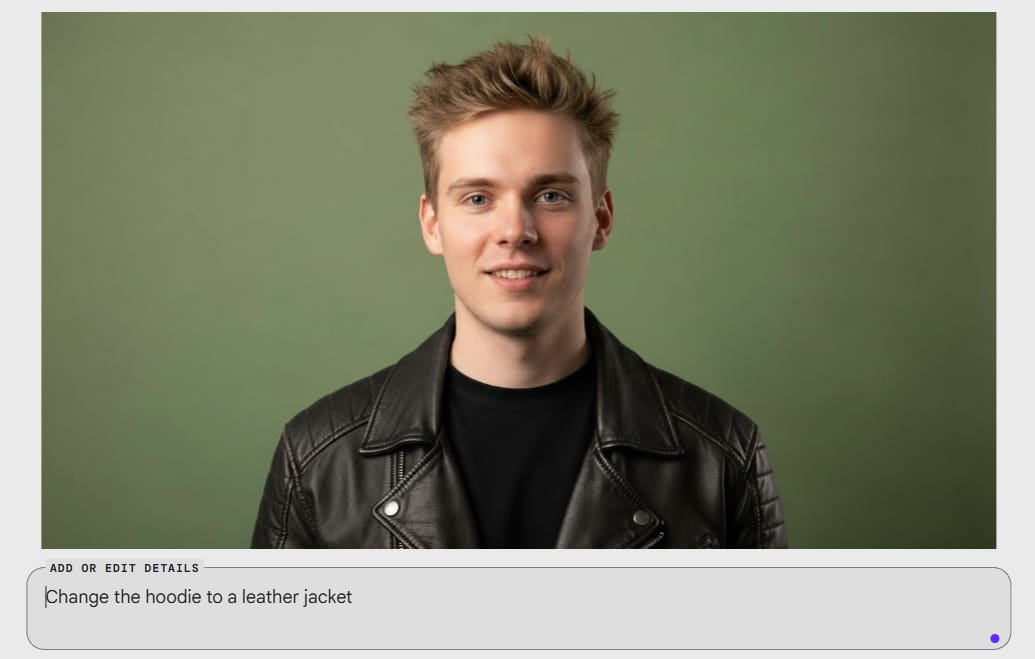
Sometimes the AI makes a very beautiful picture but there is a small detail that is wrong, for example, the shirt color is not right or you want to add sunglasses.
Edit: Use this for big changes. Click the Edit button on the picture and type:
Change the hoodie to a leather jacket.

Refine: Use this for smaller, subtle changes. For example, you want to make the sky a bit brighter or make the face clearer.
2. What Is The Difference Between Precise Reference Being "On" And "Off"?
In the Settings, you will see a switch named Precise Reference. In my experience, this is a very powerful button:

When it is ON: The AI will follow the sample image very closely in every detail. This is good when you need 100% accuracy.
When it is OFF: The AI will be a bit more "free." It will take inspiration from the sample but create more freely. I usually turn this off when I want the character to have different facial expressions.
Part VII: What Are Some Small Tips For You To Use Google Whisk More Effectively?
When you have already locked the elements in the Sidebar, I suggest you do not write too long in the main prompt bar anymore. If you have locked the boy character and the Tokyo background, you only need to type ‘Eating ramen'.
If you write too long like “A blonde man in a blue hoodie eating ramen on a street in Tokyo', sometimes the AI gets "confused" because it has to look at the sample image and read your pile of words at the same time. Simplicity is the key for Google Whisk to work the most smoothly.
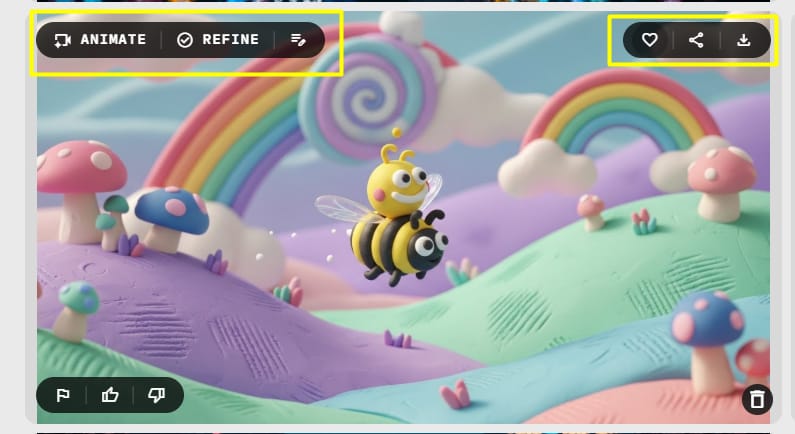
During your work, you will create dozens of pictures. Google Whisk allows you to:
Favorite (Heart): To save the most beautiful pictures.
Seed: Every picture has a "seed" number. If you like the layout of a picture, you can lock this seed number to create similar versions.
Animate: If you have enough credits, you can turn a still picture into a very interesting short moving video.
Part VIII: What Real-Life Jobs Can You Use Google Whisk For?
1. Does Google Whisk Help With Making Social Media Content?
I see many of you using this tool to create a "virtual model." You create a character that represents your brand, then use Google Whisk to take that character traveling, introducing products, or celebrating holidays.
Because the character always looks the same, customers will recognize your brand more easily.
2. How To Use Google Whisk For Storytelling And Making Storyboards?
For those of you who write or make movies, this is a priceless tool. Drawing a Storyboard (visual script) used to take a lot of time because you had to redraw one character over and over.
Now, you only need one original character and "throw" them into different camera shots.
Advanced prompt example for a Storyboard:
Detailed pencil sketch style, storyboard panel, character looking surprised, high angle shot.

Combined with the locked character, you will immediately have a professional comic book frame in just a few seconds.
Part IX: Comparison Table Of Main Features
Below is a summary table to help you easily remember the components in Google Whisk:
Component | Detailed Function | Professional Tip |
Subject | Remembers face details, hairstyle, body shape, and specific clothing of the character. | Always create a character with a plain background before dragging it here so the AI can see them clearly. |
Scene | Keeps the room structure, furniture positions, light direction, and location fixed. | If you want to change the person but keep the same room and camera angle, lock the Scene and change your prompt. |
Style | Copies the "art language" like materials (clay, watercolor, oil paint) and the main color theme. | You can use a beautiful landscape photo as a Style reference for a portrait to make the colors match perfectly. |
Edit | Replaces or adds large details based on your specific change requests. | This is best when you want to change a jacket, add sunglasses, or change hair color without restarting. |
Refine | Improves sharpness, adjusts light/dark areas, and fixes small errors in the image. | Use this feature at the very end to "polish" your work and make the photo look professional and clean. |
Part X: Summary And Final Advice
1. Are You Ready To Master Google Whisk?
I hope this guide has helped you feel less confused by a new AI tool. Google Whisk is really not hard; it is like a smart puzzle game. Do not be afraid of making mistakes; the AI does not get tired, and you can try hundreds of times until you find the most satisfying picture.
My final note is to always remember to expand your library. Sometimes an AI mistake creates a very strange and beautiful style; save it because maybe you will need it for your next project.
2. What Are The Next Steps You Should Take?
Now, I want you to try this step immediately:
Access the Google Labs website.
Create a character that is an animal you love (for example, a cat in boots).
Try to put that cat into an outer space background by using the Sidebar.
Practicing immediately will help you remember the lesson much longer than just reading. If you create an interesting piece of art, don't forget to share it with everyone!
If you are interested in other topics and how AI is transforming different aspects of our lives or even in making money using AI with more detailed, step-by-step guidance, you can find our other articles here:
Building Apps with Bolt: A No-Code Guide to Turning Ideas into Reality
Detailed Guide: How To Automatically Get Unlimited High-Quality LinkedIn Jobs*
Prompt Engineering Automation: Build a Mini AI Assistant with n8n
Discover My Ultimate AI Tools Productivity Kit for 2024*
*indicates a premium content, if any
How useful was this AI tool article for you? 💻Let us know how this article on AI tools helped with your work or learning. Your feedback helps us improve! |
Reply