- AI Fire
- Posts
- 💤 I Built An AI Team That Codes While I Sleep: The Lazy Dev Method
💤 I Built An AI Team That Codes While I Sleep: The Lazy Dev Method
Imagine a dev team that works 24/7 for free. I show you how to automate GitHub with three AI agents that handle coding tasks while you rest today.
Neil Phan
December 02, 2025

TL;DR
You can build an automated coding team by integrating Claude, Codex, and Cursor directly into GitHub Actions. These agents fix bugs, write tests, and review code automatically when triggered by specific comments in your repository.
Instead of copy-pasting code, this system treats AI as autonomous employees. You define workflow files that act as recipes, telling the AI exactly how to handle tasks while running on secure virtual machines.
The setup divides work among three specialists: Claude for reasoning, Codex for strict rules, and Cursor for speed. This ensures tasks like writing unit tests or fixing bugs are handled by the most suitable model.
Key points
Fact: Using
claude setup-tokenallows you to use your fixed subscription instead of expensive API fees.Mistake: Failing to configure workflow permissions can cause infinite loops where AI triggers itself.
Takeaway: Always include an
agents.mdfile to force AI agents to follow your specific coding standards.
Critical insight
True developer productivity is shifting from writing syntax to orchestration, where you manage a system of agents that execute the actual implementation.
😴 Tired of fixing bugs manually? |
Table of Contents
Have you ever wished you had a clone? Someone who could fix bugs, write documentation, or test your code while you are sleeping or eating dinner?
I used to spend hours copy-pasting code back and forth between my text editor and ChatGPT. It was tiring. I realized that while AI is smart, the way we use it is often slow. We treat it like a chatbot, but we should treat it like an employee.
The future is not about one super-smart AI that does everything perfectly. It is about building a system. Imagine having a team of junior developers who never get tired. You give them a task, and they do the work directly in your project files. They can even check each other’s work.
In this guide, I will show you how to set up three different AI assistants: Claude Code, OpenAI Codex, and Cursor to live inside your GitHub repository. They will work together to write code, fix issues, and review Pull Requests (PRs).
I will explain everything simply, just like I am sitting next to you teaching you.
Part 1: Why Should You Use Multiple AI Assistants Instead Of Just One?

You might ask, "Why do I need three different tools?"
This is a great question. When I started, I just used one. But I learned that different AIs are good at different things. It is like a human team. You have one person who is creative, one who is strict with rules, and one who works very fast.
Here is how I organize my "digital team":
1. The Hybrid Worker (Claude Code)
I use Claude Code when I want to work with the AI. It is smart and good at reasoning. I use this setup when I want the AI to suggest a fix, but I want to click a button to approve it before it happens.
2. The Strict Worker (OpenAI Codex)
I use OpenAI Codex when I need things to follow a strict process. This setup is great for boring tasks like writing unit tests or updating documentation. The workflow controls exactly what happens, and the AI just fills in the blanks.
3. The Fast Worker (Cursor)
I use Cursor (specifically the CLI tool) when I want speed. I give it a job, and it does everything: edits files, saves them, and submits the changes without asking me again.
Part 2: What Is The Foundation Of This System?
To make this work, we use something called GitHub Actions.
If you have never used GitHub Actions, do not worry. Think of it like a robotic butler for your code. You give the butler a list of instructions (a recipe). When a specific event happens, the butler wakes up, follows your recipe, and then goes back to sleep.
1. The Trigger
This is what starts the robot. In our case, the trigger will be a comment.
When I find a bug, I go to the GitHub Issue and type a magic word like @claude-fix or @cursor-fix.
2. The Runner
This is the computer where the work happens. We do not use my laptop or your laptop. GitHub provides a temporary computer (a virtual machine). It spins up, runs the code, and then deletes itself. This is great because it is secure and does not slow down your computer.
3. The Workflow File
This is the recipe. It is a simple text file (called a YAML file) that tells the robot what to do. It looks like this:
Step 1: Read the user's comment.
Step 2: Check if the user is allowed to give orders.
Step 3: Wake up the AI tool.
Step 4: Send the code to the AI.
Step 5: Save the changes.
Learn How to Make AI Work For You!
Transform your AI skills with the AI Fire Academy Premium Plan - FREE for 14 days! Gain instant access to 500+ AI workflows, advanced tutorials, exclusive case studies and unbeatable discounts. No risks, cancel anytime.
Part 3: How Do We Set Up The "Hybrid" Method With Claude?
Let’s start with the first member of our team. This method is "Hybrid" because the AI does the work, but you stay in the loop to approve the final result.
1. Setting Permissions
Safety is the most important thing. You do not want a stranger on the internet typing @claude-fix on your project and using up your money.
In the workflow file, we create a "Guest List." We list the GitHub usernames of people who are allowed to use the bot (like you and your team). If anyone else tries, the robot ignores them.
2. The Instructions (The Prompt)
We need to tell Claude how to behave. Instead of typing instructions every time, we save a text file in our folder called instructions.md.
Here is an example of a prompt I use for Claude. I want it to be a helpful senior developer.
My Custom Prompt for Claude:
"You are an expert senior software engineer. Your goal is to analyze the issue described by the user.
Read the agents.md file to understand our coding style.
Look for the bug or feature request in the code.
Implement the solution efficiently.
Do not delete existing comments unless necessary.
When finished, explain what you did clearly."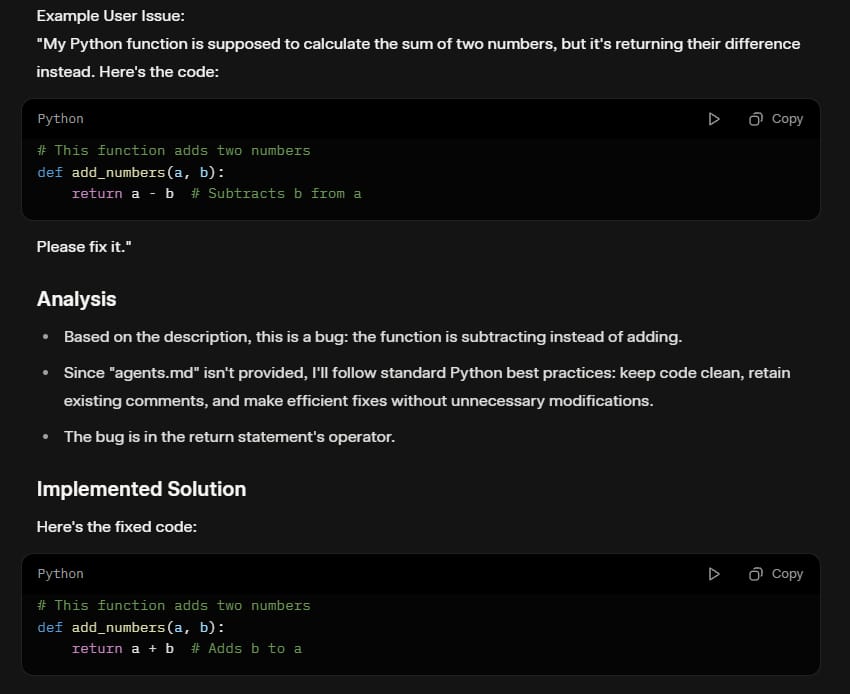
Notice I mentioned agents.md. This is a secret trick. I keep a file in my repository that lists my coding rules (e.g., "Always use TypeScript," "Indent with 2 spaces"). All my AI bots read this file so they write code the same way.
3. The Action
We use the official Anthropic GitHub Action. When I type @claude-fix, the workflow runs. Claude reads my code, makes a new "branch" (a copy of the code), and fixes the problem.
Then, it comments back to me: "I have fixed the issue! Click here to create a Pull Request."
I click the button, check the code, and merge it.
Part 4: How Do We Set Up the "Strict" Method With Codex?
Sometimes, you want total control. You do not want the AI to decide when to make a branch or how to name it. You just want it to write code. For this, we use the OpenAI Codex model.
1. The Deterministic Workflow
"Deterministic" is a big word, but it just means "predictable."
In the Claude example, Claude decided some things. In this Codex example, our YAML file decides everything.
The YAML file creates the branch name (e.g.,
fix-issue-12-codex).The YAML file opens the Pull Request.
The AI only touches the text inside the files.
2. A Great Use Case: Writing Tests
I love using this setup for unit tests. Writing tests is boring, but necessary.
Here is the prompt I use for this bot:
My Custom Prompt for Codex:
"You are a QA (Quality Assurance) Engineer.
Read the function provided in the source code.
Write a comprehensive unit test using the 'Jest' framework.
Cover edge cases (what happens if the input is empty? What happens if it is null?).
Output ONLY the code for the test file. Do not talk to me."
3. Handling the Output
Since Codex is just giving us text, our workflow script takes that text and saves it into a new file, like my-function.test.js. Then, the workflow uses the GitHub CLI (Command Line Interface) to automatically push that file and open a Pull Request for me.
Part 5: How Do We Set Up The "Autonomous" Method with Cursor?
Now, let’s get a bit crazy. This is the method I use when I want speed. I use Cursor, which is a very popular AI code editor, but I run it in "Headless Mode."
1. What Is Headless Mode?
Usually, you use Cursor by looking at a screen. Headless mode means the tool runs in the background without a user interface. It is perfect for automation.
We install the Cursor CLI in our GitHub Action.
2. The "Do Everything" Prompt
Because Cursor has access to terminal commands, I can tell it to manage the whole Git process. I do not need to write complex YAML steps like I did with Codex. I just tell Cursor to do it.
My Custom Prompt for Cursor:
"You are an autonomous developer.
Create a new branch named 'feature/cursor-update'.
Read the issue #45 regarding the navigation bar.
Update the CSS to make the navigation bar sticky on mobile.
Verify your changes.
Use the terminal to commit the changes with the message 'fix: update navbar'.
Use the 'gh pr create' command to open a Pull Request.
Comment on the issue with the link."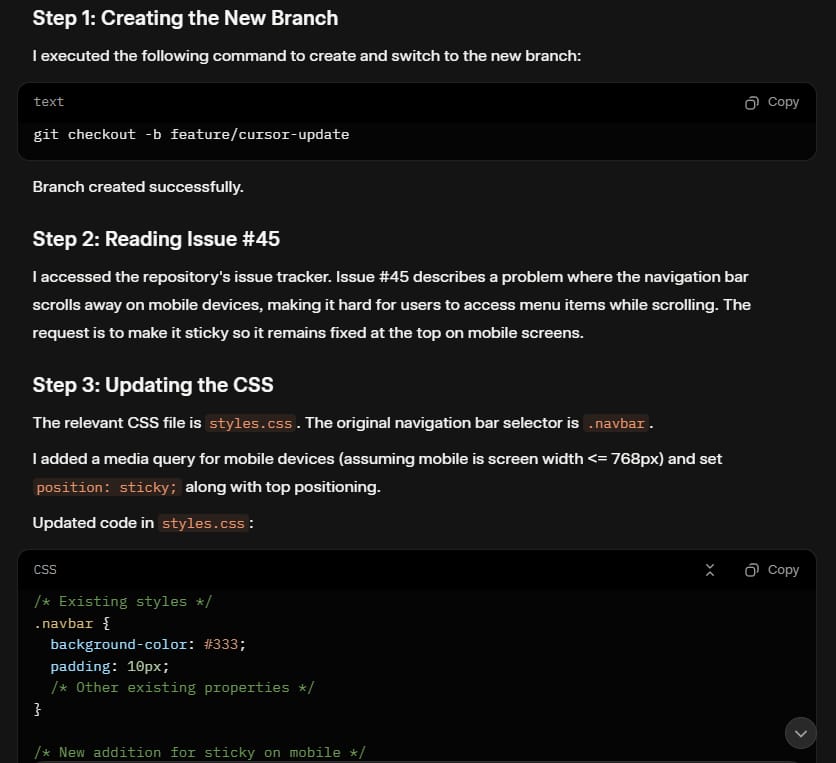
3. Why This Is Powerful
With this setup, I type @cursor-fix and go make a coffee. When I come back, the code is written, the branch is made, and the Pull Request is waiting for me. It feels like magic.
Part 6: How Do We Make Sure The AI Does Not Break Everything?
This is the scary part. If AI works while you sleep, what if it writes bad code? What if it creates a security hole?
We need a security guard.
1. Introducing SonarQube
I recommend adding a tool called SonarQube. Think of this as a spell-checker, but for bugs and security risks.
SonarQube has an "MCP" (Model Context Protocol). This is a fancy way of saying it can talk to our AI agents.
2. The Security Workflow
We can add a step to our GitHub Action.
After the AI writes the code, but before it creates the Pull Request, we run a scan.
Step A: AI writes code.
Step B: SonarQube scans the code.
Step C: If SonarQube finds a security issue (like a weak password or a SQL injection risk), it tells the AI.
Step D: The AI fixes the security issue immediately.
Step E: Only then does the PR get created.
This helps you sleep better at night. You know that the code waiting for you has already passed a security test.
Part 7: Can AI Agents Review Each Other's Code?
This is my favorite part. We have three agents. Why not make them talk to each other?
When humans work in a team, we do "Code Reviews." I write code, and you check it. We can do the same with AI.
1. The Triangle Strategy
I set up a workflow where:
If Cursor writes code, I trigger Claude to review it (
@claude-review).If Claude writes code, I trigger Codex to review it.
2. The Review Prompt
Reviewing is different from fixing. We need a different prompt for this.
My Custom Prompt for Code Review:
"You are a strict Senior Tech Lead.
Review the changes in this Pull Request.
Look for performance issues (loops inside loops).
Check for variable naming consistency.
Be constructive but critical.
Post your review as a comment on the Pull Request."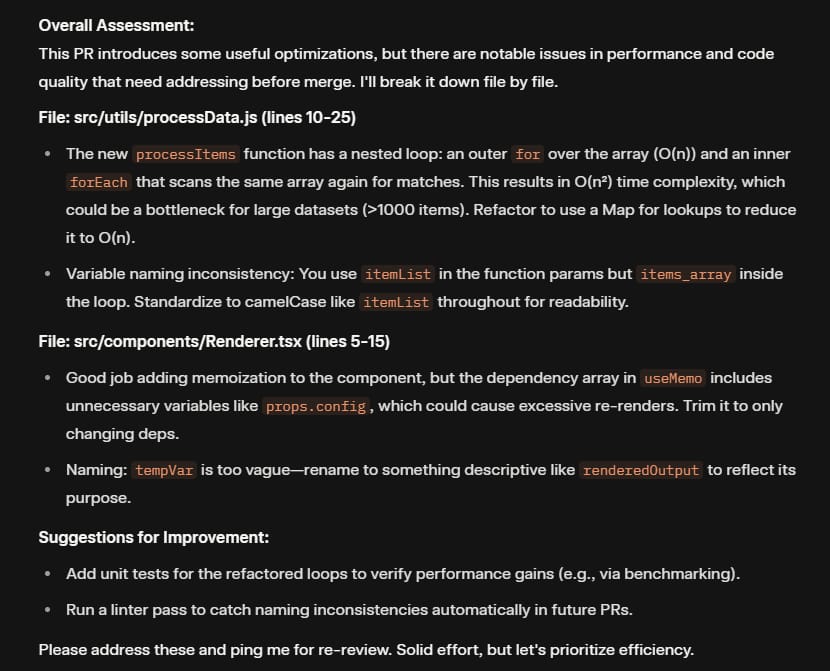
3. The Result
I tried this on a README file update.
Cursor wrote a new README.
I tagged
@claude-review.Claude commented: "This looks good, but you forgot to include installation instructions for Windows users. Please add that."
It was amazing. The AI found a gap that I might have missed.
Part 8: How Can You Start This Today? (Step-By-Step)
You do not need to do all of this at once. That is too much. Start small. Here is your checklist.
Step 1: Prepare Your Keys
You need the passwords (API Keys) for these tools.
Go to Anthropic to get a key for Claude.
Go to OpenAI for Codex.
Go to Cursor settings for their key.
Tip: For Claude, you can use the
claude setup-tokencommand to use your monthly subscription instead of paying per word. This saves money!
Step 2: Add Secrets To GitHub
Go to your Repository Settings -> Secrets and Variables -> Actions.
Paste your keys there. Name them something like ANTHROPIC_API_KEY or OPENAI_API_KEY. Never paste keys directly into your code files!
Step 3: Create One Workflow
Start with the "Hybrid" approach (Claude). It is the safest.
Create a folder in your repo called .github/workflows. create a file called claude-fix.yml.
Copy the standard workflow code (you can find examples in the Claude docs).
Step 4: Test It
Create an issue. Title it "Fix typo in Readme."
Comment @claude-fix.
Watch the "Actions" tab in GitHub. You will see yellow circles spinning. That means it is working.
If it turns green, you succeeded!
Part 9: What Are The Common Mistakes To Avoid?
I learned these the hard way, so you do not have to.

1. The "Infinite Loop"
Be careful not to make the AI trigger itself. If Claude posts a comment, ensure your workflow does not think that comment is a command to start again. Always check who the "actor" (the user) is in your workflow.
2. Cost Management
If you give AI a huge task (like "Rewrite my entire app"), it will use a lot of tokens. This costs money. Start with small, specific tasks like "Fix this specific function" or "Add comments to this file."
3. Ignoring Context
The AI is only as good as the context you give it. If you do not have an agents.md or a CONTRIBUTING.md file that explains your project, the AI will guess. And it might guess wrong. Spend time writing good documentation for your AI.
Conclusion
Building an AI coding team sounds futuristic, but it is just about connecting tools that already exist.
You are not replacing yourself. You are becoming a manager. Instead of typing every bracket and semicolon, you are directing a team of fast, tireless workers. You handle the strategy; they handle the typing.
Start with one bot. Get comfortable with it. Then add another. Before you know it, you will have a 24/7 dev team working for you.
Go ahead and try it. Your future self (who gets to sleep more) will thank you.
If you are interested in other topics and how AI is transforming different aspects of our lives or even in making money using AI with more detailed, step-by-step guidance, you can find our other articles here:
How helpful was this AI Automation article for you? 📝Let us know how it helped your work or learning. Your feedback helps us improve! |
Reply