- AI Fire
- Posts
- 🎬 The NEW Way to Create Cinematic AI Ads Using All Your Current Tools, No Editing
🎬 The NEW Way to Create Cinematic AI Ads Using All Your Current Tools, No Editing
Follow this step-by-step pipeline to turn a concept into a polished AI video ad using ChatGPT, Nano Banana 2, and Kling 3.0.
Max Anh
March 05, 2026

TL;DR BOX
In 2026, making videos with AI is now a professional way to work. By using ChatGPT for planning, Nano Banana 2 for pictures and Kling 3.0 for the final video, one person can make a professional ad in one afternoon.
The key insight is that AI video works best when broken into stages rather than relying on one prompt to generate everything. Planning a 9-shot storyboard, generating a visual grid, fixing product details and then generating multi-shot sequences creates far more consistent results than traditional “one-prompt video generation.”
With features like Omni Reference for combining characters and products and Modified Video for fixing small issues without regenerating entire clips, creators can now build structured cinematic ads without cameras, crews or expensive production budgets.
Key Points
Fact: AI video generators now support multi-shot prompts with visual references, making consistent storytelling possible across scenes.
Mistake: Generating videos directly without building a storyboard first. This often causes character inconsistency and blurry product details.
Action: Start by making a "3x3 grid" of pictures in Nano Banana 2. This gives the AI a clear plan to follow for the video.
Critical Insight
The biggest breakthrough in 2026 isn’t just AI video generation; it’s AI video direction. Creators who treat AI like a film production pipeline (concept → storyboard → reference images → multi-shot video → editing) consistently produce far more professional results than those relying on single prompts.
Table of Contents
I. Introduction
A year ago, making a product ad that looked cinematic required a director, a camera crew, a studio and a post-production budget that most solo creators couldn't justify.
The alternative was AI but honestly, the output looked like AI with characters’ faces changed between shots, products looked blurry and the whole thing felt cheap, no matter how good the prompt was.
Recently, I found a workflow that actually fixes this problem. There's a workflow combining ChatGPT, Nano Banana 2 and Kling 3.0 that lets a single person produce a multi-shot cinematic video ad in a single afternoon.
The idea is simple: each tool handles the job it’s best at and you just follow the steps.
In this post, I’ll show you every step, every tool and the small tricks that make the output look like it came from a real production team instead of a laptop.
🎥 What is your biggest struggle when making AI videos for brands? |
II. What’s The 5-step Workflow?
You plan the ad like a real director first. Then you create all shots as a single storyboard grid. You fix the product close-ups. Then you generate a multi-shot video, add character + product scenes and patch small issues. Finally, you edit the final cut.
Key takeaways
Plan your story → make a picture grid → fix small details → make the video → put everything together.
Each tool does one job well.
You get repeatable results, not lucky generations.
Before jumping in, here's why this workflow is different from just "using AI to make a video".
This workflow fixes all problems by splitting the process into clear stages, each handled by the right tool:
ChatGPT plans the creative concept and shot structure.
Nano Banana 2 builds a visual storyboard and fixes product details.
Kling 3.0 generates cinematic multi-shot video sequences.
Kling's Omni Reference feature combines characters and products in the same scene.
By the end, you end up with something that actually looks like a real ad, consistent characters, clear product details and proper cinematic shots.
Here's the full map before getting into each step:
Step | What You're Doing | Tool |
|---|---|---|
1 | Brainstorm concept + shot sequence | ChatGPT |
2 | Generate a 3x3 storyboard grid | Nano Banana 2 |
3 | Fix product detail loss | Nano Banana 2 |
4 | Generate multi-shot video sequences | Kling 3.0 |
5 | Combine character + product in one scene | Kling 3.0 Omni Reference |
Let’s walk through the workflow step by step so you can reproduce the entire pipeline yourself.
Learn How to Make AI Work For You!
Transform your AI skills with the AI Fire Academy Premium Plan - FREE for 14 days! Gain instant access to 500+ AI workflows, advanced tutorials, exclusive case studies and unbeatable discounts. No risks, cancel anytime.
III. Step 1: Start With a Concept, Not a Prompt
Great ads start with a great concept and a great concept has three things:
A clear emotion (what should the viewer feel?)
A central metaphor (what does the product represent?)
A visual arc (what happens on screen, shot by shot?)
1. Use ChatGPT to Build the Concept First
Before touching any image or video tool, use ChatGPT to flesh out the creative direction. Describe your product, your vibe and ask it to give you a concept and a 9-shot storyboard written in plain text.
Here is the prompt I used to generate ideas for a sci-fi watch ad:
You are a creative director who specializes in cinematic brand collaborations between luxury products and famous movie franchises.

Your task is to generate **multiple concept ideas** for collaborations between **Rolex watches** and **well-known movie franchises**.

Follow these rules strictly:

1. Generate **10-15 different collaboration concepts**.
2. Each concept must use a **different famous movie franchise** (examples: Dune, Star Wars, Jurassic Park, Batman, The Matrix, Interstellar, James Bond, etc.).
3. For each concept, write:
   - A **title** in this format:
     Rolex × [Franchise] - "[Concept Name]"
   - A **short concept paragraph** (60-90 words).
4. Write in **plain English** with **clear, direct sentences**.
5. Keep the concept in **one continuous paragraph** (no bullet points inside the concept).
6. The concept must:
   - Integrate the **world and themes** of the franchise.
   - Turn the **Rolex watch into a meaningful object inside that universe** (artifact, survival tool, relic, navigation device, etc.).
   - Emphasize ideas like **time, precision, legacy, survival, mastery or destiny**.
7. Avoid marketing buzzwords or advertising hype.
8. Focus on **story, symbolism and atmosphere**.

Output format:

Concept 1
Rolex × [Franchise] - "[Concept Name]"
[Short paragraph]

Concept 2
Rolex × [Franchise] - "[Concept Name]"
[Short paragraph]

Continue until all concepts are generated.
From that concept, ask ChatGPT to turn it into a numbered 9-shot sequence using the follow-up prompt:
I like Concept [x], now give me a story of a 9-shot sequence that has a name, purpose, visual and VFX for each scene.Each shot should have a camera angle, the action happening and the emotional tone.
In this post, I chose the Rolex x Dune concept. Therefore, every prompt I used is related to that concept. If you want to change the prompts, just copy my prompts and ask AI to give your version.

2. Use the Storyboard as a Creative Compass, Not a Script
Here's the key mindset: you don't need to follow ChatGPT's storyboard rigidly. Just use it to establish the emotional arc and the key visual beats, then adapt as you go.
The storyboard's real job is to give you clarity before you spend time generating images and videos.
Adjusting a concept in text takes seconds and fixing a weak idea after you’ve already generated 20 images takes hours.
IV. Step 2: Build Your Visual Storyboard With Nano Banana 2
With your concept locked in and a 9-shot sequence written out, you now have a creative direction but it's still just words on a screen. The next step is turning that text storyboard into actual visuals.
This is where most people run into their first real problem: they generate images one at a time and every frame looks like it belongs to a different project with different lighting, different style and different character faces. The storyboard falls apart before the video stage even begins.
Nano Banana 2 solves this with one clever approach and it starts with generating all nine frames at once.
1. What Is Nano Banana 2 and Why Does It Matter Here?
Nano Banana 2 is an image generation model built on Google’s Gemini 3.1 Flash architecture.
It’s available on Google Flow, Gemini or other third-party platforms (I recommend using Google Flow). What makes it special for this kind of work is its ability to maintain character consistency across multiple frames and generate highly detailed compositional images.
In simple terms: it’s very good at making multiple shots feel like they belong to the same world.

2. The 3x3 Grid Strategy
Instead of generating images one at a time, which is slow and inconsistent, the approach is to generate an entire 3x3 storyboard grid in a single prompt. One generation produces 9 shots at once.
This works because video AI video generators work better when you feed them strong visual references upfront.
So, the more context you give the video model, the more consistent and cinematic the output will be. A full 3x3 grid gives Kling 9 frames of visual context to work from.
3. How to Build the Grid
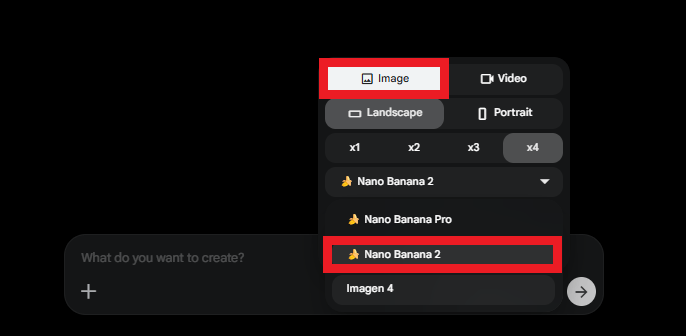
You go to Google Flow, create a new project and below the chat box, you select Nano Banana 2 as your image model (it also has Nano Banana Pro and Imagen 4 models).
Then, you use a detailed storyboard grid prompt that includes:
Character descriptions (who is in the ad, what do they look like, what are they wearing?)
Product description (exact color, design, details of the product).
A frame-by-frame image prompt for each of the 9 shots.
I already put the whole prompt in the 3x3 Storyboard Grid Doc (Rolex x Dune version); you just go into it, copy and paste to your Google Flow.

Underneath your written prompt, upload 2 types of reference images: photos of your characters and high-quality product photos. These references tell the AI exactly what it's working with.
You can find these prompts in the Reference Character Prompts, then you do the same with the 3x3 grid.

Then you generate several versions of the grid. In practice, the best storyboard usually comes from mixing the strongest frames from multiple generations.
How would you rate the quality of this AI Workflows article? 📝 |
V. Step 3: Fix Product Detail Loss!
When you generate a 3x3 image grid, each individual frame inside that grid loses detail because it's competing for space with 8 other frames.
The overall image looks good at first glance but the moment you zoom in, the flaws show up.

In a watch ad, this means the logo is blurry, the brand text is unreadable and the texture of the watch looks muddy. If the image quality is poor here, the video output will inherit those problems.
How to Fix It: The Elegant Solution
Go back to Nano Banana 2 and upload 2 images as references:
The blurry AI-generated watch from your storyboard grid.
High-quality product photos of the real product (for a watch, pulling screenshots from a retailer site works well)
In the prompt, instruct the AI to upscale the product image using the real product photos as a guide for the fine details.
Upscale the photo of [character description] in the medium shot. Use the close-up reference to restore sharp facial details while maintaining the wide composition.Nano Banana 2 will use the real product's texture, logo and branding to reconstruct the AI version, sharpening what was lost.

You can also do it for other scenes where your character is blurry or inconsistent,
The rule to remember: Always check your product details at 100% zoom before feeding storyboard frames into any video generator. Fixing small issues at the image stage saves a lot of time that would otherwise be spent regenerating video scenes.
Once your storyboard frames are clean and detailed, you're ready for the video stage.
VI. Step 4: Generate Multi-Shot Video Sequences With Kling 3.0
The Multi-Shot tool lets you describe multiple shots in a single prompt and generate them as one continuous video. Three cinematic shots were generated in one run.
This is the feature that compresses hours of work into minutes.
1. The Prompt Structure for Multi-Shot Video
Multi-shot prompts rely on timestamps to define when each shot begins and ends. Each segment describes the camera angle, action, emotion and visual tone.
A typical structure of a scene looks like this:
[0:04] Shot 1: [Camera angle, action, emotion, lighting]
[4:08] Shot 2: [Camera angle, action, emotion, detail]
[8:12] Shot 3: [Camera angle, action, emotion, detail]
An example three-shot sequence for a dramatic opening:
[0:04] Shot 1: Wide aerial shot over endless Arrakis dunes, the camera glides slowly forward above golden sand waves, a lone Fremen Timekeeper stands on a high ridge, atmosphere vast and silent, harsh desert sunlight and heat distortion.
[4:08] Shot 2: Medium shot from behind the Fremen standing on the dune crest, wind pushes sand across his stillsuit, he studies the horizon calmly, mood quiet and focused, warm golden lighting.
[8:12] Shot 3: Low-angle shot looking up toward the warrior against the blazing sun, cloak and stillsuit fabric moving in the wind, emotion controlled and patient, drifting sand particles in the air.
To create these prompts, you just go to the chat that you used to create a 3×3 cinematic storyboard grid. Then, use this prompt:
Now, could you give me video prompts for each scene? Here is the format you need to follow.

Scene 1:
[0:04] Shot 1: [Camera angle, action, emotion, lighting]
[4:08] Shot 2: [Camera angle, action, emotion, detail]
[8:12] Shot 3: [Camera angle, action, emotion, detail].
2. How to Run It
There are many ways to use Kling 3.0, such as using its own website or third-party platforms,… In this post, I’ll use it in Fal.ai, which is basically a platform where you can run AI models for images and video.
So, you head to Fal.ai → click on the search bar, type Kling 3 and choose the image-to-video model (highly recommend you choose kling-video/o3/standard/image-to-video).

Then, upload one of your storyboard frames as the reference image for the first shot. Paste the multi-shot prompt with timestamps and set the video duration to 12 seconds (3 shots x 4 seconds each).
In Fal, when you scroll down, you will see the Multi Prompt option. Here is what we add to the prompt, not the prompt chat in the beginning.

3. What to Expect (Honestly)
For storytelling, shot control and cinematic structure, though, this feature is a real leap forward. Just expect to spend a little extra time polishing characters with very detailed visual elements.

Creating quality AI content takes serious research time ☕️ Your coffee fund helps me read whitepapers, test new tools and interview experts so you get the real story. Skip the fluff - get insights that help you understand what's actually happening in AI. Support quality over quantity here!
VII. Step 5: Combine a Character and a Product With Omni Reference
This is the feature where the workflow really starts to feel powerful.
Kling 3.0's Omni Reference lets you take two completely separate images, a character and a product and combine them into the same video, interacting naturally in the same scene.
So, instead of compositing footage or editing elements manually, you simply provide two reference images and describe how they interact. The system handles the rest.

1. The Shot This Creates
Imagine this: the Fremen Timekeeper kneels in the open desert, listening to the sand. A deep rumble moves through the dunes. The ground begins to tremble as waves ripple across the surface. Then, slowly and deliberately, his hand brushes away the sand to reveal the Rolex beneath. The watch glints in the harsh Arrakis sunlight, its second hand still moving with perfect precision. He studies it for a moment, realizing the exact second has arrived, the only moment safe enough to cross the desert before the sandworm rises.
That's one continuous shot, combining a human character and a product, generated entirely in Kling 3.0.
2. How to Build It on Fal
Now, go back to Fal.ai.
Next to the model name, you will find a box that includes several other features. You choose the reference to the video feature.
Then, upload your character reference image and your product reference image separately.
In the prompt, use the @ symbol to tell the AI which picture is the "person" and which is the "product", then describe how they interact in the scene.
Here's a sample prompt structure:
In @start_image, a wide desert shot of @Element1  kneeling low on the Arrakis dunes, pressing his hand into the sand and listening carefully.
The desert surface begins to tremble as ripples travel through the dunes around him.
Fine sand shifts and slides as @Element1  slowly brushes the sand aside with deliberate movements.
@Element2  emerges from beneath the sand, partially buried, catching the harsh Arrakis sunlight.
The second hand of @Element2  continues sweeping with perfect mechanical precision.
@character studies @Element2  intensely, realizing the exact second has arrived while distant dunes begin to rise with the approaching @Element3  beneath the sand.
Set the video duration to up to 12 seconds. Generate multiple variations; the product may appear on different sides of the character depending on the generation, so running several versions and picking the best is standard practice here.

3. Where It Works Best (and Where It Doesn't Yet)
Omni Reference performs especially well with scenes involving one character and one object.
→ Dramatic product reveals, object appearances and character reactions tend to look convincing and cohesive.
More complex scenarios involving multiple characters or choreographed interactions can still feel inconsistent.
→ That's a limitation of where the technology currently sits and it will improve. For product-meets-character moments, though, this feature is genuinely impressive right now.
VIII. What Still Breaks in This Workflow and What Doesn’t?
Highly detailed faces (tattoos, complex markings) can drift in close-ups. Human-to-human physical interaction is still unreliable across tools. And if your product reference is blurry, everything downstream suffers.
Key takeaways
Complex facial patterns = more regen attempts.
Avoid tight physical interaction scenes.
Fix detail at image stage, not video stage.
Once you start using these tools, a few patterns become clear. Some techniques work incredibly well and others still break in predictable ways.
What Works Brilliantly
Multi-shot prompting compresses what used to take days into a single session. Describe three shots in one prompt, get three shots in one clip.
Omni Reference for character + product combinations is remarkably capable. If your ad involves a person interacting with or reacting to a product, this feature is built exactly for that.
Nano Banana 2's reference-based upscaling is a hidden superpower that most people overlook. Use it every time your product details look soft or unreadable in a storyboard frame.
What to Watch Out For
There are still limitations worth planning around:
Characters with complex facial markings or intricate patterns will show more inconsistency in close-up multi-shots. The more detailed the character design, the more variations you'll need to generate before finding a clean one.
Person-to-person interaction scenes (fights, embraces, physical contact) are still inconsistent in AI video generation across all tools. Plan around this limitation by keeping human interactions minimal or off-camera.
Always zoom in to 100% on your product before moving to the video stage. What looks fine at thumbnail size often has illegible text or blurry logos up close. Fix it at the image stage, not the video stage.
And one practical note: Kling 3.0 is still rolling out, so access isn’t universal yet. If you can’t find it in your usual tools, check platforms like Fal.ai, where new model versions often appear first.

If you don’t see this latest model, check out other platforms.
IX. Conclusion: The New Standard for Solo Creators
Not long ago, making an ad that looked like this required a director, a crew, a studio, a post-production team and a budget most small creators could never justify. That era is over.
The tools available right now (ChatGPT for creative structure, Nano Banana 2 for storyboarding and Kling 3.0 for cinematic video) make it possible for a single person to produce something genuinely impressive in a single afternoon.
Follow the steps carefully and you’ll be surprised how professional the result looks.
The full workflow recap:
ChatGPT → Concept + 9-shot storyboard structure.
Nano Banana 2 → 3x3 storyboard grid (all 9 frames, one prompt).
Nano Banana 2 → Upscale and restore product detail loss.
Kling 3.0 → Multi-shot video sequences with timestamps.
Kling 3.0 Omni Reference → Combine character + product in one scene.
Kling 3.0 Modified Video → Surgical fixes for continuity details.
Video editor → Assembly, voiceover, final cut.
If you are interested in other topics and how AI is transforming different aspects of our lives or even in making money using AI with more detailed, step-by-step guidance, you can find our other articles here:
9 AI Skills You Must Have to Master ChatGPT, Claude, Gemini or any Other AI
Unlock Automated Leads: How AI Can Build Your Lead Generation Powerhouse*
Easy Guide to Make a Realistic Talking AI Clone That Looks Just Like You (Same Tone, Voice, ... )
Google Gemini Released a Hidden Superpower with NotebookLM for Free!?
Top AI Tools to Build Your AI Business: Easy Steps, No Coding*
*indicates a premium content, if any
Reply