- AI Fire
- Posts
- 🧑💻 I Built a Working SaaS in 15 Minutes With Google’s New AI Stack (No-Code, All Automated)
🧑💻 I Built a Working SaaS in 15 Minutes With Google’s New AI Stack (No-Code, All Automated)
Most people fail because they skip the blueprint. Here’s how to turn a fuzzy idea into a real app you can demo today
Max Anh
January 26, 2026
TL;DR BOX
The old ‘six-figure SaaS’ era is basically over. As of early 2026, Google is pushing a new no-code stack that can get you to a working MVP fast (sometimes shockingly fast) if your scope is tight. You can now move from an idea to a finished product without an engineering team. You use Gemini for strategy, Stitch for design and Antigravity for the actual building.
In this guide, we built a Lead Scraper SaaS that connects to real-time government APIs, stores data in Supabase and features an AI summarizer; all without writing a single line of manual code. What matters now isn’t your coding skill. It’s whether you can explain the outcome clearly. If you can define the problem and the "Happy Path" for a user, the AI agents will handle the terminal commands, routing and deployment.
Key points
Fact: Google Antigravity is an agentic IDE that doesn't just suggest code; it executes it in your terminal, installs its own dependencies and runs browser tests to verify its work.
Mistake: Jumping into code without a Product Requirements Document (PRD). Fuzzy plans lead to "hallucinated" code in no-code environments. Always use Gemini to lock your blueprint first.
Action: Go to Google AI Studio, use the PRD prompt in Section III to define your idea and then drop that output into Google Stitch to see your interface come to life.
Critical insight
The real "unfair advantage" in 2026 isn't knowing how to code; it's telling the system exactly what ‘done’ means. You win by providing the AI with high-context API documentation and a clear "Definition of Done".
Table of Contents
I. Introduction
Last week, I tried a simple experiment: could I go from a blank folder to a working SaaS demo before my coffee got cold?
I used Gemini for the PRD, Stitch for the UI and Antigravity to build and run the code.
15 minutes later, I had a dashboard that pulled real contract data, saved it in Supabase and showed company news.
It wasn’t perfect but it was real. And I’ll show you the exact steps and prompts so you can copy the no-code workflow.
🛠️ How confident are you building this app? |
*Improtant Note: If this is your first time hearing about Antigravity, take a few minutes to read this post and watch this video. It will help you understand how these features work and make everything else much clearer.
II. What No-Code Tools Actually Make This Possible?
Before jumping in, you must understand the toolkit. Google has released three specific tools that act as your strategist, designer and lead engineer. These three tools work together like a factory pipeline.
Key takeaways
Gemini acts as product strategist.
Stitch handles UI design.
Antigravity builds and runs code.
Clear role separation matters.
Tools work best when each one has a single job.
1. The Strategist: Google Gemini
Gemini acts as your Product Manager. Its job is to take your messy, high-level ideas and turn them into a "Product Requirements Document" (PRD).
This is your master blueprint. Most no-code projects fail not because the code is bad but because the plan was fuzzy.
2. The Designer: Google Stitch
Stitch is your UI/UX Master. It doesn't just generate pretty pictures; it understands interface logic. By feeding it your PRD, it creates editable, production-ready screens.
This saves you "tokens" (AI memory) and prevents you from making design mistakes that make your app feel outdated.
3. The Builder: Google Antigravity
Antigravity is your Agentic Developer. Unlike a simple chatbot, Antigravity can interact with your terminal, your browser and your files.
It writes the code, executes it and even runs tests to verify that everything works as intended.
Think of the process as: Strategy (PRD) → Design (UI) → Build (Frontend + Backend + APIs + Testing).
Learn How to Make AI Work For You!
Transform your AI skills with the AI Fire Academy Premium Plan - FREE for 14 days! Gain instant access to 500+ AI workflows, advanced tutorials, exclusive case studies and unbeatable discounts. No risks, cancel anytime.
III. What Mindset Shift Do You Need to Build With AI?
AI is not creative magic. It amplifies clarity. Vague ideas produce vague software. Your job is no longer writing lines of code. Your job is steering the AI toward the right result.
Key takeaways
Define success clearly.
Review outputs critically.
Correct direction often.
Iteration replaces coding.
Clear intent is the new technical skill. With AI development, you're not writing code line by line anymore, instead of that, you:
Define the outcome - What does success look like?
Review the result - Does it match your vision?
Correct the direction - What needs to change?
If that clicks, let’s start Phase 1.
IV. Phase 1: Creating Your Blueprint with Google Gemini
Every great building starts with a plan. In software, this is the PRD. Building software without a plan is like building a house without knowing where the doors and windows should be. That’s why I keep saying this: you have to define what you’re building first.
Step 1: Prepare Your Prompt
Open Gemini and paste a structured prompt. Start with product name, users and features:
You are a Senior Product Manager with deep expertise in UX design and strong familiarity with Google’s Material Design principles. Your task is to convert unstructured user ideas into a clear, professional, engineering-ready Product Requirements Document (PRD) that strictly adheres to Material Design 3 (Material You) standards.

---

## Core Context

Product Name: [INSERT PRODUCT NAME]
Target Audience: [INSERT AUDIENCE]
Development Stage: [e.g., MVP, Prototype, V1]

Additional Project Context & Raw Inputs:
[INSTRUCTIONS FOR USER: Paste unfiltered thoughts, feature ideas, competitive insights or rough notes here. The system will organize and refine them.]

> [INSERT RAW NOTES HERE]

---

## Required Output Structure

### 1. Executive Summary
- **Product Vision:** Distill the raw notes into a concise, high-level value proposition.
- **Problem Statement (Why):** Clearly explain the core problem this product addresses.
- **Visual & Emotional Direction:** Define the intended aesthetic and feel (e.g., minimal, playful, utilitarian, calming).

### 2. User Personas & User Flows
- Define **two distinct user personas** derived from the target audience.
- **Primary User Flow (Happy Path):** Outline a step-by-step journey for the main use case, from first open to successful outcome.

### 3. UI / UX Specifications (Material Design 3)
All guidance in this section must align with Google’s Material Design 3 (Material You).

- **Color System:** Specify the Seed Color and describe how it expands into the full tonal palette (Primary, Secondary, Surface, On-Surface).
- **Typography:** Recommend a modern Google Font (e.g., Roboto Flex, Inter, Plus Jakarta Sans) and map it to M3 type scales (Display, Headline, Body, Label).
- **Components:** Identify core M3 components to use (e.g., Navigation Rail vs Bottom Bar, FAB behavior, Card variants).
- **Shape & Elevation:** Define corner radius conventions and elevation usage consistent with M3 standards.

### 4. Functional Requirements (MoSCoW Framework)
Using the additional project context, classify features into:
- **Must Have:** Essential for the MVP to function.
- **Should Have:** Important but not blocking initial release.
- **Could Have:** Optional enhancements or future improvements.
- **Won’t Have:** Explicitly excluded from the current scope.

### 5. Technical Recommendations
- **Technology Stack:** Propose an appropriate frontend and backend stack tailored to the product.
- **UI Framework:** Recommend a UI library that best supports Material Design 3 for the chosen stack (e.g., Material UI for React, Flutter, Jetpack Compose).

---

## Tone & Style Guidelines
- Clear, professional and well-structured.
- Use clear headings and bullet points.
- Optimize for readability and usefulness for engineers and UI/UX designers.
Step 2: Fill in the Details
Now fill in your app details. Here is my example of the lead scraper app:
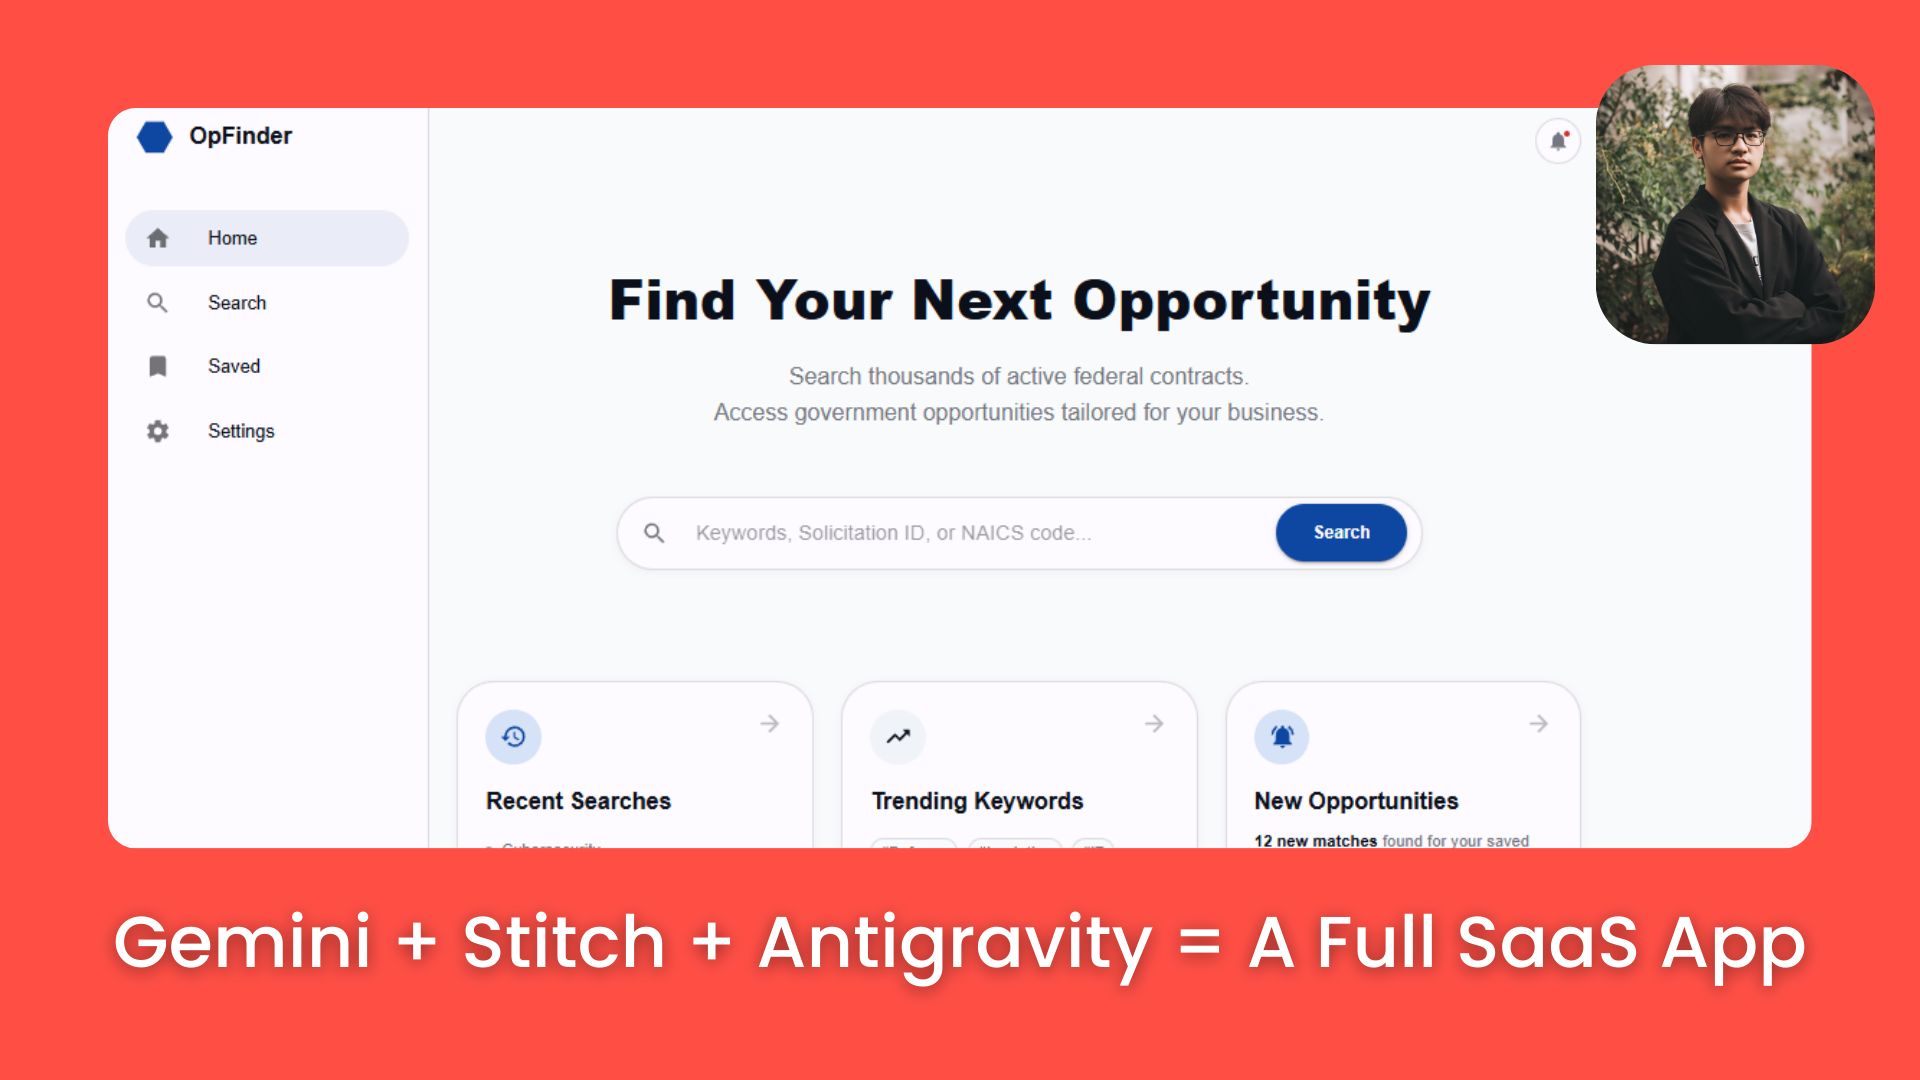
Product Name: OpportunityFinder.
Target Audience: Small to mid-sized businesses, government contractors, consultants and sales teams looking for federal contract opportunities
Development Stage: MVP
Key Features:
Scrape federal contracts by keyword
Find companies and contractors
Display detailed project information
Show company profiles and news
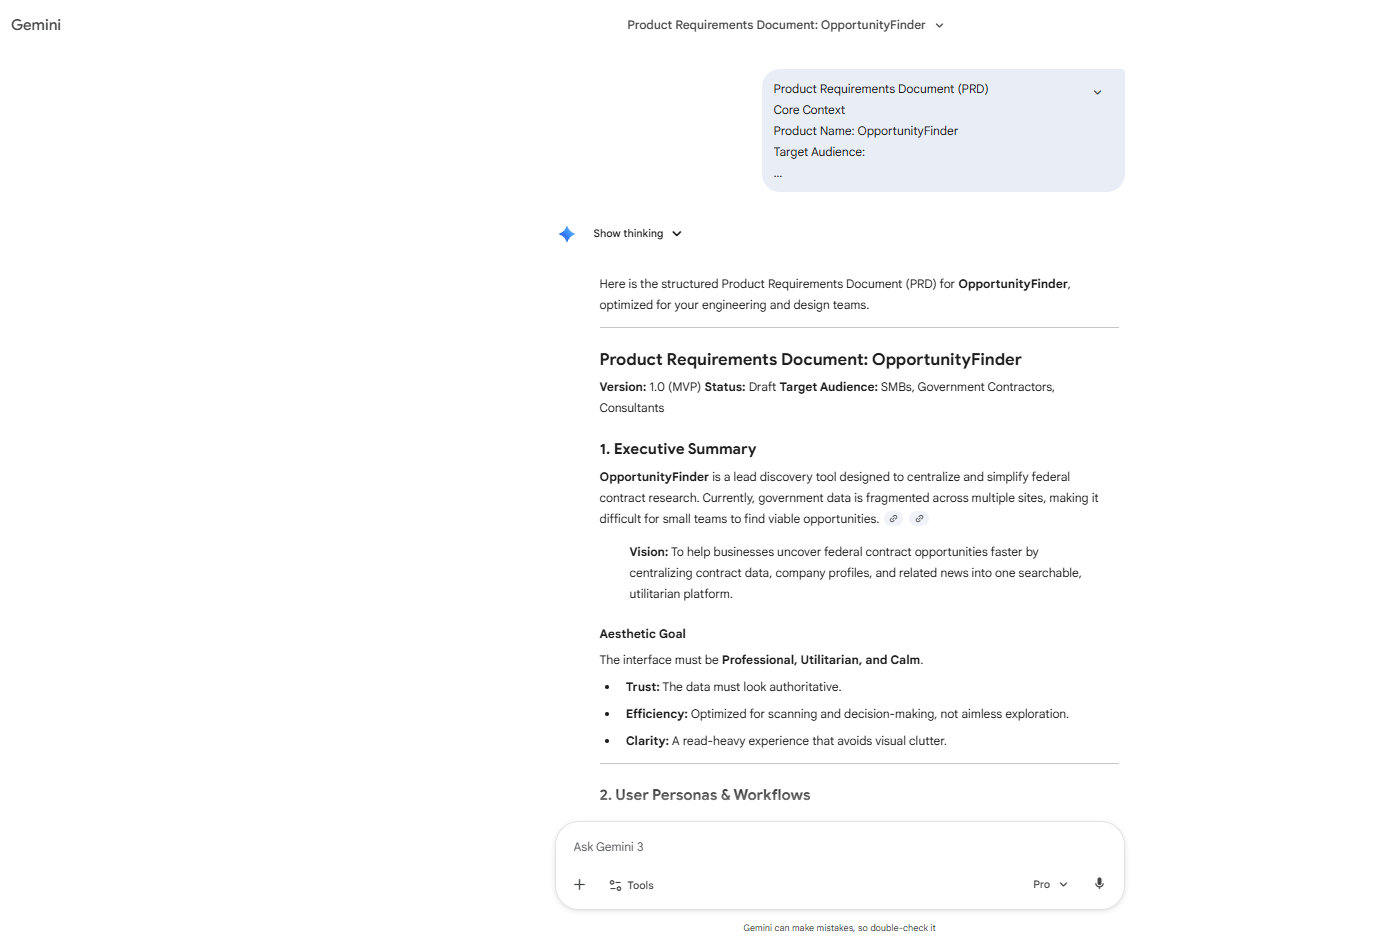
Then, you hit enter and let Gemini create your PRD.
Here's the important part: Don't accept the first version. Review it carefully and ask for improvements:
"Add a section on API recommendations. Include federal contract databases, company information APIs and news APIs".
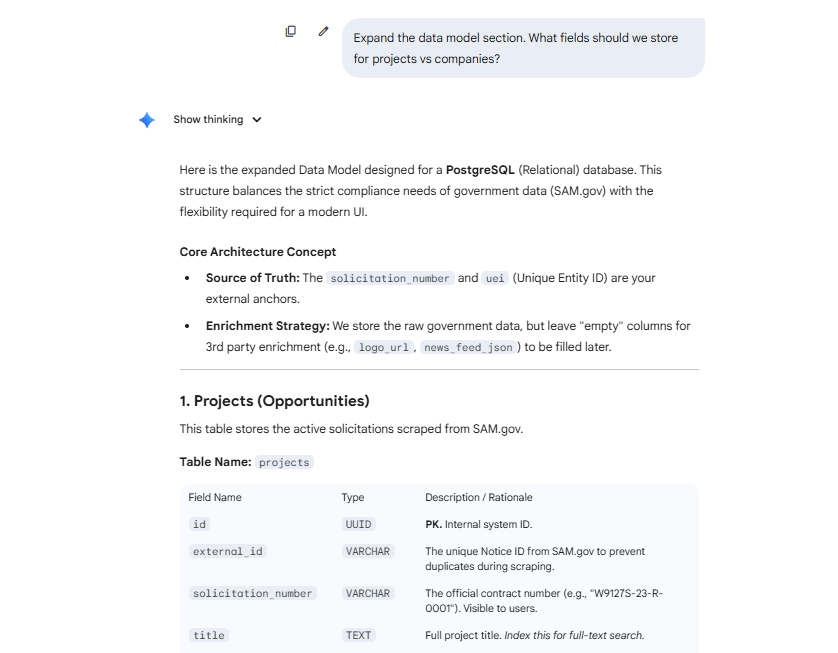
"Expand the data model section. What fields should we store for projects vs companies?"
The more time you spend here, the easier everything else becomes.
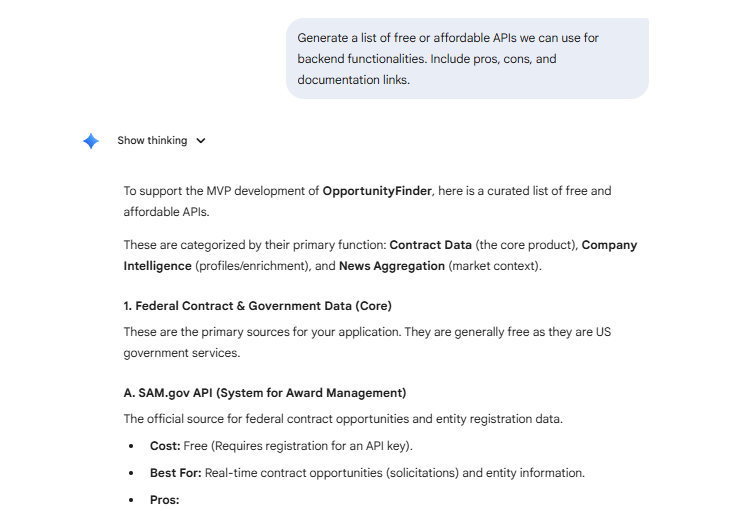
*Pro Tip: Always ask Gemini to recommend APIs.
Generate a list of free or affordable APIs we can use for [specific functionality]. Include pros, cons and documentation links.This tells the AI which data sources to use later (like federal databases), saving you hours of manual research.
V. Phase 2: Designing the Interface with Google Stitch
Now that the logic is set, you need to give it a shape. Text is hard to visualize. So I start with a quick UI. It makes the build faster because the AI has visual boundaries.
This step is like sketching a floor plan before you start buying furniture for a room.
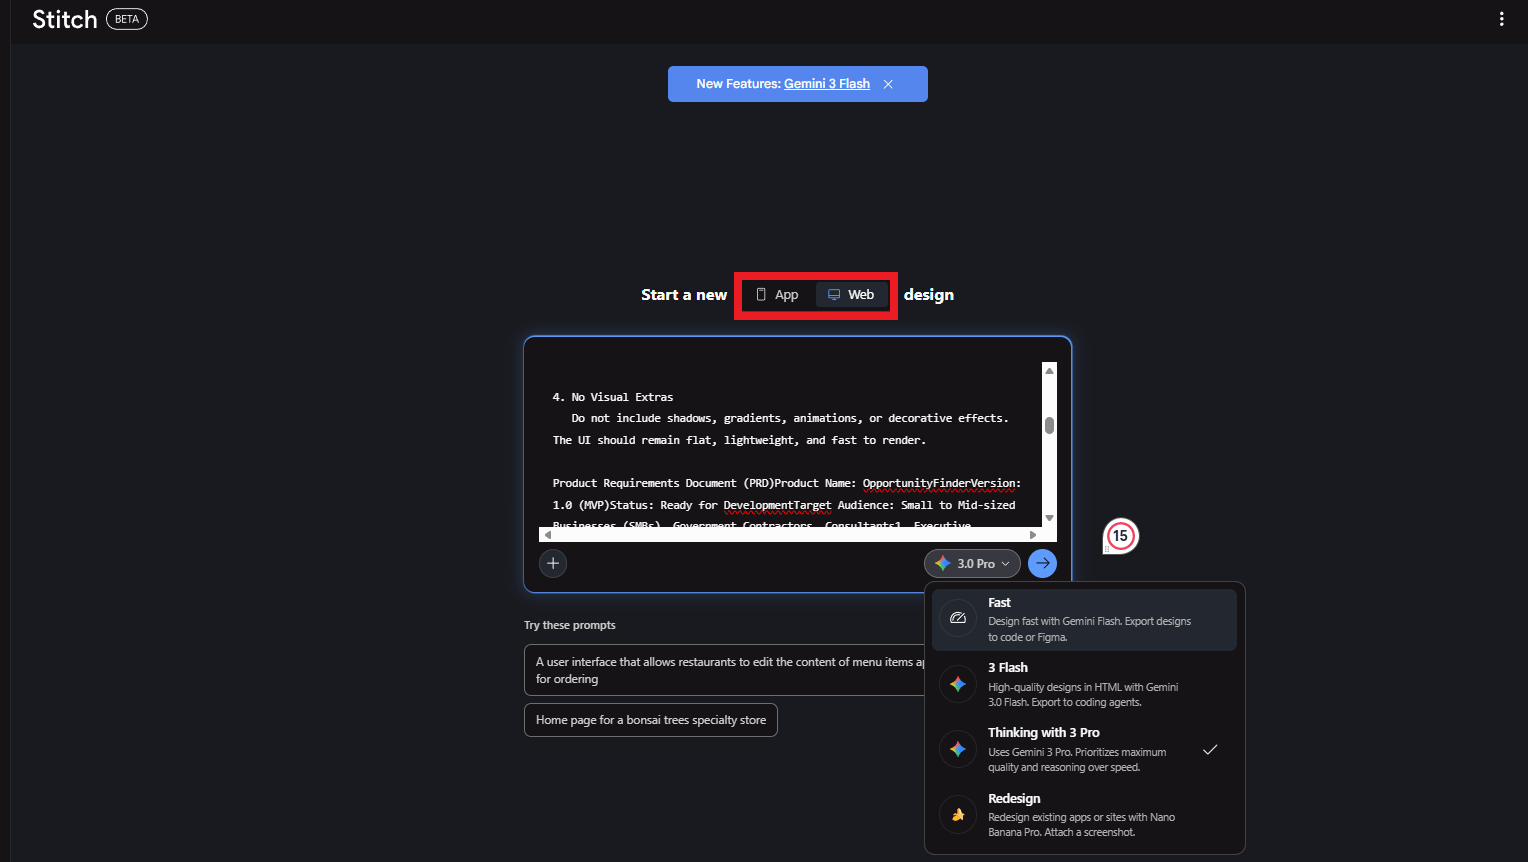
Step 1: Open Google Stitch and Generate the UI
Navigate to Google Stitch and start a new project. Next, you generate the UI. Here’s a copy-paste prompt that you can easily copy and use:
You are a Senior Technical Designer and Prototyping Expert. Your task is to produce a functional, low-fidelity wireframe that strictly follows Google Material Design 3 structural rules, with priority on implementation speed, semantic structure and developer clarity over visual refinement.

Context:
This interface is for the Alpha MVP / Functional Testing phase of a web application named [APP NAME].

• Core Purpose: Build a simple, working UI intended for early-stage development and validation.
• Target Users: Developers and QA testers. The design should emphasize readability, structure and ease of debugging.

Aesthetic Direction:
Disregard branding, imagery and visual embellishment. Use a clear “Blueprint Mode” approach:

• Color Strategy: Default Material Design 3 baseline only. Neutral grayscale for surfaces and standard M3 purple/blue for primary actions. Maintain strong contrast for accessibility and legibility.
• Layout Philosophy: Practical and standardized. Use default Material containers such as Cards, Lists and Grids with system spacing and padding.
• Tone: Functional, minimal and semantic.

Task:
Generate a basic wireframe UI for the pages defined in the PRD below. The output must comply with these strict constraints to ensure fast and straightforward implementation:

1. Stock Components Only
   Use standard Material Design 3 components (e.g., <Button variant="contained">, <TextField>, <DataGrid>) with zero custom CSS or styling overrides.

2. Layout First
   Emphasize correct Flexbox/Grid usage, spacing tokens, responsive containers and hierarchy.

3. Placeholder Content
   Insert clear placeholder text such as “Lorem Ipsum” or “Sample Row 1” wherever real data is unavailable.

4. No Visual Extras
   Do not include shadows, gradients, animations or decorative effects. The UI should remain flat, lightweight and fast to render.

[INSERT PRD - Paste the complete PRD here]
Before you hit Enter, set one thing first. You need to set an important parameter: Select "Web" aspect ratio (16:9 or similar).
Now, you can hit enter and wait for screens to generate.
Step 2: Review and Refine
Stitch generates multiple screens (a login page, the main dashboard, a configuration page,...) for the scraper.
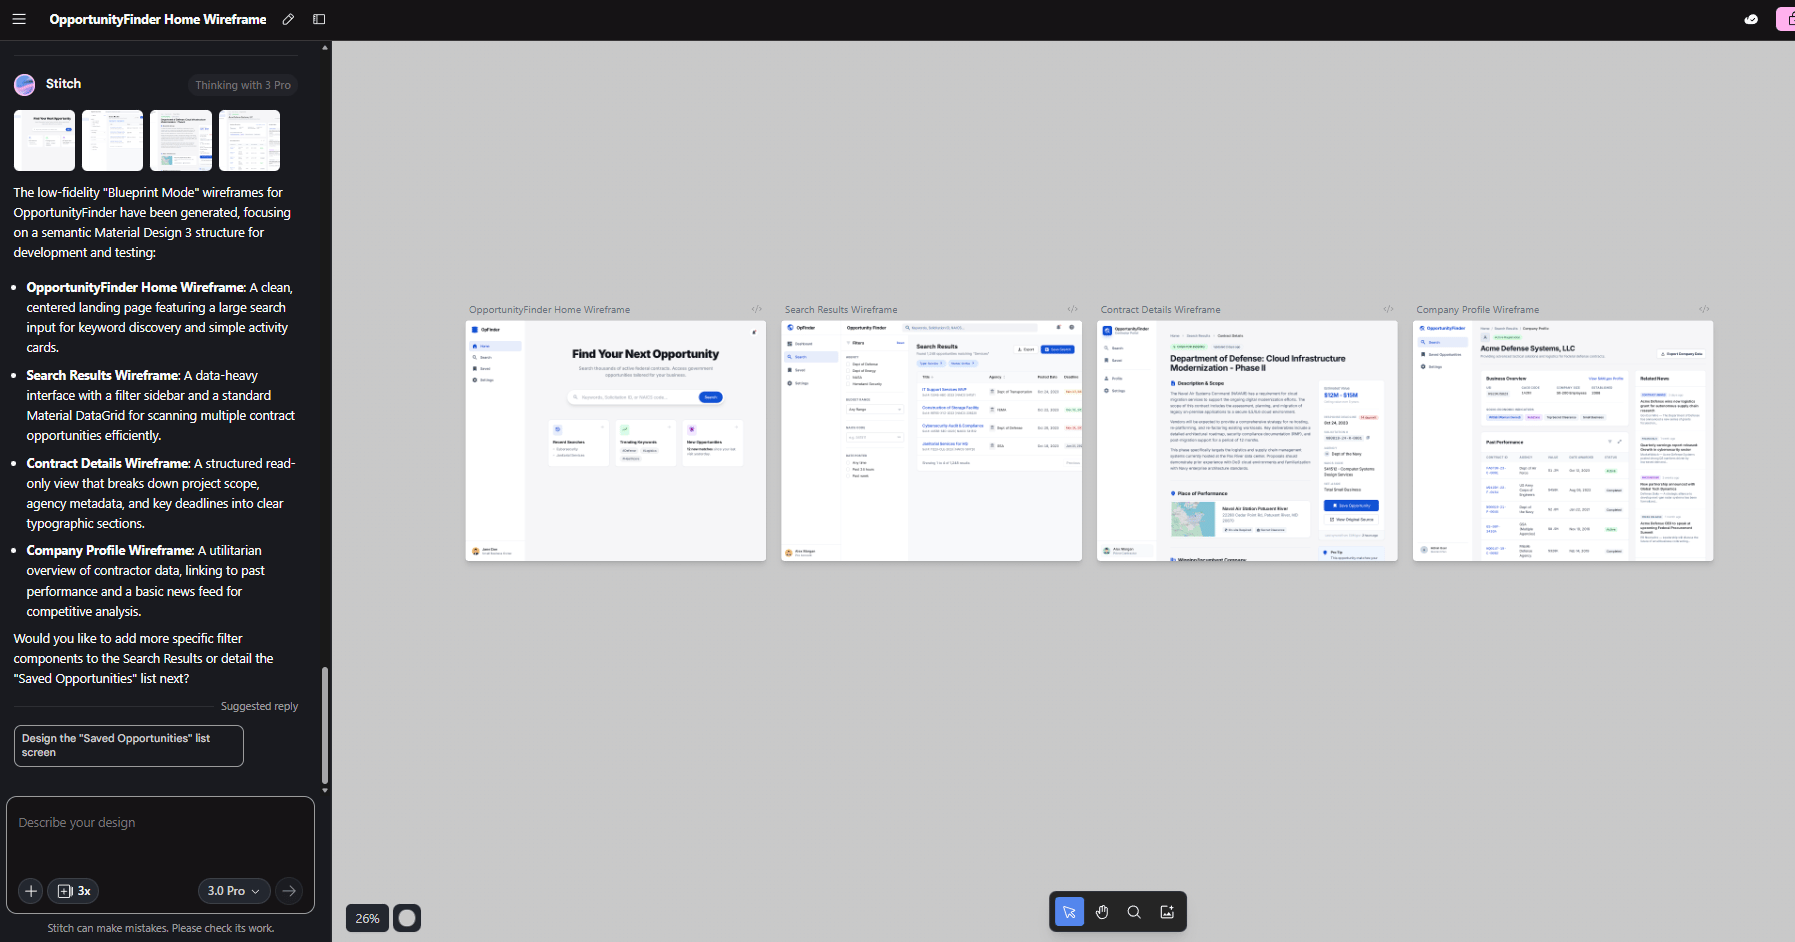
Now the real work begins. You click through the screens like a user would and check every single detail to see if something looks wrong. So, you fix it directly by clicking on the screen and requesting changes, for example:
"Move the filter panel to the left sidebar instead of the top".
"Make the project cards larger and add more spacing".
Step 3: Export for Development
Once the UI looks good, you export the entire design folder. This gives you design references for building.
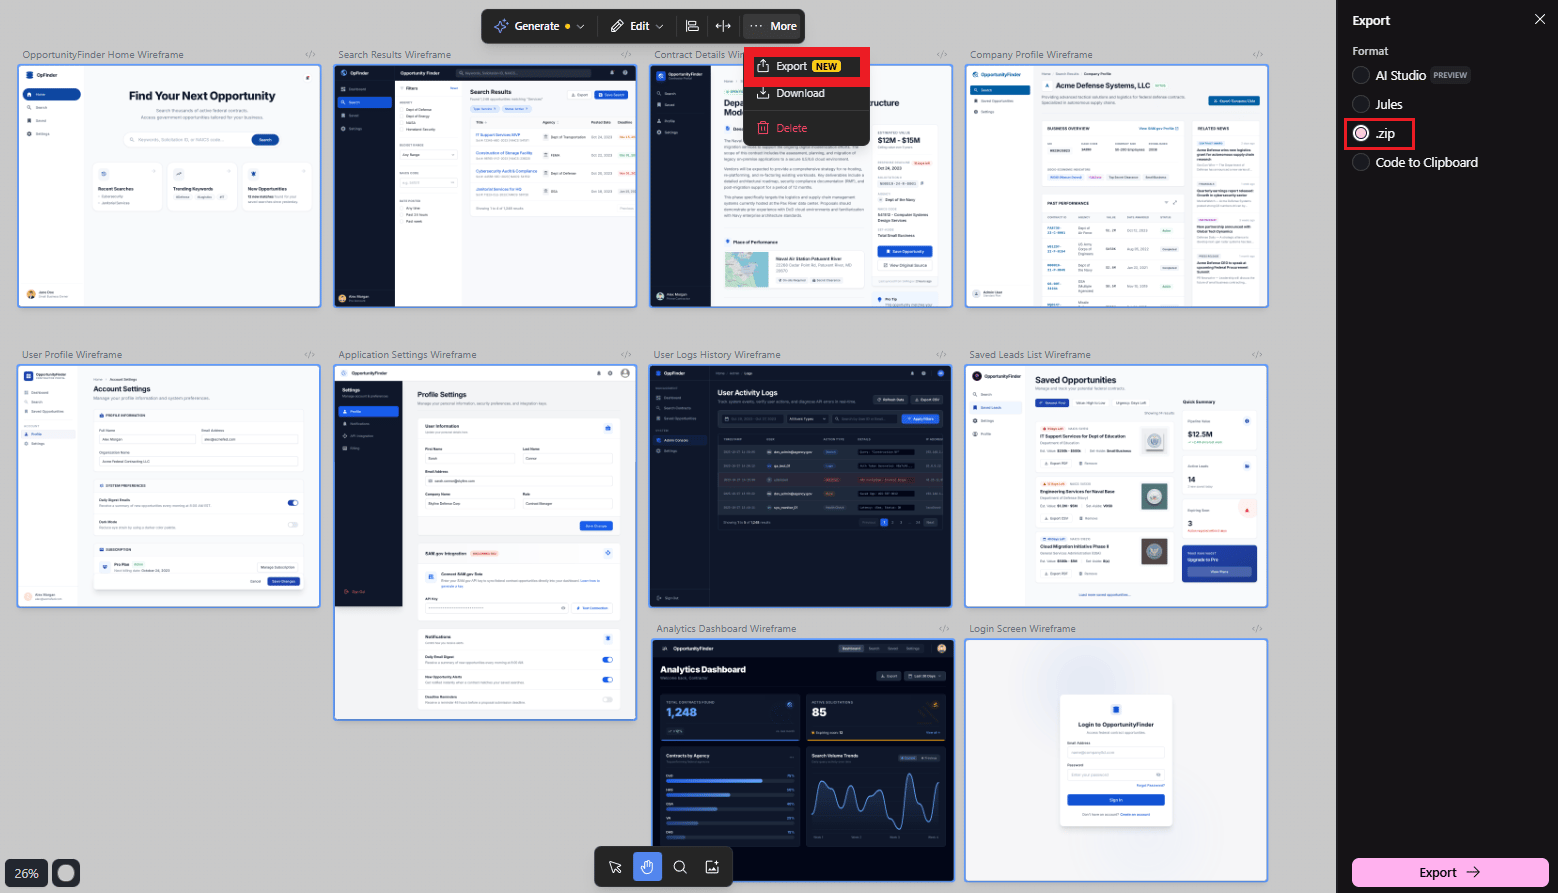
Your UI should include:
Main Dashboard (list of scraped leads).
Scraper Configuration Page (set search parameters).
Detail Views (project/company information).
Filters (projects vs companies).
The product has boundaries now and that makes the next phase much easier to build.
Overall, how would you rate the AI Workflows Series? |
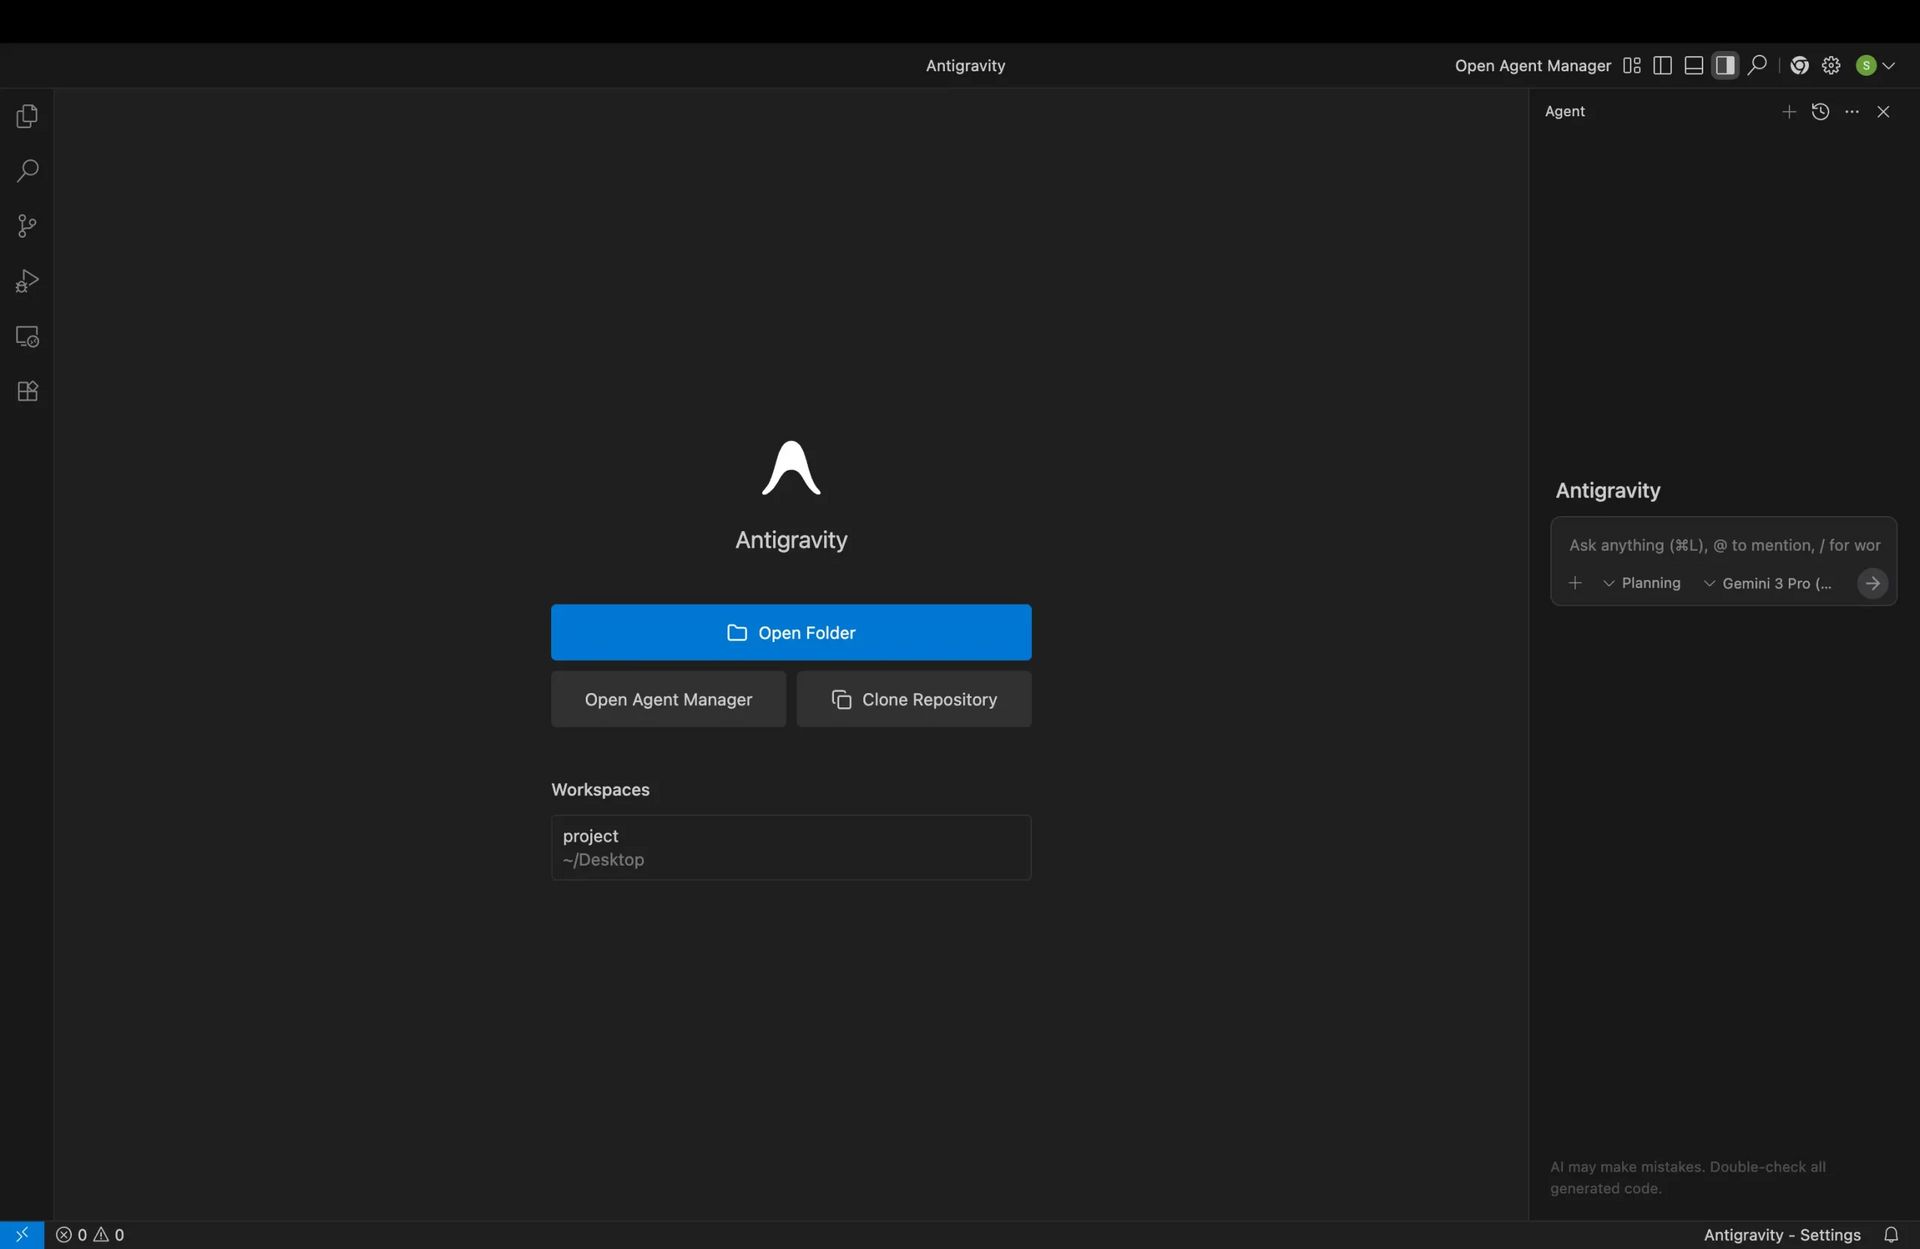
VI. Phase 3: Building the Frontend with Google Antigravity
Most no-code projects slow down here (writing components, wiring routes, fixing small issues).
Antigravity changes that by treating the build like a managed process instead of manual labor.
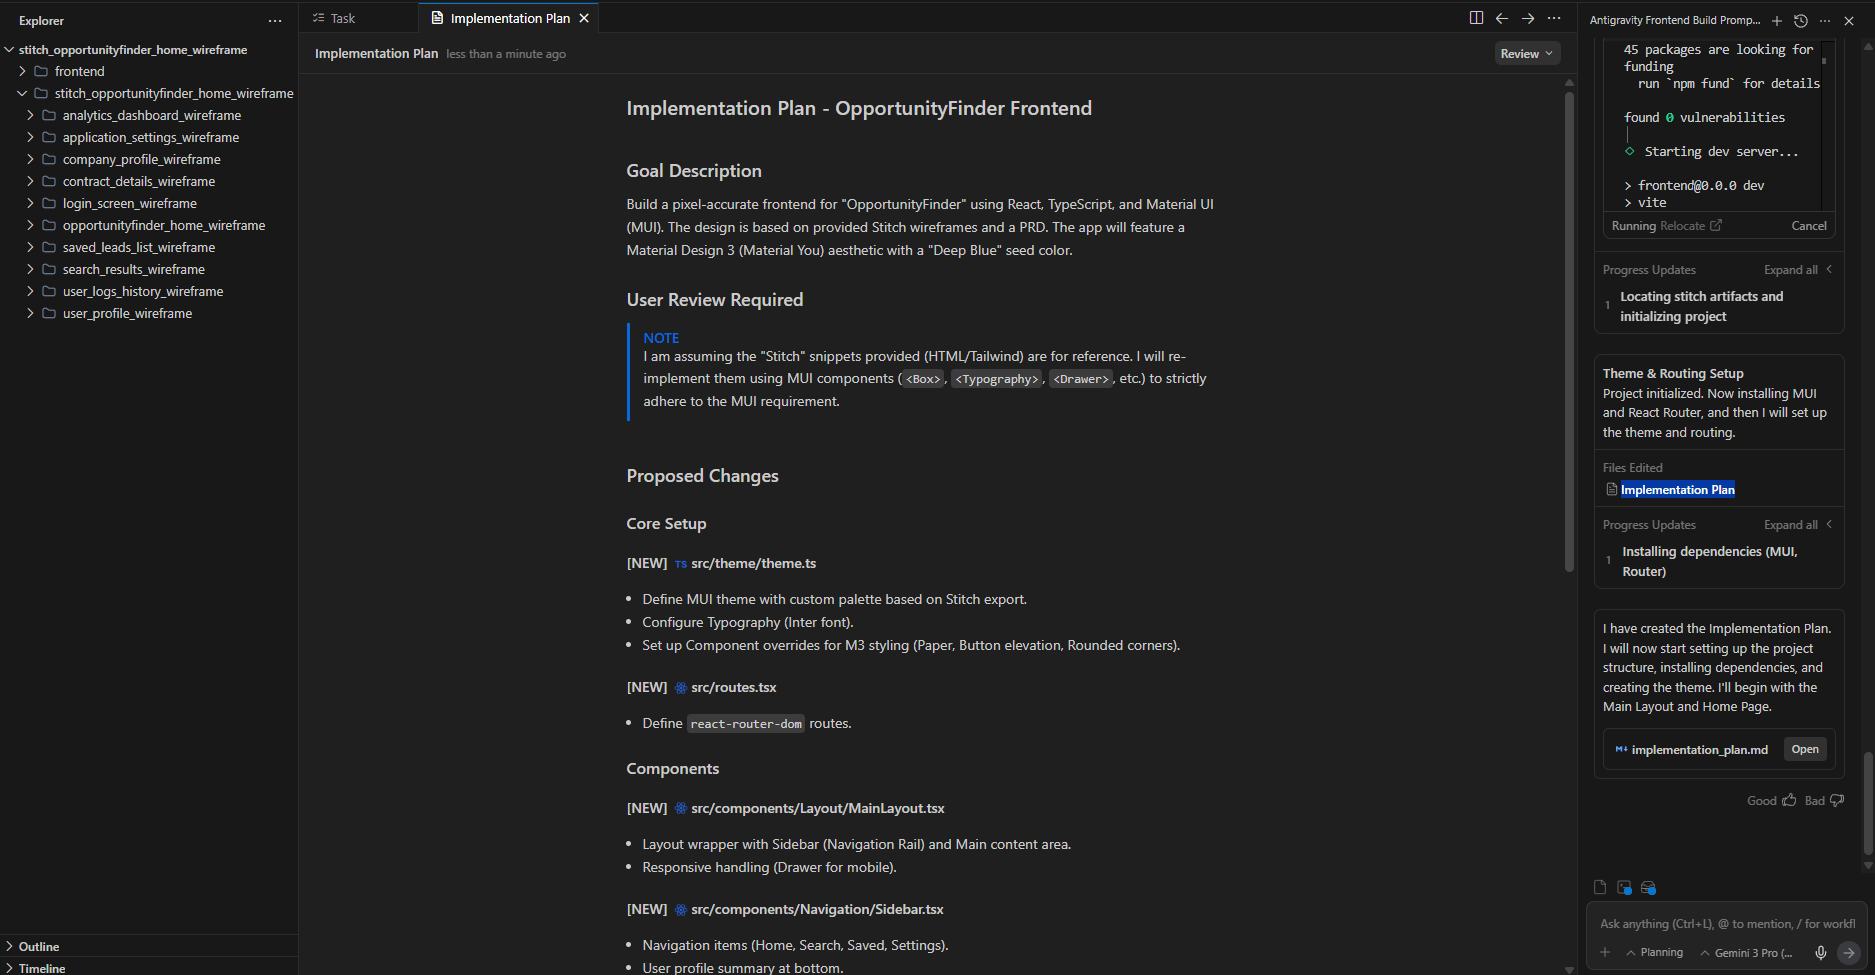
Step 1: Set Up the Project and Generate the Frontend
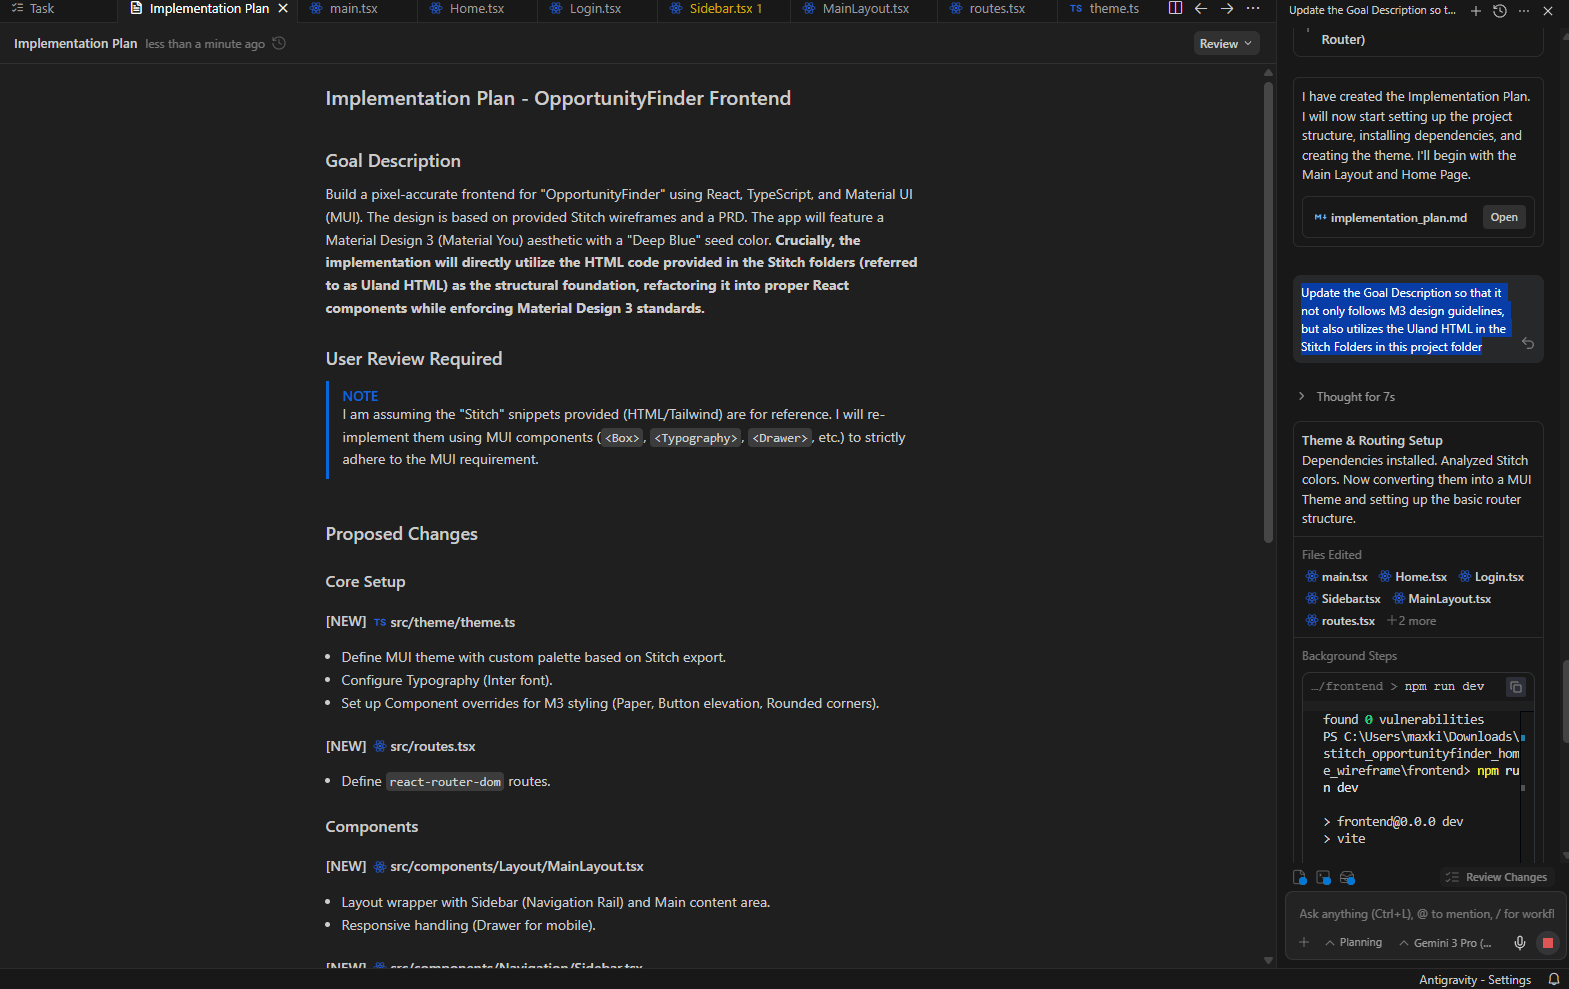
You open Google Antigravity and drop in the folder exported from Stitch. The screens are no longer ideas because the design and structure are now in the system.
The last thing you need to give is a clear prompt, maybe like the prompt I used:
Antigravity Frontend Build Prompt

You are a Senior Frontend Engineer with deep expertise in UI/UX implementation.

Objective:
Create a pixel-accurate frontend for a web application using the provided “Stitch UI Exports”
(design images and generated snippets) along with the accompanying Product Requirements Document
(PRD).

Input Context:
1. Visual Reference: A project folder is provided containing UI design images for each screen.
2. Code Reference: Raw component snippets generated by Google Stitch are included.
3. Behavioral Reference: The PRD below defines user flows, states and interactions.

Constraints & Standards:
- Design System: Follow Google Material Design 3 (Material You) without deviation.
- Tokens Only: Use theme tokens for Color (Primary, Surface, On-Surface), Typography (Roboto Flex),
  and Elevation (Levels 0-5).
- Component Library: All components must be built using `MUI` (Material UI) or `Material Web`
  standards.
- Styling Rules: No hardcoded hex values; rely exclusively on M3 theme variables.
- Tech Stack: React (Vite) or Next.js (App Router), TypeScript, Tailwind CSS optional if compatible
  with MUI.

Responsiveness:
All layouts must be fully responsive across Mobile, Tablet and Desktop using standard Material 3
breakpoints.

Scope:
Focus strictly on Frontend UI/UX. Use mocked or placeholder data only. Do not implement backend
logic.

Task:
1. Input Analysis:
   - Cross-check Stitch UI images against the PRD to understand screen structure and hierarchy.
2. Routing Setup:
   - Define the page and route structure specified in the PRD (e.g., `/dashboard`, `/login`,
     `/settings`).
3. Component Development:
   - Refactor Stitch-generated snippets into clean, reusable React components.
   - Ensure all interactive elements (buttons, inputs, navigation rails) implement proper
     hover, focus and active states per Material Design 3.
4. Page Assembly:
   - Compose full pages by assembling components to match the provided visual designs.

[INSERT PRD HERE - Paste the complete PRD text here]
Step 2: Review the Implementation Plan
Antigravity will generate a detailed plan and you have to read it carefully. Ask yourself:
Does it cover all features?
Are there backend tasks mixed in? (Handle those later)
Is anything important missing?
If something feels missing, you just adjust it:
"Add a sidebar component for displaying project details when a card is clicked".
"Include filter toggles for switching between projects and companies".
Once the plan matches your intent, you move on and then let Antigravity handle the rest. It will:
Write React components.
Set up routing.
Create folder structure.
Install dependencies.
When it’s finished, it walks you through what it built and how everything fits together.
Step 3: Launch Locally
To preview it, just tell Antigravity:
Launch the project locally so I can preview it.The agent will run the development server and open the app in your browser.

Maybe the first version won't be perfect. That's normal. You'll refine it through iteration. My first run wasn’t perfect. A few pages were blank. I just screenshot the issue and told the agent what to fix.
VII. Phase 4: Refining the Frontend
Now comes the hands-on part. You’ll spend the most time in this phase but compared to traditional coding, it’s still dramatically faster.
Think of this phase as a tight loop: ask, review, refine.
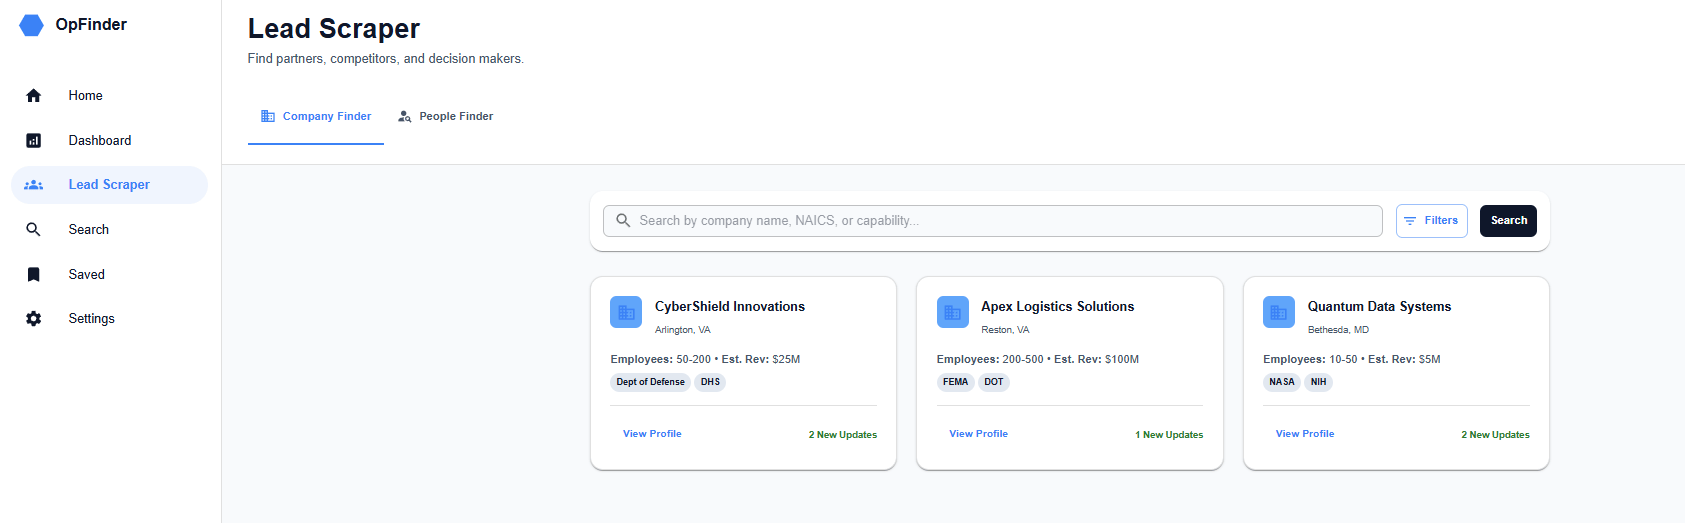
Example: Adding the Scraper Configuration Page
You tell the agent what you want in plain language:
Add a 'Lead Scraper' page with two main search types: 'Project Finder' and 'Company Finder'. Place it in the navigation next to the dashboard.The agent creates the new page, adds routing, builds UI components and updates the navigation for you automatically.
Review the result. If something's off, refine:
"Remove the extra search filters. We only need keyword search for now".
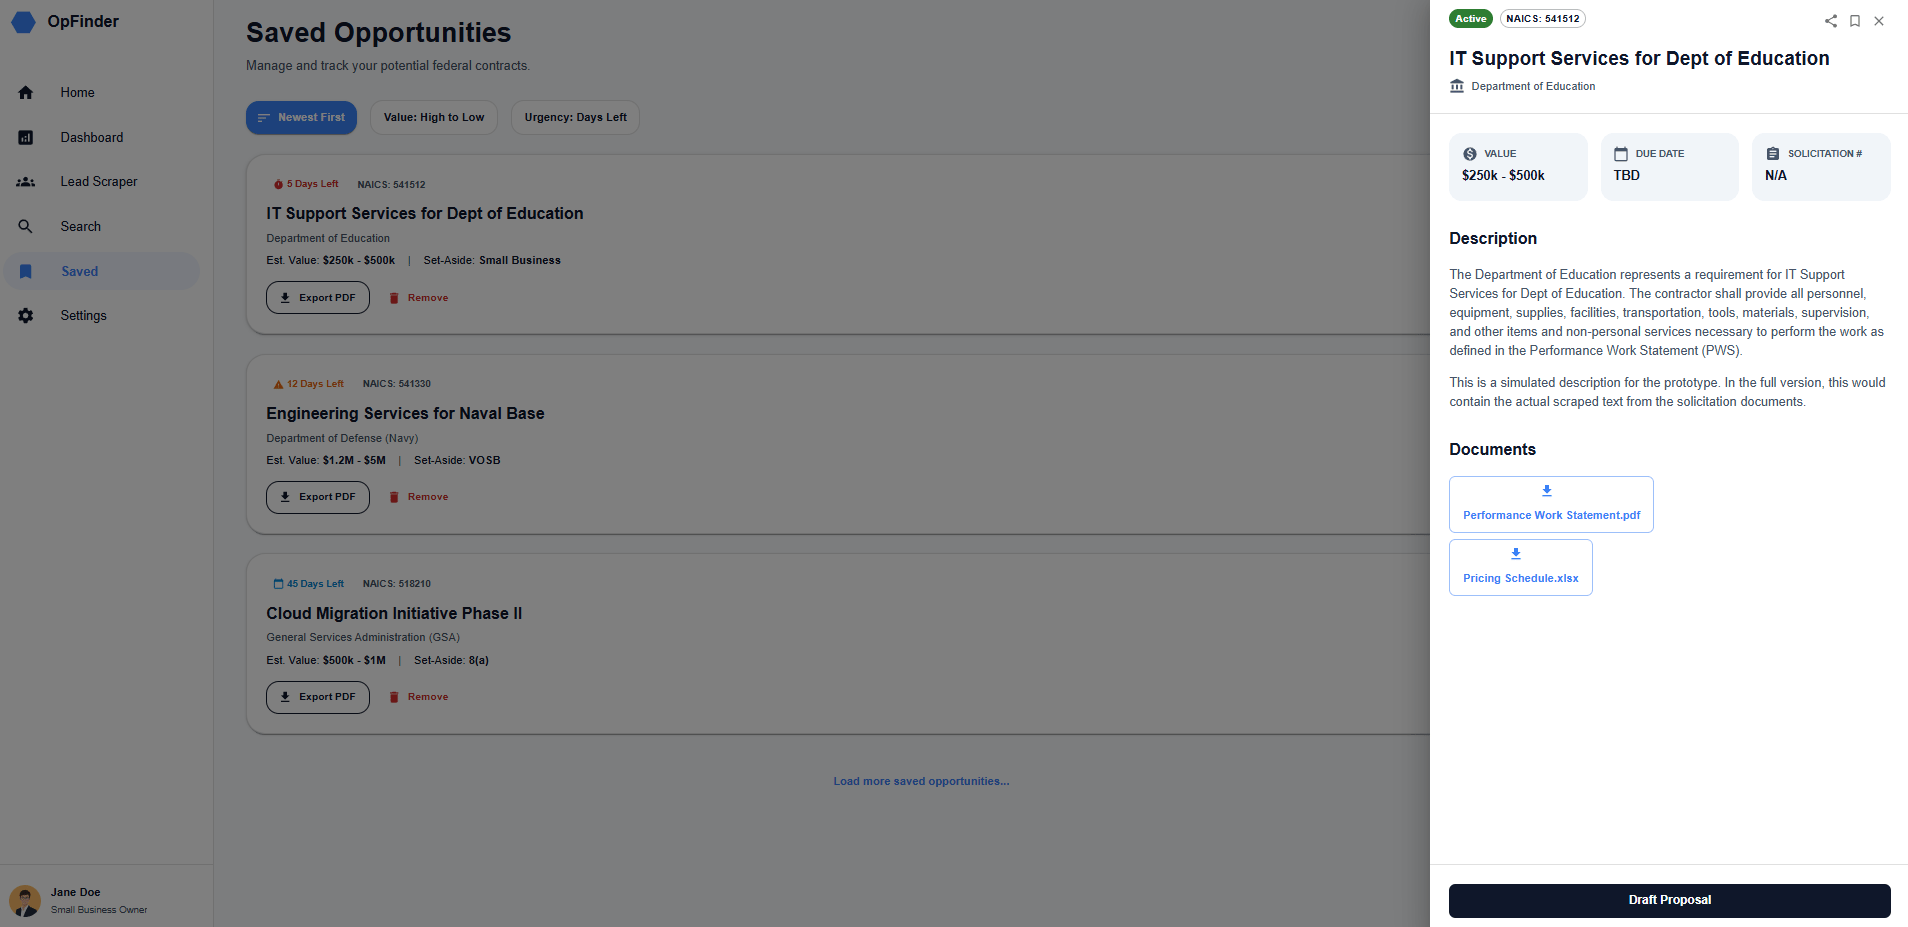
Example: Building the Project Details Sidebar
Next, you want more depth without cluttering the main screen.
When a user clicks on a project card in the dashboard, open a sidebar on the right with detailed information: project name, contracting agency, budget, timeline and description.The agent writes the code. You review and approve.
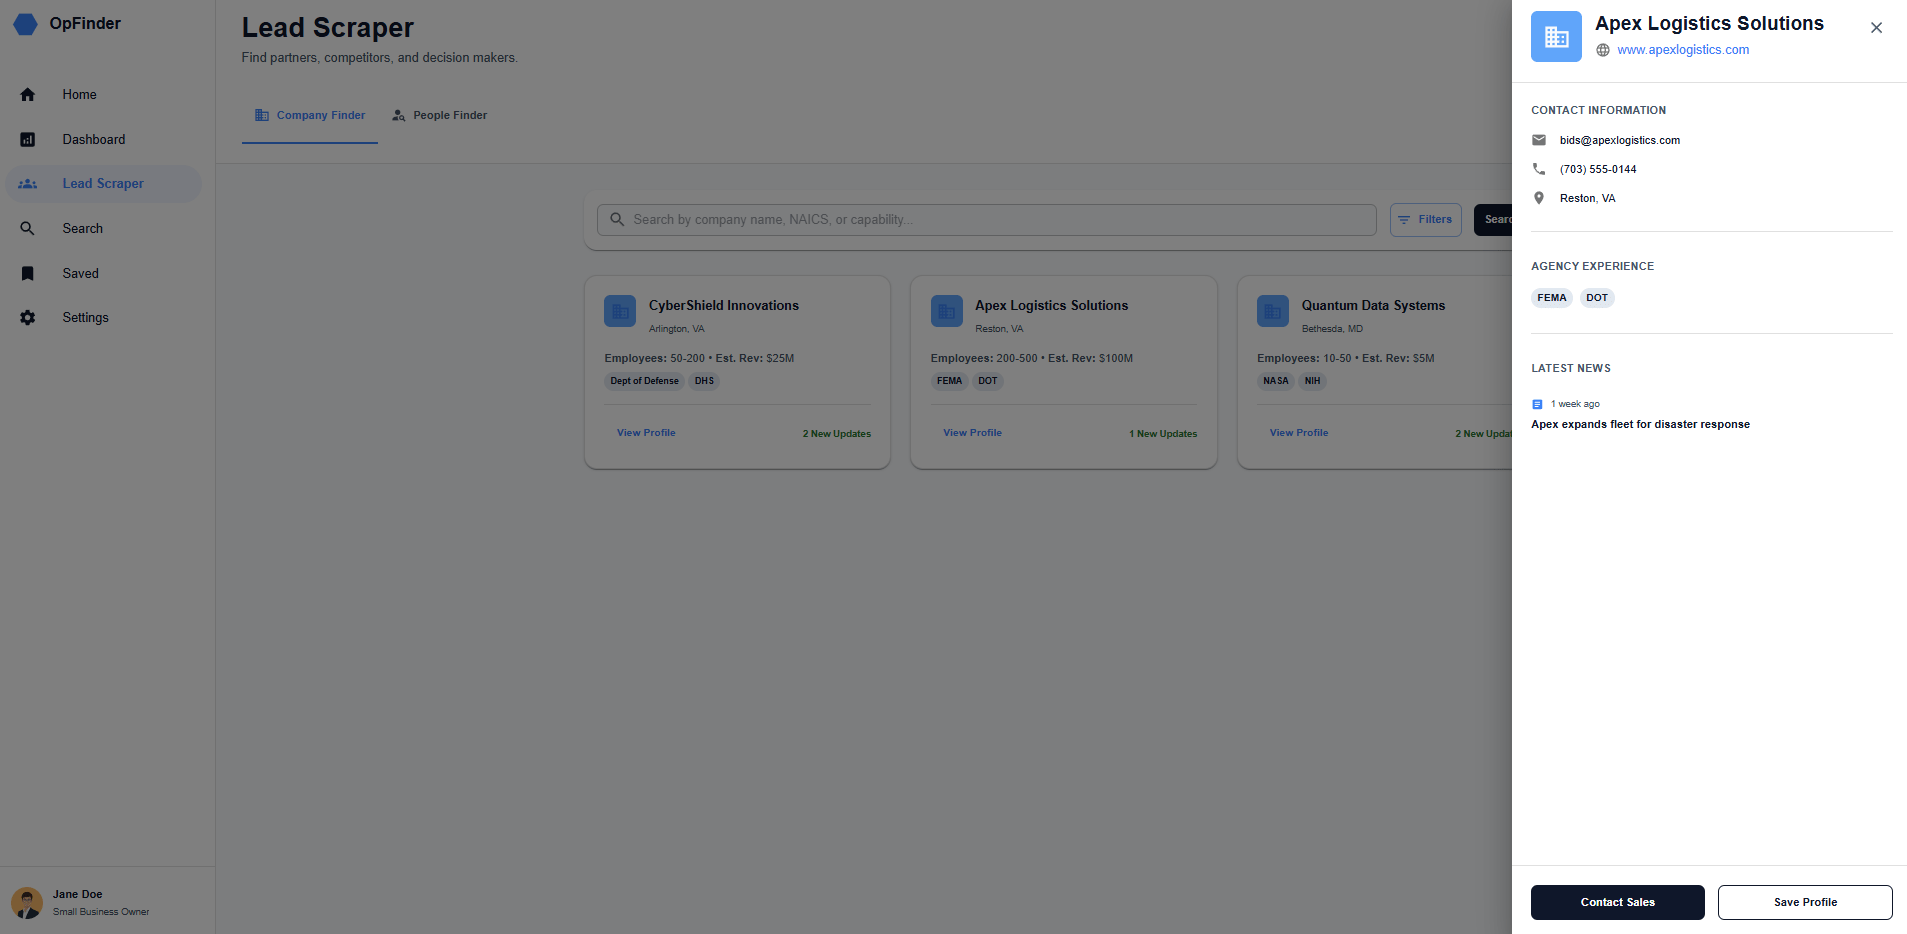
Example: Adding Company Profiles
You extend the same pattern:
Create a company profile view that shows: company name, website, contact info, agency profile and latest news about the company.Once again, the agent builds and your job is refining.
Pro Tip: Break changes into small, specific requests. That focus keeps the agent accurate and turns frontend work into fast, controlled iteration instead of a long coding grind.
VIII. Phase 5: Building the Backend
This is where things stop being a demo and start becoming a real product. The frontend looks done. Now you give it a brain.
Step 1: Give Context from the PRD
Remember the list of APIs you asked Gemini to help with in Phase 1, right? It’s time to use this in this phase.
You open Antigravity and give it a clear context:
This is the Technical Recommendations of this project, in the PRD I made:
[Paste your list of APIs]
---
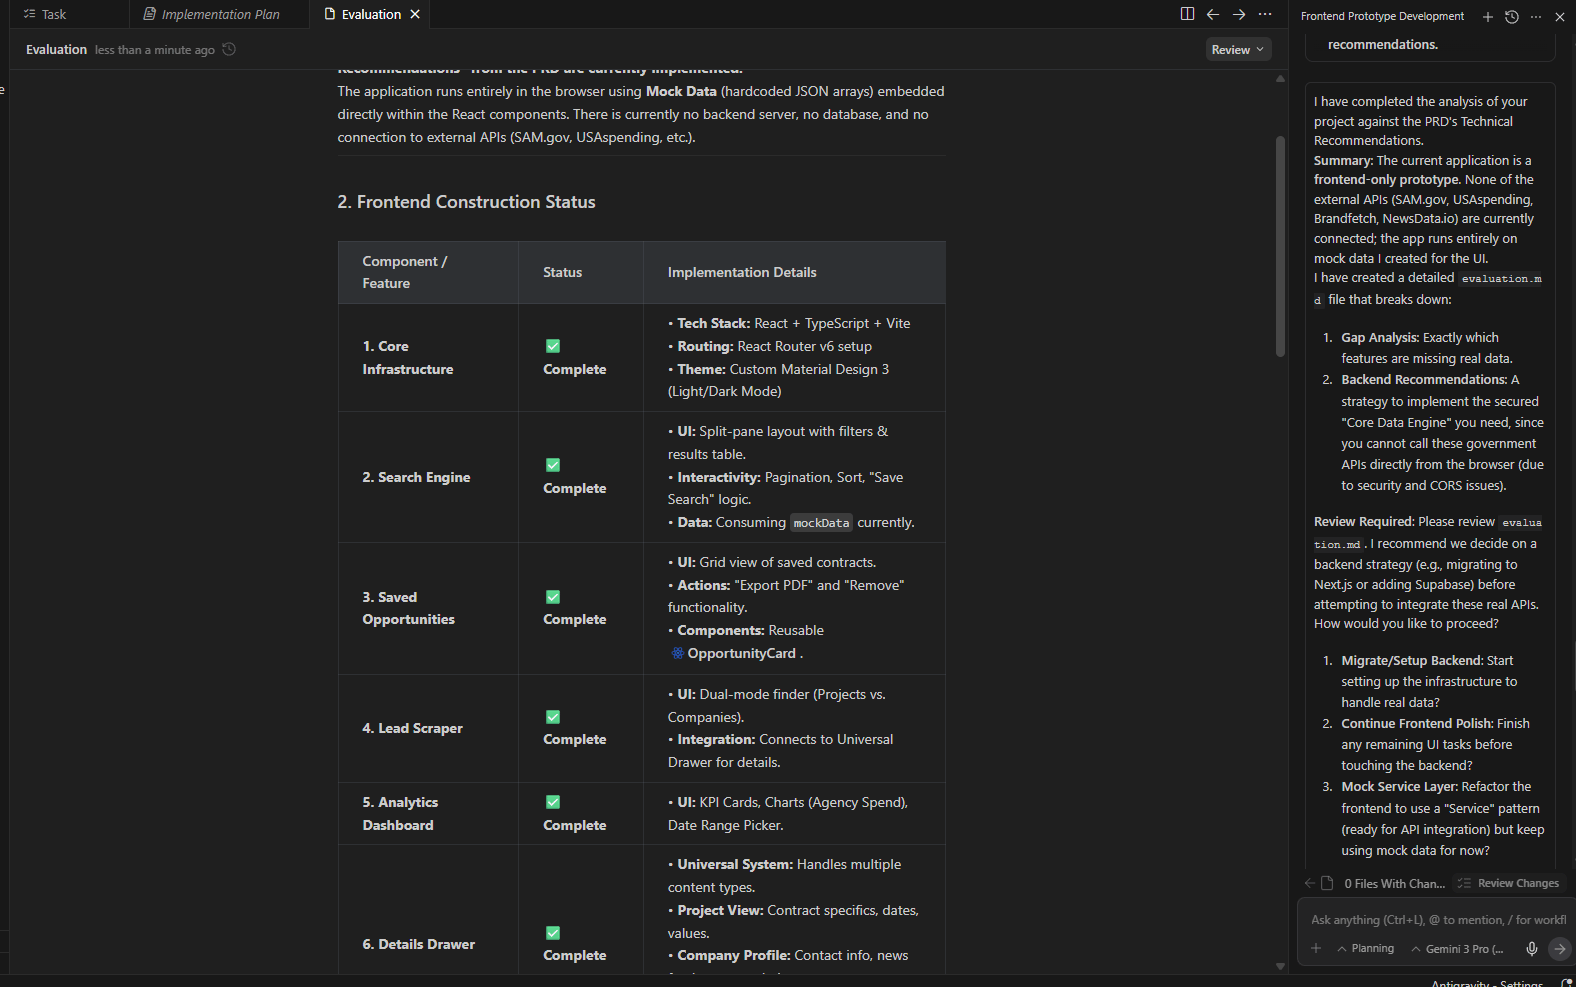
I want you to analyze this and cross-reference it with the project files we have here and see what has already been done and what hasn't been. This is so you have context of what already done and what you need to do. So, create a recommendation if these technical recommendations need to be changed (backend), based on the codebase we have. Do not make changes yet; put it in an evaluation.mdThe agent generates an evaluation file showing:
✅ Frontend: Complete (React, TypeScript, routing)
❌ Backend: Not started (Python server, database, APIs)
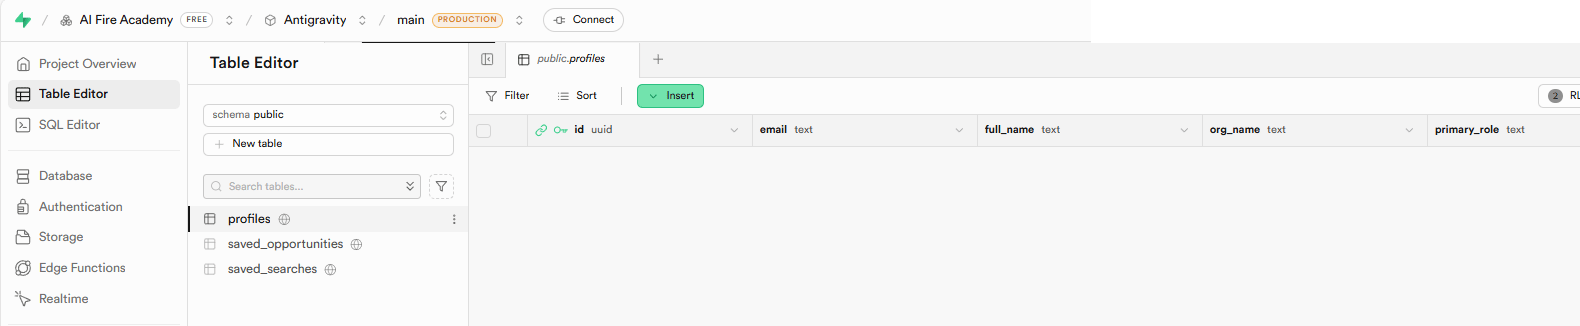
Step 2: Set Up the Database (Supabase)
The agent recommends Supabase (a Postgres database) and generates SQL code to create tables.
What you need:
A Supabase account (free tier works).
Create a new project.
In here, you will go to the Project Settings → In the API section, you will put your Supabase URL + anon key into your .env and let Antigravity read it from there.
Security note: Never share API keys publicly. That's why they go in .env files; they're hidden from the frontend.

Then Antigravity will generate the SQL query for you.
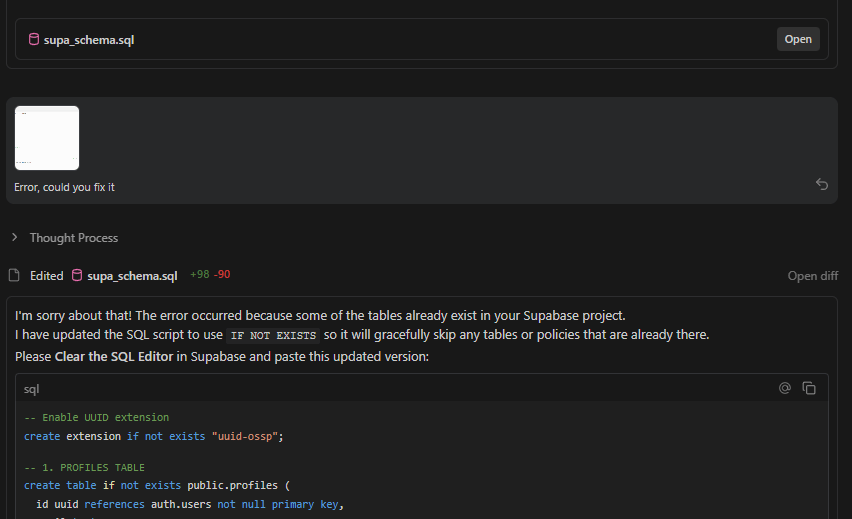
Go to Supabase → SQL Editor → Paste the SQL query and run.
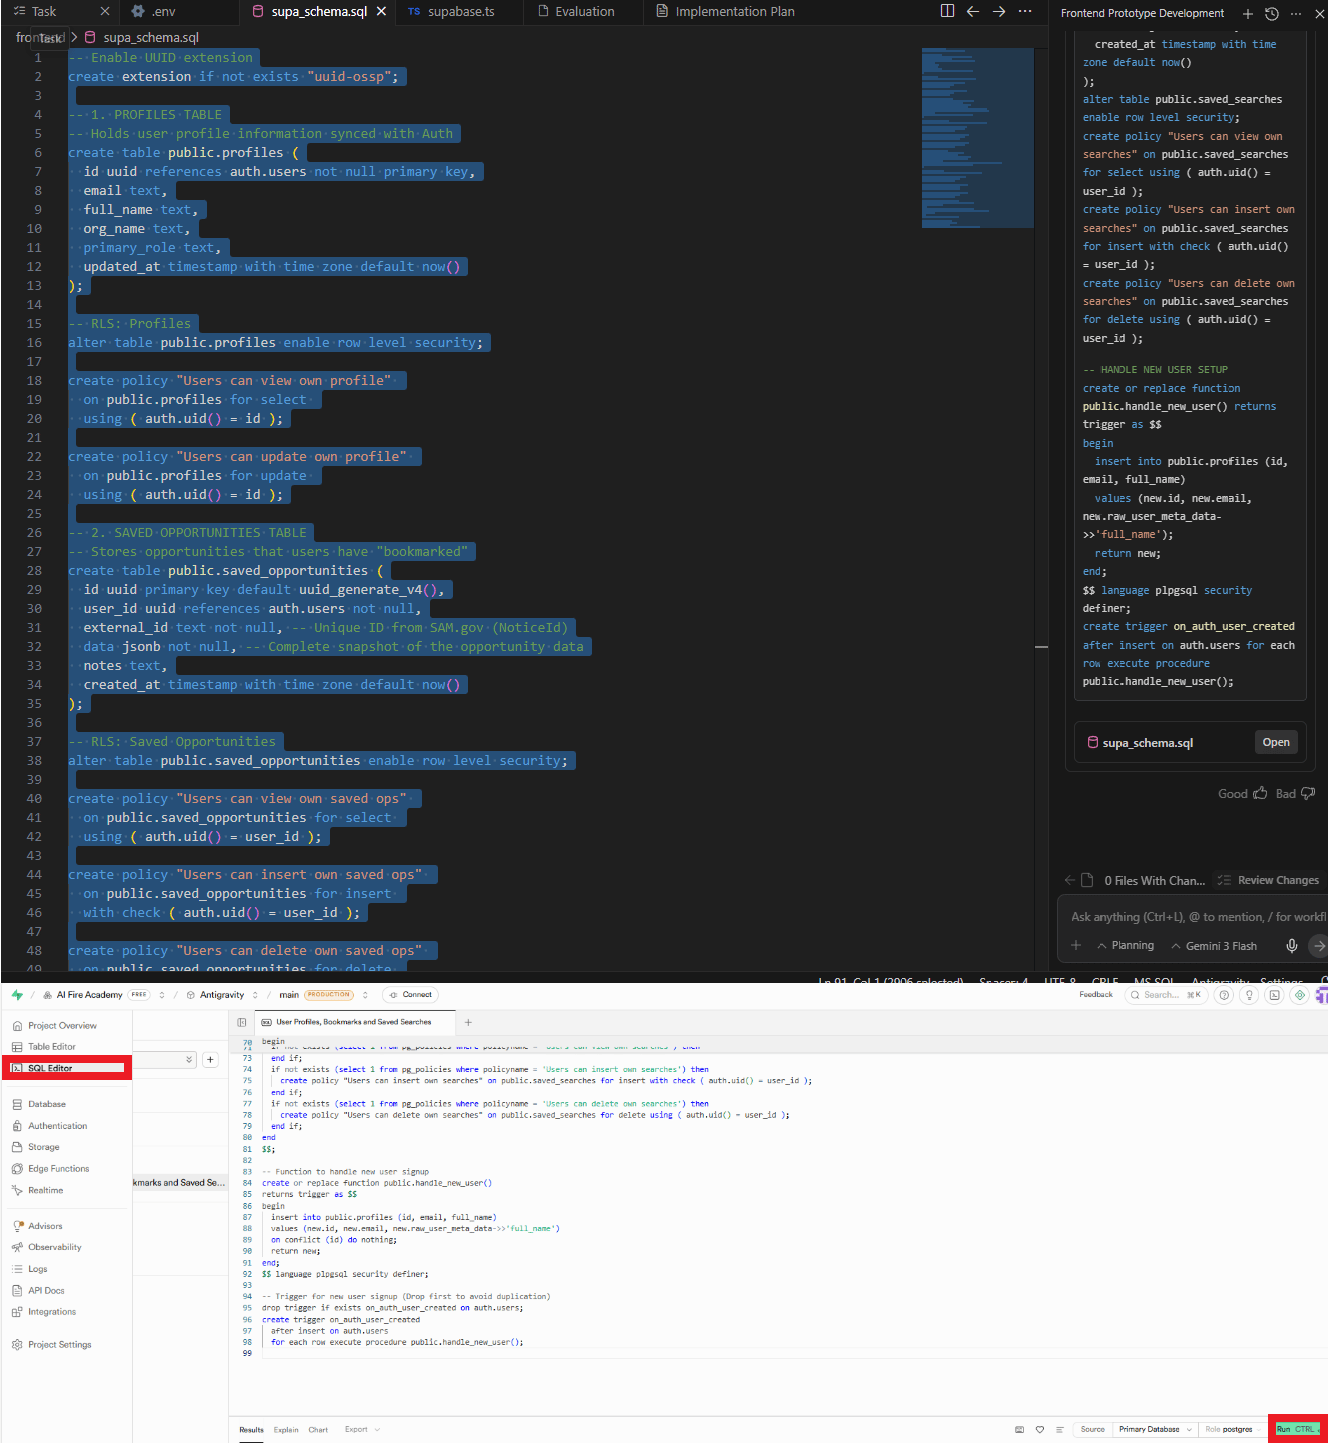
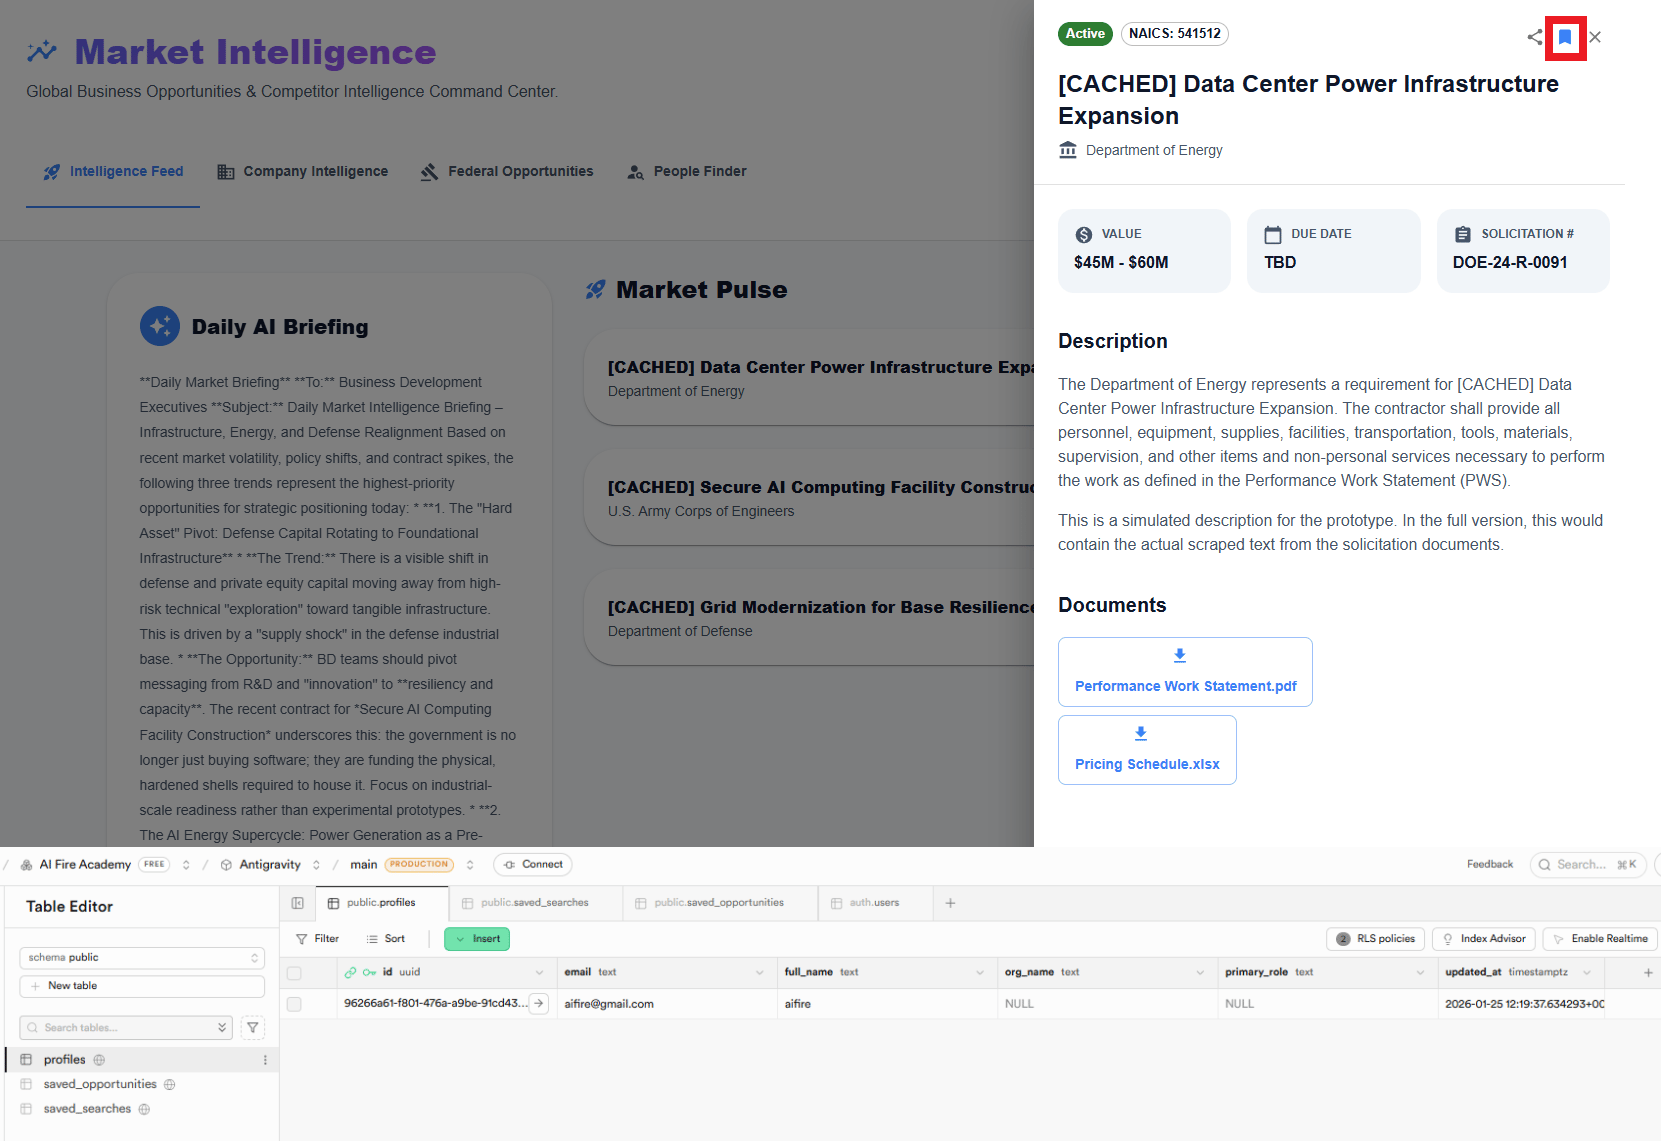
Tables you'll create:
profiles: stores the name, email and organization for everyone who signs up.
saved_opportunities: stores any contract or project you click "Save" on.
saved_searches: stores your specific filter combinations (e.g., "IT projects in the DOD with Budget > $1M").
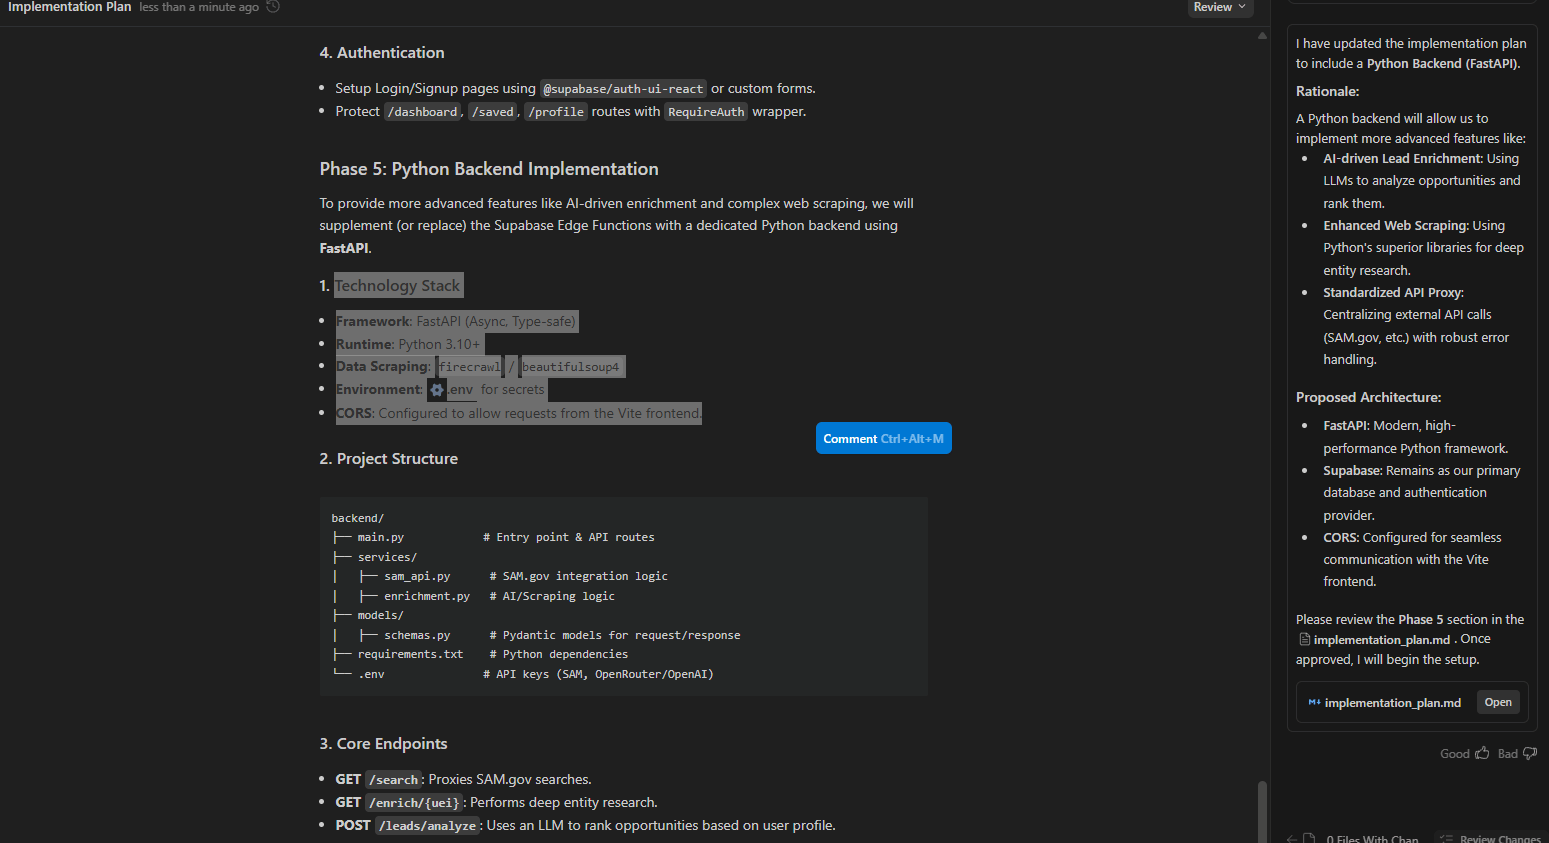
The skeleton of the product is now real. Next, you will need to ask AI to build the Python server and it will:
Install Python dependencies.
Create a Flask/FastAPI server.
Set up endpoints for scraping.
Connect to your database.
You just need to approve each step. At this point, the system stops being static anymore. Now, it can fetch data, store it and serve it back.
Creating quality AI content takes serious research time ☕️ Your coffee fund helps me read whitepapers, test new tools and interview experts so you get the real story. Skip the fluff - get insights that help you understand what's actually happening in AI. Support quality over quantity here!
IX. Phase 6: Wiring Up APIs
This is the moment your app stops being a demo and starts being useful.
Up to now, everything looks good on the surface but real value comes from live data. This phase is where you connect the outside world to your product.
API #1: GovCon API (Federal Contracts)
You start with federal contract data. The flow is simple:
Open the API docs page for your contract data source (GovCon or similar).
Enter your email for free access.
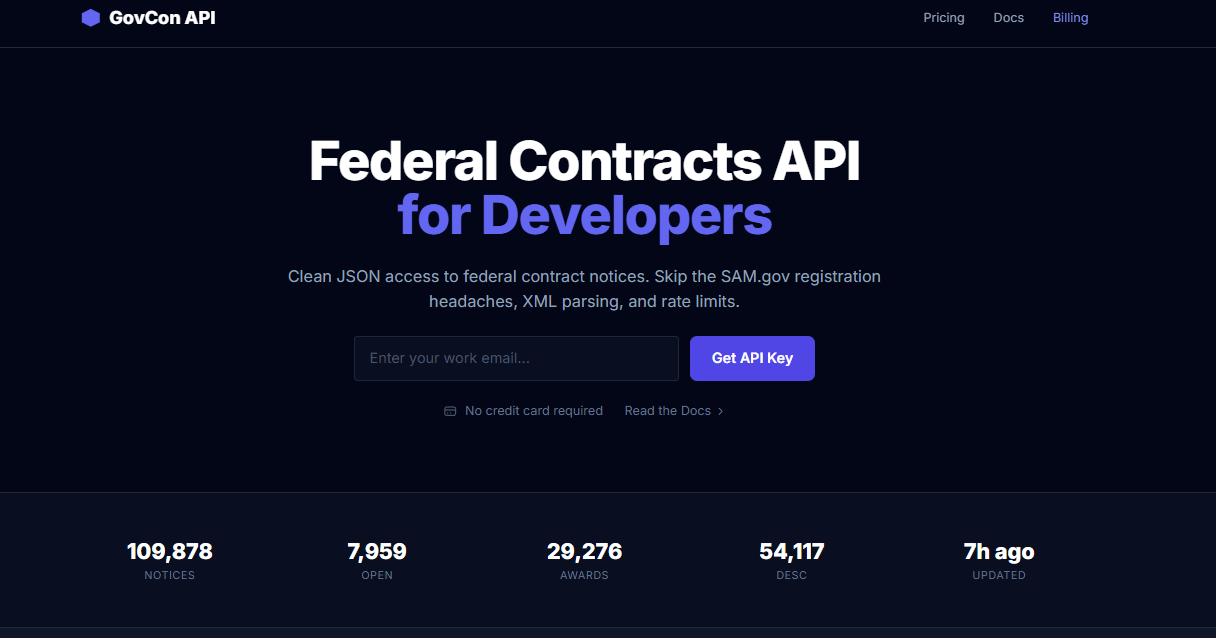
Copy the API documentation.
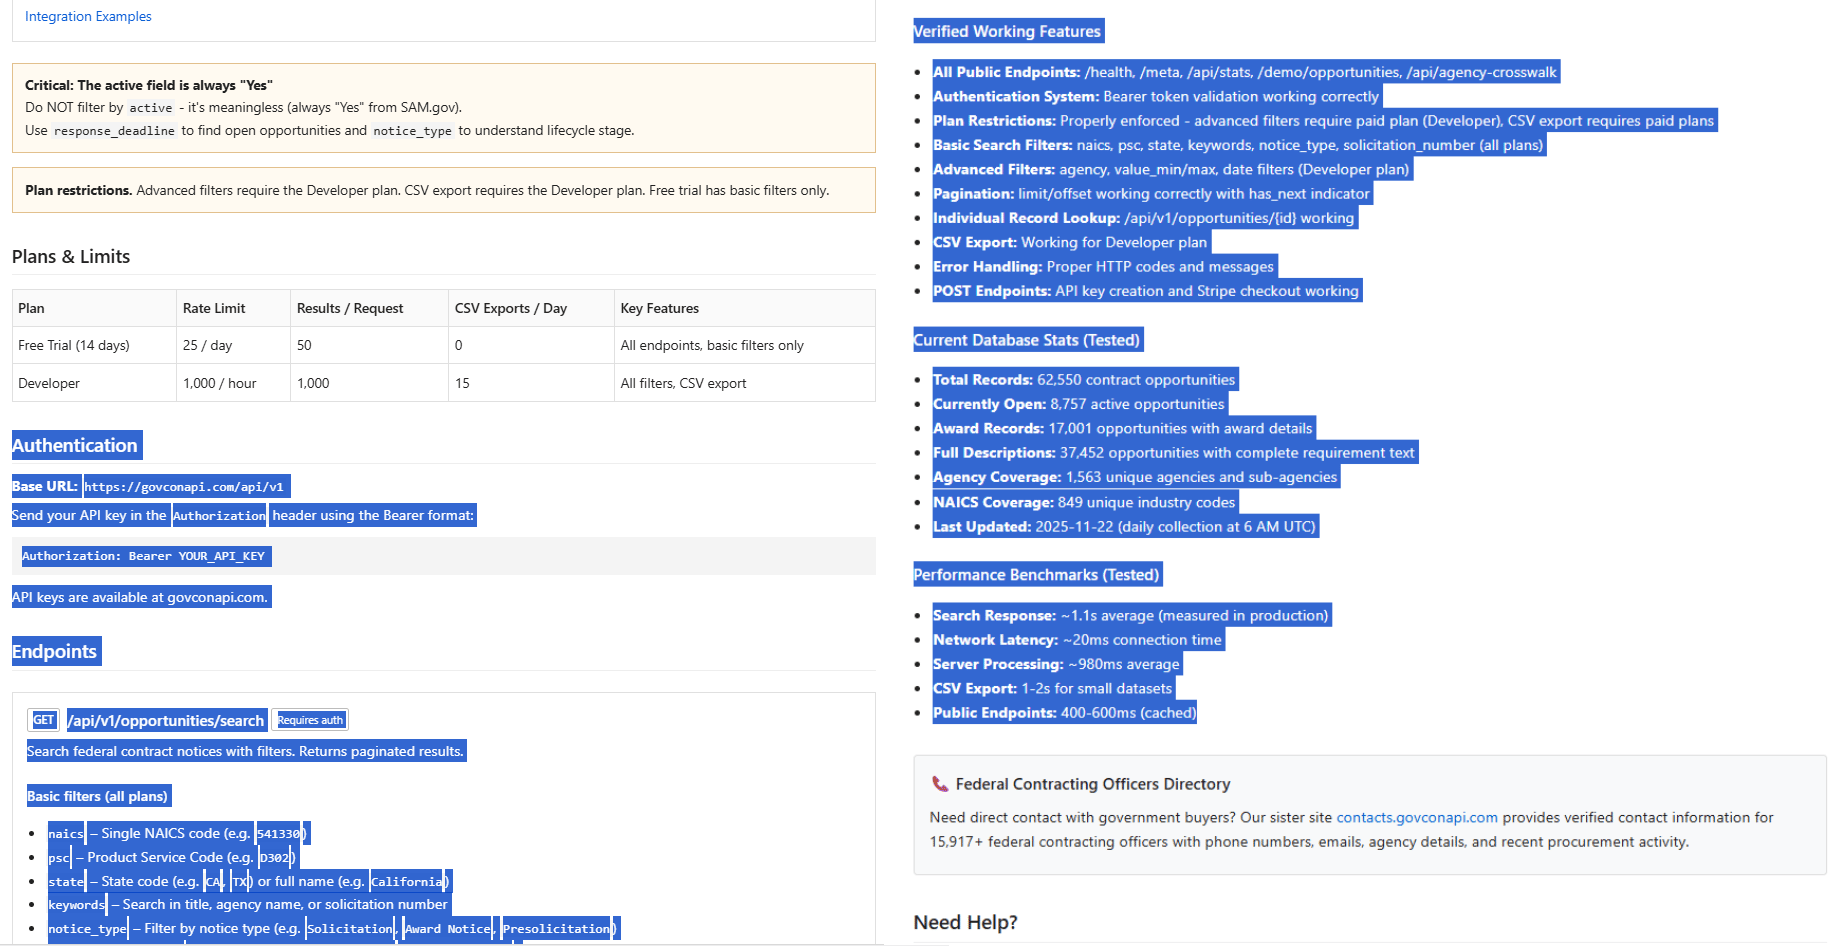
Paste it into Antigravity with this prompt:
Integrate this API into our scraper. When a user searches for 'construction' projects, query this API and return matching federal contracts. Store results in our Supabase database.
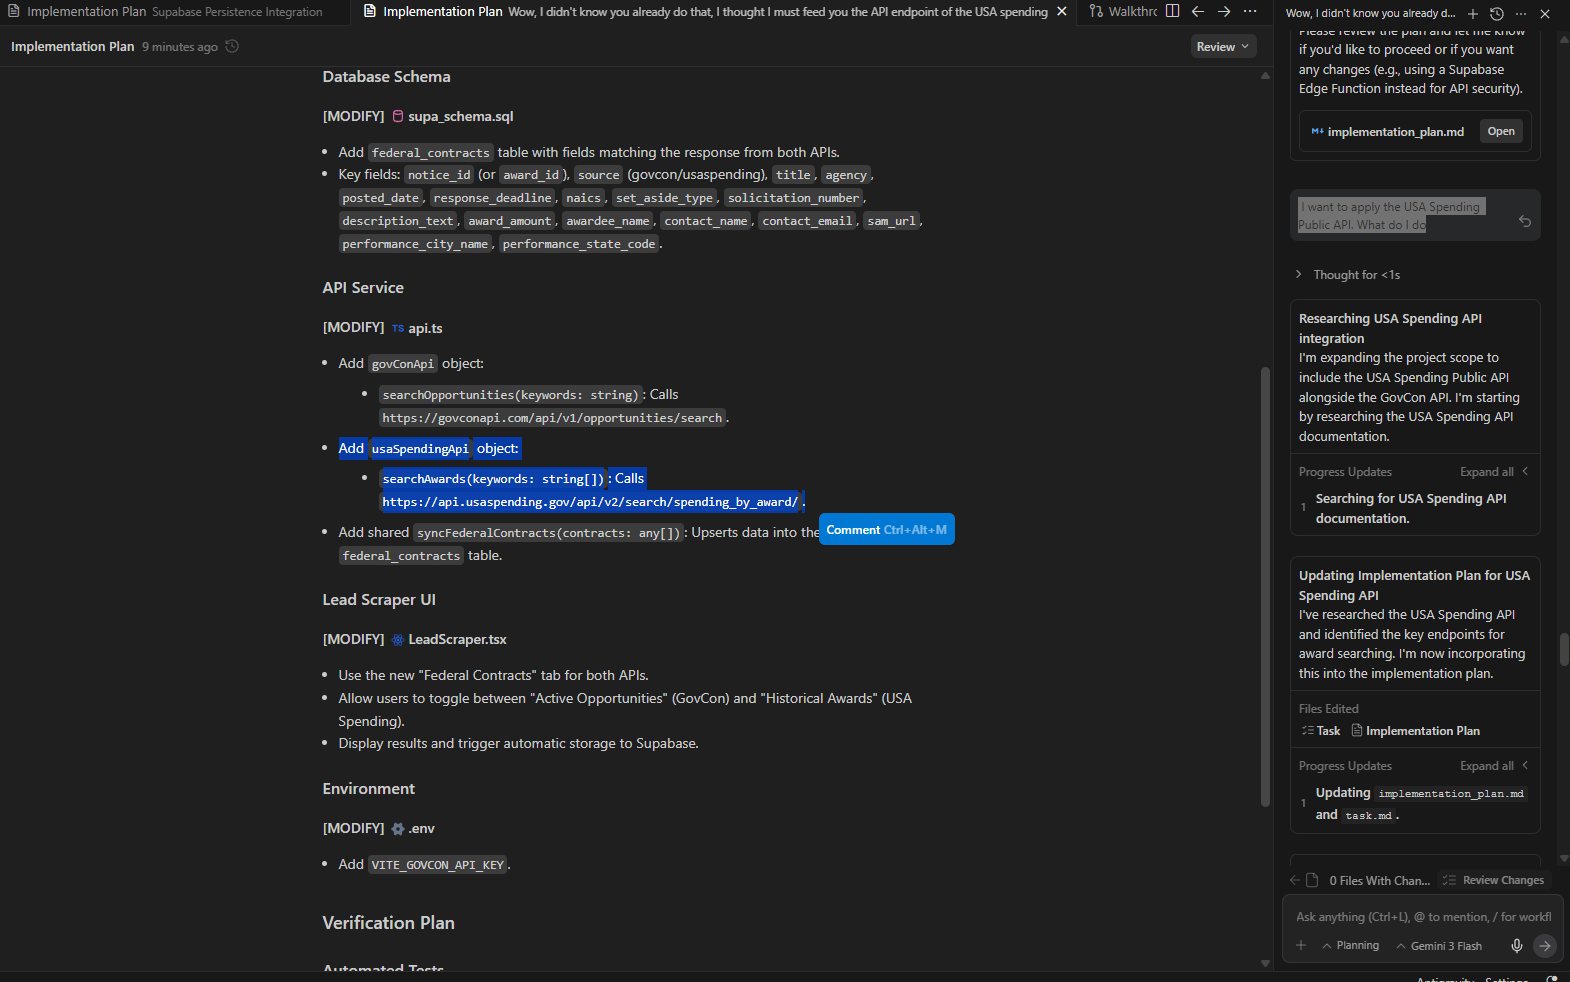
[Paste the documentation for the GovCon API]API #2: USA Spending Public API
USAspending has solid docs, so you can ask Antigravity to integrate it directly.
API #3: News API (Latest Company News)
For the "Latest News" section:
Get a News API key.
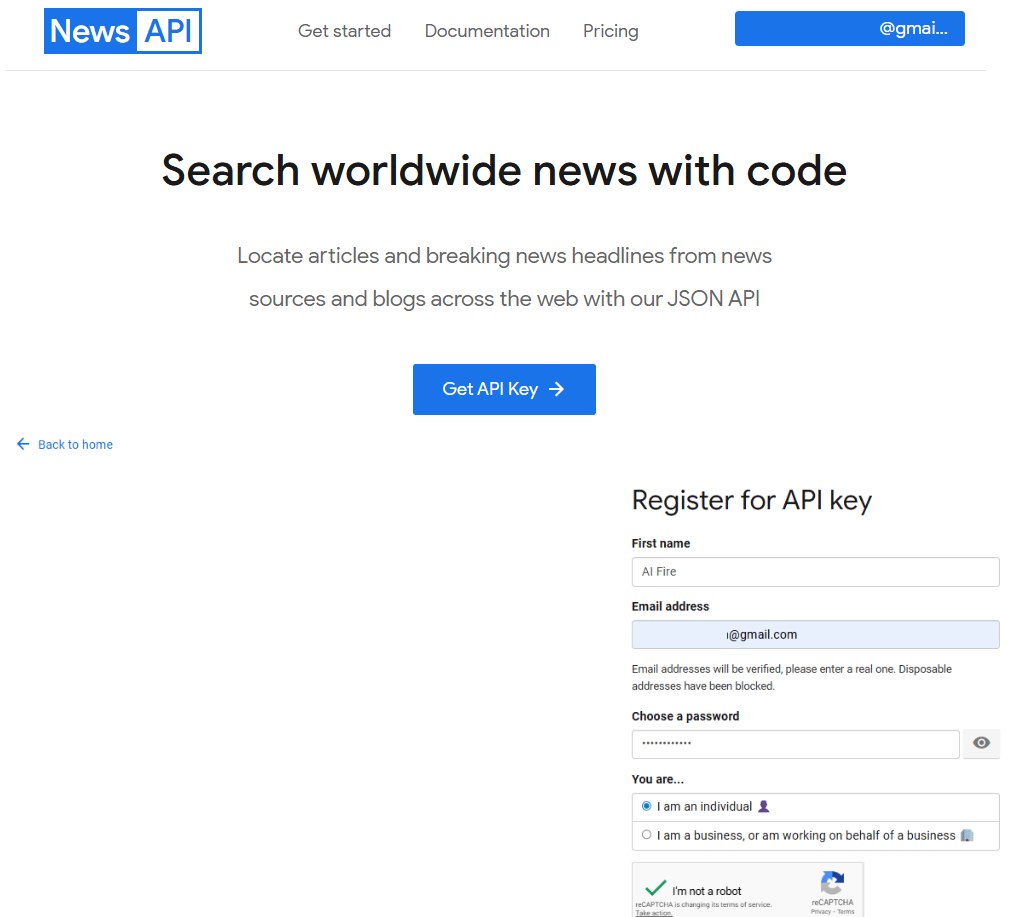
Integrate it so users see recent articles about companies.
If you don’t want paid plans, start with a free-tier news provider and cache results.
Pro Tip: Always include full API documentation when asking Antigravity to integrate. More context = better integration.
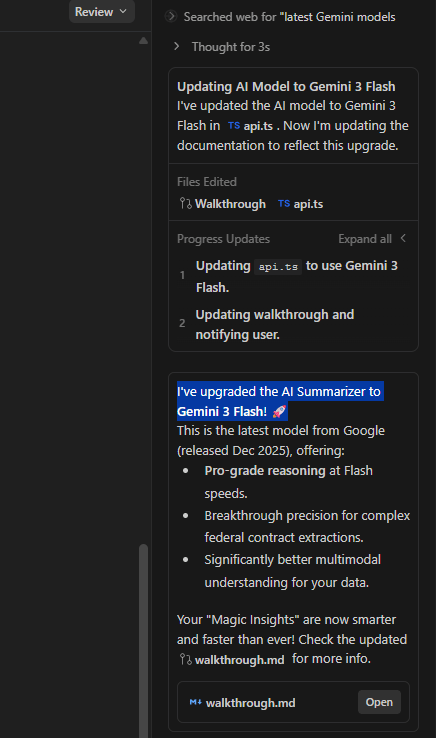
*Secret sauce: If you want this to feel premium, add an AI summarizer. When the scraper pulls a 20-page federal contract, the AI reads it instantly and gives your user a three-sentence summary of the most important parts. This transforms "raw data" into "valuable insights".
X. Phase 7: Testing the Full System
Instead of checking pieces in isolation, you run the system end-to-end to confirm it behaves like a real working research tool you’d actually use.
Test #1: Scraping Projects
You go to the "Lead Scraper" page
Select "Federal Opportunities"
Enter the keyword: "Artificial Intelligence Defense Contracts".
Hit "Analyze"
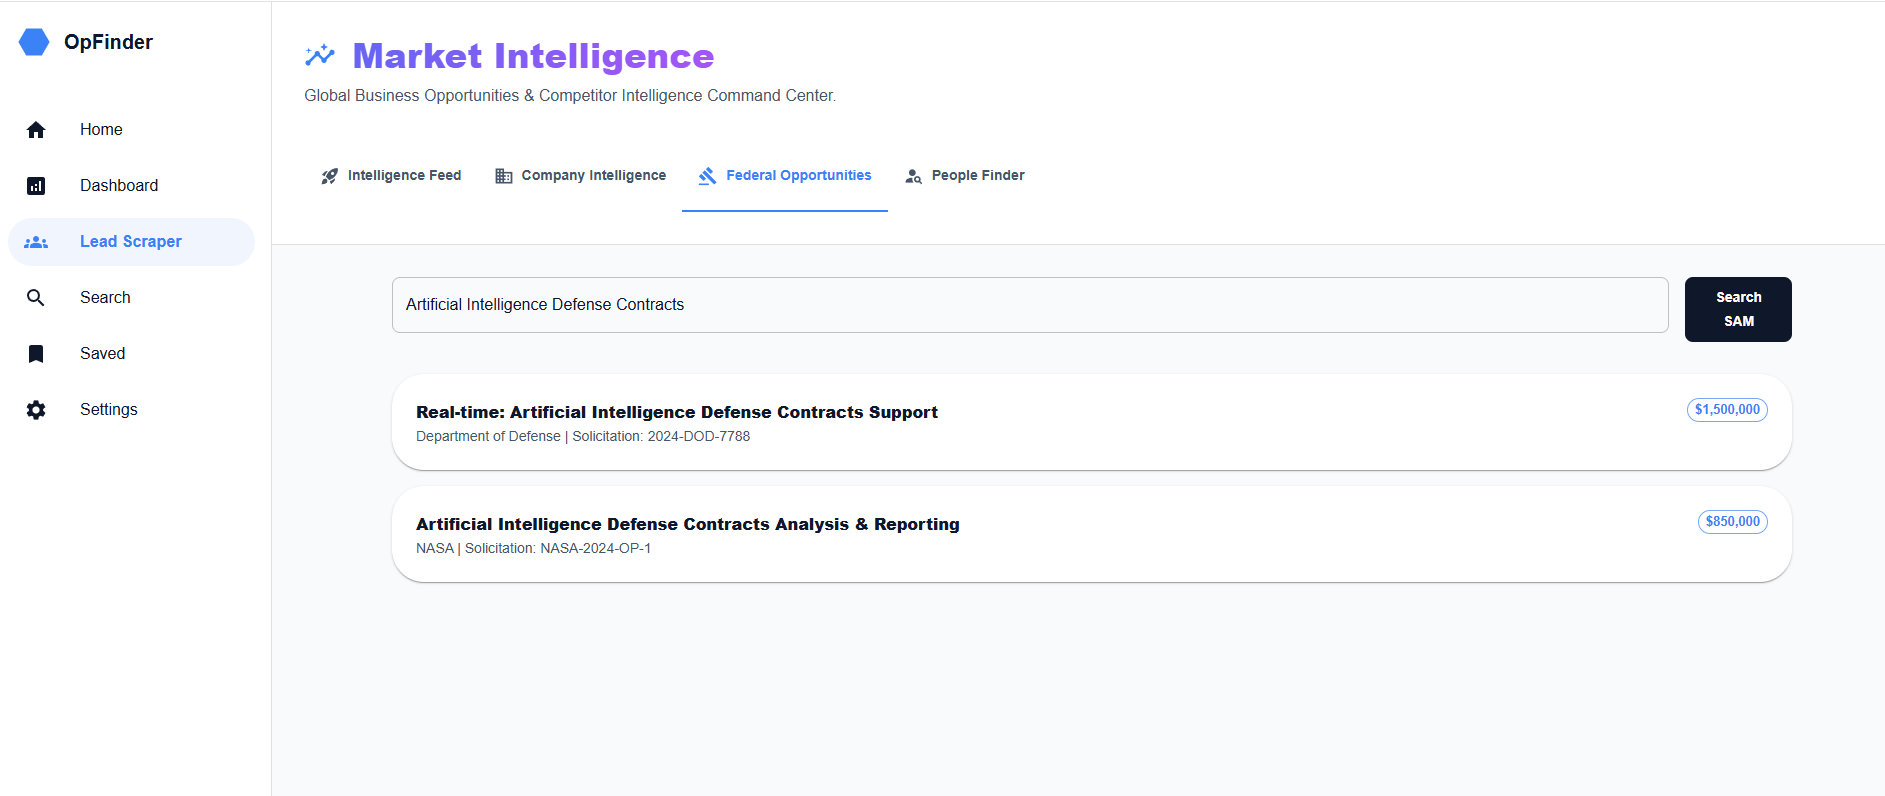
A few seconds later, the dashboard fills with live contract opportunities. Also, the results get stored in Supabase. You can click any project.
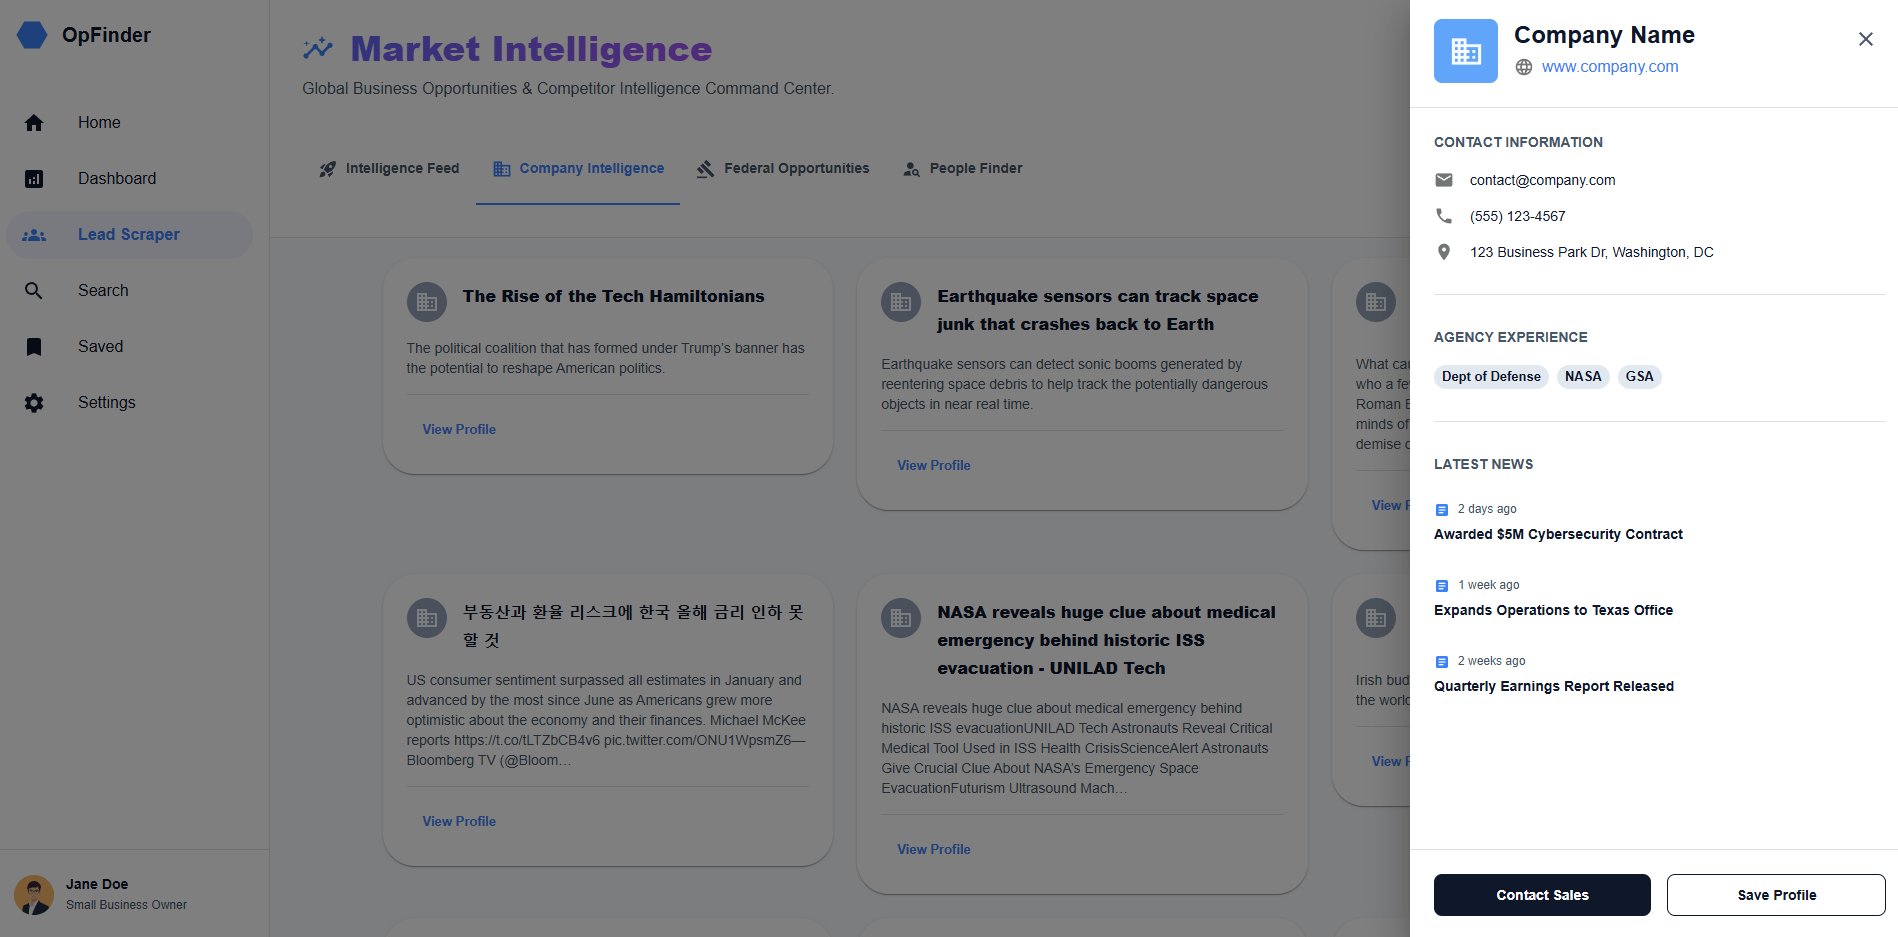
Test #2: Scraping Companies
You switch to Company Intelligence, enter a major contractor like "Lockheed Martin" or "SpaceX" and hit search. The system pulls in matching contractors and latest news articles via the News API proxy.
You open a profile and see exactly what you expect: overview, website and recent activity.
Test #3: Viewing Details
Finally, you test the user experience by viewing the "Market Pulse" feed. Then, in the "Daily AI Briefing" section at the top, you will see the AI agent has analyzed the current feed and generated a high-level executive summary of trends, budget shifts and competitive advantages.
Next, you click the "Save" icon on any high-value project. Move to the "Saved" page and you will see the project is listed correctly, confirming the Supabase Database pipeline is fully connected and persisting your research data.
If all three flows work smoothly, the system is ready to use. That’s when you know the pipeline, storage and UI are truly connected.
XI. The Honest Reality Check
This part usually gets skipped in demos.
You sit down thinking the AI will do everything in one shot. It won’t. The first output looks close but not right.
So you refine it again and again, prompts stack up, syntax breaks, an API refuses to connect, a button looks off and suddenly you’re adjusting spacing for the third time.
That’s the real no-code process.
You spend time guiding the system, fixing small errors and nudging things toward something you’d actually ship. But here's what matters: Even with fixes, this is still 10 to 20 times faster than hiring a human developer.
What used to take 3-5 devs and months can now be done by one focused builder. You still iterate a lot but it’s way faster.
XII. Final Thoughts: Clarity is Your Superpower
We are entering a phase where a single founder with clarity and taste can build tools that once required entire teams.
Stop asking "Can I code?" and start asking "What do I want to build?"
If you can answer that question clearly, you can now build almost anything.
Your Action Plan:
Define your idea.
Create your PRD with Gemini.
Design with Stitch.
Build with Antigravity.
Pick one niche. Ship a v1 in 1 day. Comment ‘DONE’ when your dashboard shows live data.
If you are interested in other topics and how AI is transforming different aspects of our lives or even in making money using AI with more detailed, step-by-step guidance, you can find our other articles here:
Stop Writing Proposals: Turn Sales Calls Into Decks in 3 Minutes With Al (Free Template)*
Full Al Agent Guide You Can Build to Sell for $2,600 in 2 Hours (n8n + Free Template)*
How I Built My Own VIRAL AI Inspirational Finance Channel with only Free Al Tools
7 Google Antigravity Features that Vibe Coders Use to Build 10X Faster
*indicates a premium content, if any
Reply