- AI Fire
- Posts
- ⚙ Google Antigravity Mastery Guide: Learn 100 Hours of Agent Workflows in Under 1 Hour (Part 1)
⚙ Google Antigravity Mastery Guide: Learn 100 Hours of Agent Workflows in Under 1 Hour (Part 1)
Most developers waste tokens, overload context, and blame the tool. Here’s the exact workflow we use to stay coherent, cut costs, and ship faster without writing messy prompts.
Max Anh
March 03, 2026

TL;DR BOX
In 2026, Google Antigravity has changed from a simple tool for writing code into a "Mission Control" for AI workers. Most users fail because they treat it like a chatbot, leading to "Instruction Drift" and wasted tokens. To win, you must adopt an Agent-First Workflow: organize your work by giving each website its own folder. Build a "Skills Library" using simple .md files so your AI knows exactly what to do.
By leveraging the Agent Manager and Inbox, you can orchestrate multi-threaded builds where parallel sub-agents research, code and test simultaneously. Mastering these foundational "Infinity Stones" ensures that your AI remains a coherent, high-performing virtual CTO rather than a hallucinating intern.
Key points
Fact: Antigravity agents use Artifacts (implementation plans, task lists and browser recordings) as a "Trust Layer", allowing you to verify logic without reading every line of code.
Mistake: Long conversations in a single window. In practice, performance tends to degrade once context grows large, even in high-token models.
Action: Open the Agent Manager and type
/in the chat box to see your saved tasks. If you don't have any, create a "Push to GitHub" task today.
Critical insight
The real "unfair advantage" of Antigravity in 2026 is Semantic Triggering. By building modular Agent Skills, the IDE only "equips" specific logic (like your brand's SEO rules or database schema) when needed, saving you thousands in token costs and preventing model confusion.
Table of Contents
🧩 What is your biggest struggle with AI coding in 2026? |
I. Introduction
Using Antigravity without these tips is like having a fast race car but only driving it very slowly. That's most people using Google Antigravity.
Google Antigravity is a full AI development environment built for autonomous agents that can actually plan, execute and refine complex projects.
After spending hundreds of hours building real projects inside Antigravity (including running real projects with tens of thousands of users), there are 6 specific areas where most people are leaving enormous value behind.
Think of them as the six Antigravity Infinity Stones. If you master these six, you’ll build faster, cleaner, cheaper and at a quality level most teams struggle to match.
In Part 1 of this mastery guide, we are diving into the first three as the foundational layer that everything else is built on. Get these right and the rest of the system clicks into place.
In Part 2, you’ll go deeper with advanced steps to improve your workflow and fine-tune your system. Even though it’s labeled advanced, you’ll get clear instructions, links, and free templates so you can follow along without getting stuck.
*Important Note: If this is your first time hearing about Antigravity, take a few minutes to read this post or watch this video. It will help you understand how the framework works and make everything else much clearer.
II. Infinity Stone #1: Setup & Project Organization
Most people rush setup and that’s exactly why they spend weeks fixing problems that were created on day one.
Poor setup doesn’t just slow one project down. It creates errors that repeat across every future build. Getting this layer right is worth more than any prompt trick.
1. One Project Folder = One URL
This is the most common beginner mistake and it compounds fast. The rule is simple: one URL, one project folder.
If you’re building a dashboard at app.yourbusiness.com, that lives in its own folder. If you’re building a marketing site at yourbusiness.com, that’s a separate folder. They are different systems.
This matters because when each project has its own folder, the AI has clean, focused context and it knows exactly what codebase it's working in and doesn't get confused between them. Mix 2 projects into one folder and it starts making changes in the wrong place. It happens more than you'd expect.
Also, with Antigravity's Agent Manager, you can chat with any individual project at any time. That lets you manage all your folders at once without opening new tabs or losing track.

2. Create an "Antigravity Skills" Master Folder
This one move will save hours across the course of a month.
In Antigravity, go to File → Open Folder → New Folder and name it antigravity-skills.


So, every time you build something reusable (a design system, a debugging checklist, a deployment workflow) save it here.
When you start a new project, import this skills folder into it. Instantly, all your past systems are available. Instead of rebuilding systems repeatedly, you build once and reuse forever. This becomes your compounding AI toolbox.
Learn How to Make AI Work For You!
Transform your AI skills with the AI Fire Academy Premium Plan - FREE for 14 days! Gain instant access to 500+ AI workflows, advanced tutorials, exclusive case studies and unbeatable discounts. No risks, cancel anytime.
3. Install the Claude Code Extension
In the Extensions panel (left sidebar), search "claude code" and install it. Think of Antigravity extensions like Chrome extensions, they expand what the platform can do.
The Claude Code extension gives you a second AI interface inside the same environment. If your main agent drifts or gets messy, you can switch to a clean context instantly. That redundancy is more useful than it sounds, especially when debugging.


You should keep an eye on the extensions section regularly, new tools appear that change how Antigravity visualizes and presents code.
4. Configure Global Rules and Workflows
When you click the three-dot menu and select Customizations, there are 2 features that almost nobody uses properly:
The first feature: Global Rules are injected into every message across every project. Think of them as the AI's hardwiring, constants about how you work:
Always code in TypeScript.
Use Tailwind CSS for all styling, never inline styles.
For all client projects, default to this color palette.
Always add accessibility attributes.

Note: Keep them short and focused. These rules are added to every context window, so writing an essay here wastes tokens on every single message. Say as much as possible in as few words as possible.
The second one: Workflows work differently. They live outside the context window and only load when you summon them.
Create a workflow by clicking New Workflow, naming it and writing step-by-step instructions in Markdown.

To use it, type
/in the chat and all your saved workflows appear. Select one and it executes immediately.
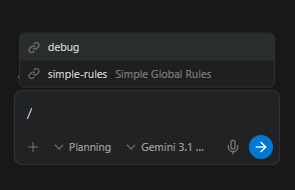
This is the smart way to handle repeatable processes, like debugging steps, pre-launch checklists, GitHub push procedures, design audits or deployment routines. Because they live outside the active context, they don’t consume tokens unless triggered.
5. Push to GitHub Regularly
Every time your project reaches a stable point, push it:
Push these changes live to GitHub and confirm when that is done.GitHub acts as your version history and safety net. If something breaks two weeks from now, you can roll back to any previous state of the project.

Also, when you combine it with Vercel (covered in Part 2), this one sentence versions your code and deploys it live at the same time. That's your entire deployment pipeline in one prompt.
6. Use the BLAST Framework at Project Start
Like I said earlier, vague project starts create messy builds.
The solution is the BLAST framework, a structured initialization system that forces Antigravity to think methodically instead of improvising from a vague prompt.
It has 6 phases:
Phase | Name | What Happens |
|---|---|---|
0 | Initialization | Creates |
1 | Blueprint | Defines the singular desired outcome, integrations, data sources, behavioral rules |
2 | Links | Identifies all external connections (Supabase, APIs), runs verification handshakes |
3 | Architecture | Builds the minimal viable product |
4 | Stylization | UI refinement and design sign-off |
5 | Trigger | Defines how the system runs: deployment, scheduling, automation |

The key piece is the constitution file (created in Phase 0), which the AI reads at every step to stay coherent throughout the entire build.
Without structure, long builds drift.
With structure, every decision connects back to the original plan.
Paste the BLAST prompt at the start of every project, answer the Phase 1 questions and let Antigravity handle everything else methodically from there.
BLAST converts “vibes-based building” into deterministic engineering.

How would you rate the quality of this AI Workflows article? 📝 |
III. Infinity Stone #2: Performance Optimization with The Agent Manager Feature
Imagine buying a Ferrari and never shifting out of first gear or spending $20,000 on a computer just to play Tetris. That’s how most people use Antigravity right now. The tool is powerful, but they’re barely touching it. This level is about unlocking the rest of that power and actually using what you paid for.
1. Understand Context Rot
Long conversations are the enemy of quality.
Even with models that have a 1-million-token context window, once a conversation passes the halfway point, output quality measurably drops.

The AI works harder to maintain coherence across a massive context and the output slowly starts getting worse; subtly at first, then obviously.
You'll notice it as increased loops, off-target responses and small decisions that seem to ignore earlier instructions.
The fix is simple: one task, one conversation window. When a task is complete, click + to open a fresh conversation. You can always navigate back to old conversations through Antigravity's history, so you never lose context, you just don't drag it forward unnecessarily.

2. 3 Ways to Access AI Models in Antigravity
When the main agent is struggling, you have 3 fallback options that most users never discover:
Option 1: Claude Plugin in the Editor Pane:
Double-click the middle editor pane and the Claude plugin appears (if installed). This gives you a clean, isolated context and you can spawn multiple instances of it simultaneously. This option is great for running parallel tasks.

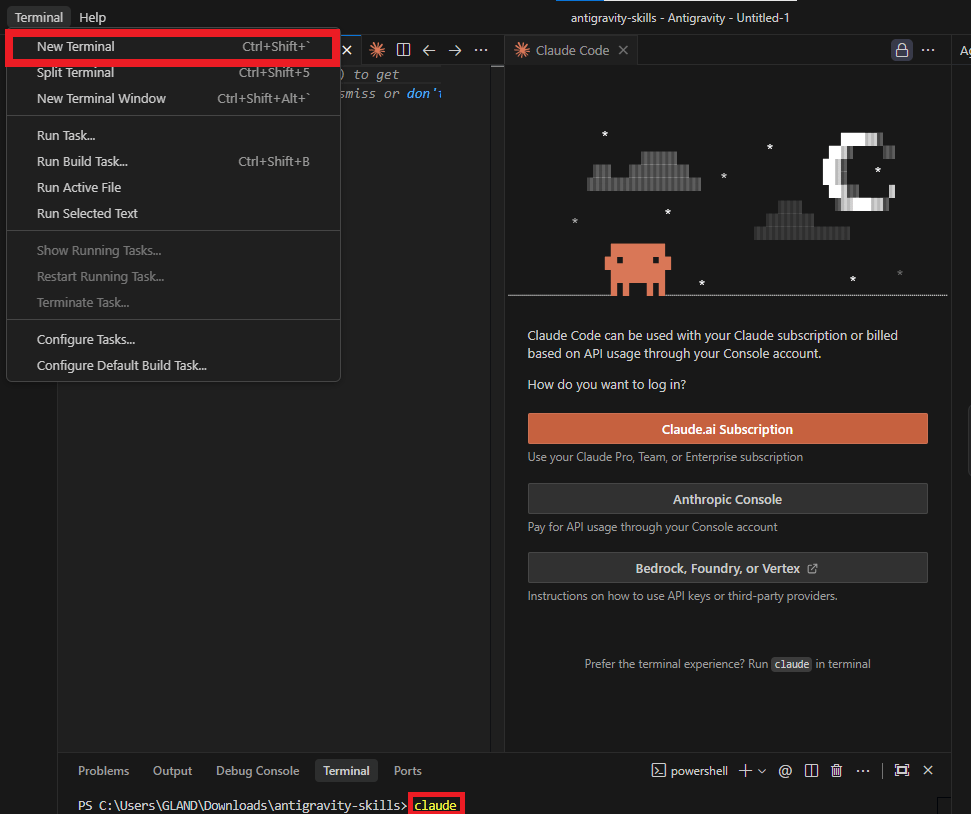
Option 2: Terminal-Based Claude:
Click Terminal → New Terminal → type claude to launch a terminal-based interface. Open as many of these as needed, each with their own independent context. You can think of them as separate brains you can consult at the same time.
Option 3: Right-Click Panel Configuration:
Right-click any panel to reposition it (left, right, top, bottom). This sounds minor until you're managing four simultaneous conversations and need everything in view at once.

3. Agent Manager: Your Agentic Command Center
This is one of the most powerful and underused features in Antigravity.
Agent Manager lets you organize conversations by project or domain and jump between any of them instantly, each maintaining its own context and file access.
Imagine you’re building a client website in Project A and suddenly need to send a $20,000 invoice. Instead of switching apps and losing your train of thought, you simply do this:
Open Agent Manager.
Switch to your Business folder.
Type:
Create an invoice for $20,000 for [client]. Find out their address for me online and then I want you to save that on my desktop. The services I'm providing is [services] and do it in my traditional invoice style, please.
In seconds, the invoice is created, the address is looked up and it's saved to your desktop. With only one sentence, it collapses multi-step task switching into one command.

That's the point, Antigravity has access to all your projects and files simultaneously through Agent Manager, so nothing requires switching contexts.
4. Parallel Sub-Agent Execution
For tasks that can run simultaneously, you can open a new terminal and try this:
Use the sub-agent feature and spin up five sub-agents, each to research a different [topic] and write a 500-word report. Save each to the left-hand sidebar.Antigravity orchestrates 5 parallel agents, each with their own context window, all running at once. This is multi-threading for knowledge work, tasks that would normally require sequential thinking can be parallelized safely.
Research, competitor analysis, content drafts… anything that's repetitive but parallel is a candidate for this.

5. The Inbox: Approval Management Across Projects
When managing multiple simultaneous builds, things waiting for your approval can quietly pile up across different projects. The Inbox in Agent Manager shows every pending approval across every project and agent in one place.

You can review and approve across projects without jumping between tabs. This is how you run 5 client projects without anything falling through the cracks.
Once you start scaling projects, you’ll realize logic verification becomes critical. That’s where Leapter comes in.
6. Leapter: Visual Logic Verification
Here's something that's just starting to gain traction: visual logic verification.
The hardest part of AI-built systems isn't building them; it's trusting them. How do you know the business logic is actually correct when you can't read all the code?
Leapter solves this by creating a visual, interactive flowchart of how your application actually makes decisions. You can run test scenarios and watch the logic execute in real time.
Imagine a pizza delivery system:
Delivery over 3 miles = double fee.
Premium members get 20% off.
5+ past orders = additional discount.
Here is the prompt I used in Leapter:
Hey, I'd like to create an intelligent system for a pizza shop with a couple of variables.
For example:
- Delivery over 3 miles = double fee.
- Premium members get 20% off.
- 5+ past orders = additional discount
And maybe some other bits and pieces that may be added.
Leapter generates a flowchart with decision nodes. You can input test values, watch them flow through each decision point and confirm the output matches what you intended.
You can even change any variable and re-run instantly without reading raw code.

Here is how you connect Leapter to Antigravity:
Build your logic in Leapter → Share → Connect → copy the Standard Endpoint and API key.


Tell Antigravity:
Call the below endpoint using the below API key.
[Insert your Standard Endpoint]

Test it and tell me what variables we can send.

[Insert your Leapter API Key]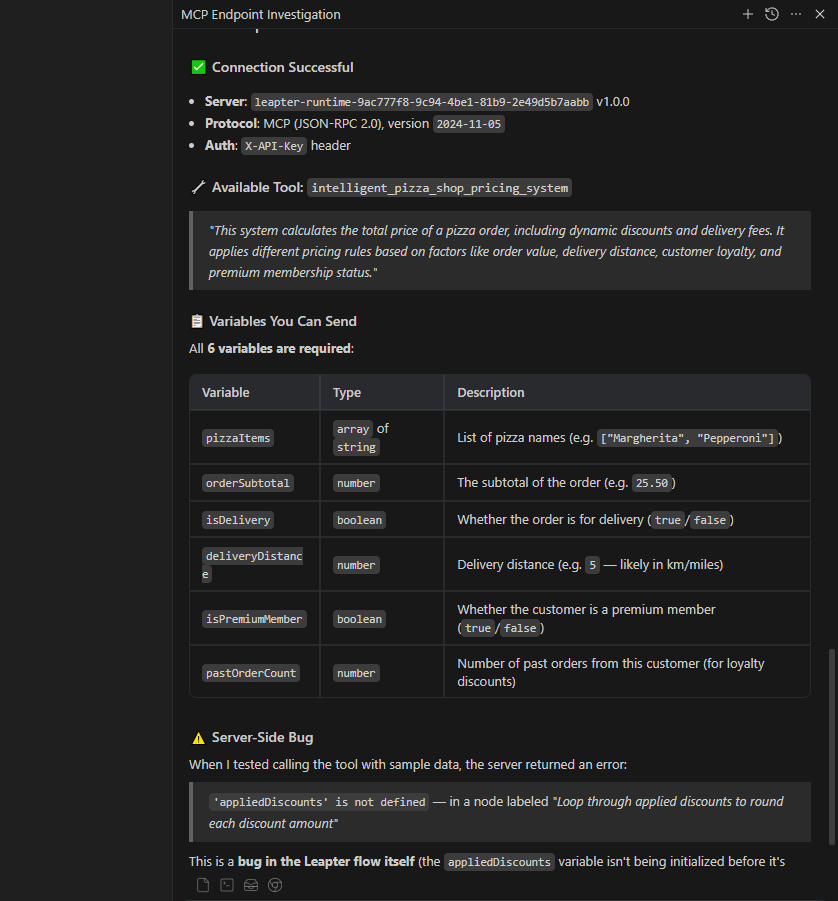
After finishing, you can test it by asking to make sure the AI works perfectly:
I would like you to say that the base delivery fee is £15, delivery distance is 50 miles, I'm not a premium member, the order value is $200 and I've ordered 17 orders in the last month. Then, we can send that one off.
Once validated, the logic can be connected back to your MCP config through an endpoint and API key. To do that, you click on the three-dot menu and select MCP Server → Choose Manage MCP Server → In new tab, you hit View rag config. Then you paste this prompt into the chat:
I'd like to add this to my MCP config, please. @mcp_config.json

After integration, it becomes a reusable, portable service that operates independently of individual project files.

Once your structure and performance are optimized, speed becomes the final multiplier.
Creating quality AI content takes serious research time ☕️ Your coffee fund helps me read whitepapers, test new tools and interview experts so you get the real story. Skip the fluff - get insights that help you understand what's actually happening in AI. Support quality over quantity here!
IV. Infinity Stone #3: Speed Hacks
The definition of speed in Antigravity is kind of different. You might think it is about typing faster but in fact, it’s about prompting smarter.
This part shows you how to prompt in Antigravity to get the best result.
1. One Task Per Message
This is the most important speed principle and probably the one most people ignore.
When you stack multiple requests in one message, you slow the system down.
Don't do this:
Create a new section on the website with XYZ content and also change the color scheme and while you're at it update the navigation menu.Do this:
Create a new section with XYZ content.

" (Next message) "Update the color scheme to [specifics].
I updated new data in the Invoice example.

Then, I asked for new color theme.
When a single message has one clear objective, the AI executes faster and at higher quality. When you bundle requests, the AI has to context-switch mid-task, which is when quality drops and weird mistakes appear.
So, the next time you prompt in Antigravity, always remember: One message, one purpose.
2. The Loop-Breaking Prompt
When Antigravity gets stuck going in circles on the same problem (and at some point, it will) stop and use this exact prompt to reset the pattern:
We've been going in a loop. Stop. Explain to me succinctly but in detail exactly how you're going to solve this and what will be different this time compared to last time.
Forcing the AI to articulate its approach breaks the loop pattern almost every time. The constraint of explaining what's different forces it to genuinely reconsider its strategy rather than repeat it.
If that doesn't work: open a fresh conversation window, paste a concise summary of the problem and restart with clean context. A reset often solves what repetition can’t.
3. @ File Referencing
In any chat window, type @ followed by a filename to directly reference that specific file:
@pricing-component.tsx update the annual plan price to $149.
Before

After
Now the AI reads exactly that file and makes exactly that change. This removes guesses and reduces the chance of unintended changes.
This is dramatically more precise than describing what you want it to look at in natural language.
4. The Playground for Experimental Work
In Agent Manager, you can open a Playground where a blank context window is completely unconnected to any existing project.
You can use it for quick research queries, experimental builds you might throw away or testing prompts before using them in a real project.

Any files generated in the Playground can be imported back into a real project later, so nothing is truly wasted. Think of it as a sandbox where mistakes cost nothing.
V. What's Coming in Part 2
The first 3 Infinity Stones are your foundation:
Setup gives you clean organized projects that scale.
Performance optimization ensures the AI is always running at full capacity.
Speed hacks make sure you're never prompting inefficiently.
But here's where it gets really interesting. In Part 2, we will get into what your builds actually look like to the people using them, how deeply Antigravity connects to your existing tools and how to cut your token costs by 60%.
The full end-to-end workflow and a bonus section on running automated code in the cloud are also in Part 2.
See you there.
If you are interested in other topics and how AI is transforming different aspects of our lives or even in making money using AI with more detailed, step-by-step guidance, you can find our other articles here:
Google's Nano Banana 2 Just Beat Pro Models for FREE. Here's How to Master It
The Real Truth About The New #2 AI Model In The World (Part 2)*
Review Top 10 Free AI Education Tools That Can Save You 10+ Hours Eve Week
Google's New AI Coding Agent Is INSANE (And Completely FREE)
*indicates a premium content, if any
Reply